Onboard Edge Node ASUS* IoT PE3000G System#
Edge Node onboarding securely configures edge nodes into the Edge Orchestrator service. The edge nodes, or hosts in the UI, can be configured and fully provisioned, lifecycle managed, and added to clusters for workload deployment.
Prerequisites#
A Linux* PC or Windows* PC to configure BIOS settings for the edge node, on the same network as the edge node.
Note
Secure Boot (SB) is disabled by default. To enable it, follow the steps below to configure SB in the BIOS. After that, refer to the instructions in Secure Boot opt in feature for enabling SB in Edge Orchestrator.
Edge Node Requirements#
Hardware Requirements#
ASUS* IoT PE3000G System
12th Gen Intel® Core™ processor i7-12800HE 4600MHz
Integrated Graphics Controller for 12th Gen Intel® Core™ processor
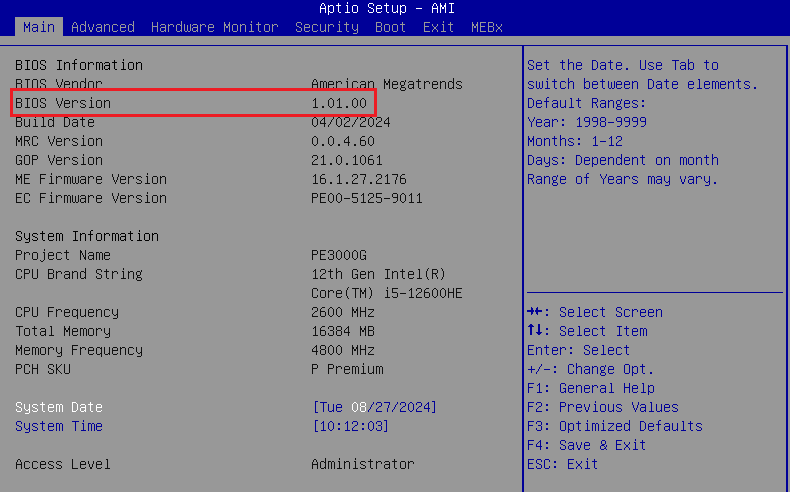
BIOS version v1.00.05 or higher
64 GB RAM
1/2/3 SSDs (Minimum 1 SSD with 500GB)
Ethernet 1GbE port
USB drive (minimum 4GB)
Prepare USB Drive#
Prepare the USB drive one time, so that the ASUS platform can use the USB-based boot to download the iPXE image. Use any Linux based machine to perform the following steps:
Note
Ensure that you understand proxy settings in your network.
If the curl or wget operation fails, verify the network proxy settings.
Run following command to find the device identifier for the connected USB drive.
lsblk --output NAME,TYPE,TRAN | grep disk| grep usb | awk '{print $1}'
Note
The output of the above command is the USB device identifier. If the identifier is different from sdb, e.g. sdc then In any of the commands below where /dev/sdb is found, sdb it needs to be replaced with the correct device identifier, eg. /dev/sdc
Use the following command to download the iPXE EFI. Replace CLUSTER_FQDN with the name of the domain that is used during installation.
wget https://tinkerbell-nginx.${CLUSTER_FQDN}/tink-stack/signed_ipxe.efi --no-check-certificate --no-proxy
Use the following command to download the secure boot certificate for iPXE and Hook Os, independent of final OS. This is step is not required if Secure Boot is not enabled. Replace CLUSTER_FQDN with the name of the domain that is used during installation.
wget https://tinkerbell-nginx.${CLUSTER_FQDN}/tink-stack/keys/db.der --no-check-certificate --no-proxy
For Edge Microvisor Toolkit, if Secure Boot (SB) is enabled (Not required for Ubuntu* OS):
Following you need to download the db-emt.der file from Release Service.
Repository URL path of Edge Microvisor Toolkit can be found by looking at the OS Profile you are trying to install and copying manually the Repository URL value without raw.gz suffix. Alternatively, it can be acquired using the Edge Orchestrator API - see the Acquiring the Edge Microvisor Toolkit repository URL path from Edge Orchestrator API section.
Choose the correct values for the command and replace them in the variables as per the example and resulting command below. Make sure that resulting HTTP status is successful.
export FILES_RS_URL=<Files Release Service URL>
export MICROVISOR_REPO_URL=<Repository URL path to OS Image without .raw.gz extension>
export OS_IMAGE_VERSION=<Microvisor Image Version>

# Following is an example of the variables and the expanded resulting command:
# export FILES_RS_URL=files-rs.edgeorchestration.intel.com
# export OS_IMAGE_VERSION=<Microvisor Image Version>
# export MICROVISOR_REPO_URL=files-edge-orch/repository/microvisor/non_rt/edge-readonly-$OS_IMAGE_VERSION-signed
# Command to download the microvisor der file
wget https://$FILES_RS_URL/$MICROVISOR_REPO_URL.der

# A real example with no variables
# wget https://files-edge-orch/repository/microvisor/non_rt/edge-readonly-3.0.20250324.1008.der -o db-emt.der --write-out "\nHTTP Status: %{http_code}\n"
Upload certificate to BIOS
Clear disk partition table.
sudo dd if=/dev/zero of=/dev/sdb bs=512 count=1 conv=notrunc
Initialize GPT Partition Table.
echo -e "g\nw\nY\n" | sudo gdisk /dev/sdb
Format the USB drive.
sudo mkfs.fat -F32 /dev/sdb
Mount USB Drive.
sudo mkdir -p /tmp/efidrive
sudo mount /dev/sdb /tmp/efidrive
Create Boot Directory and copy the
signed_ipxe.efi,db.deranddb-emt.derto the drive.sudo mkdir -p /tmp/efidrive/efi/boot sudo cp signed_ipxe.efi /tmp/efidrive/efi/boot/bootx64.efi sudo cp *.der /tmp/efidrive/efi/boot/
Unmount the USB drive from the Linux machine.
sudo umount /dev/sdb
Note
Replace /dev/sdb with the appropriate device identifier for your USB drive.
Replace CLUSTER_FQDN with the name of the domain that is used during installation.
If Secure Boot is enabled, enroll the certificates into BIOS as mentioned in the UEFI Secure Boot section.
The same USB drive can be plugged into multiple Edge Nodes to perform the provisioning flow, there is no need to prepare the USB drive every time.
Remember to unplug the USB stick once the Edge Node is provisioned.
Acquiring the Edge Microvisor Toolkit repository URL path from Edge Orchestrator API#
For Edge Microvisor Toolkit, the repository URL path of the certificate can be acquired from Edge Orchestrator API with the following command, where PROFILE_NAME is set to the OS Profile name you are trying to install (e.g. microvisor-nonrt, see View OS Profiles):
Note
To interact with Edge Orchestrator API, you must authenticate with a user who is part of the Host Manager Group and obtain a JSON Web Token (JWT) used here as JWT_TOKEN variable (see Obtaining a JSON Web Token (JWT) for instructions).
The variables CLUSTER_FQDN are PROJECT_NAME should be the same as used for obtaining the JTW_TOKEN value.
export PROFILE_NAME=<OS Profile name to be installed>
# example:
# export PROFILE_NAME="microvisor-nonrt"
export MICROVISOR_REPO_URL=$(curl -k -X GET https://api.${CLUSTER_FQDN}/v1/projects/${PROJECT_NAME}/compute/os \
      -H "accept: application/json" -H "Content-Type: application/json" -H "Authorization: Bearer ${JWT_TOKEN}" \
      | jq -r ".OperatingSystemResources[] | select(.profileName==\"${PROFILE_NAME}\") | .repoUrl" | sed 's/\.raw\.gz$//')
Disable Active Management Technology (AMT) for ASUS* IoT PE3000G System#
This guide outlines how to disable the Active Management Technology (AMT) for Asus ASUS* IoT PE3000G System with BIOS version 1.01.00.
To disable Active Management Technology (AMT), do the following:
Reboot the ASUS IoT PE3000G System.
Press the “Del” key to access the BIOS menu.
In the BIOS menu, proceed to Advanced tab with right arrow, then select AMT Configuration by using down arrow and click Enter.
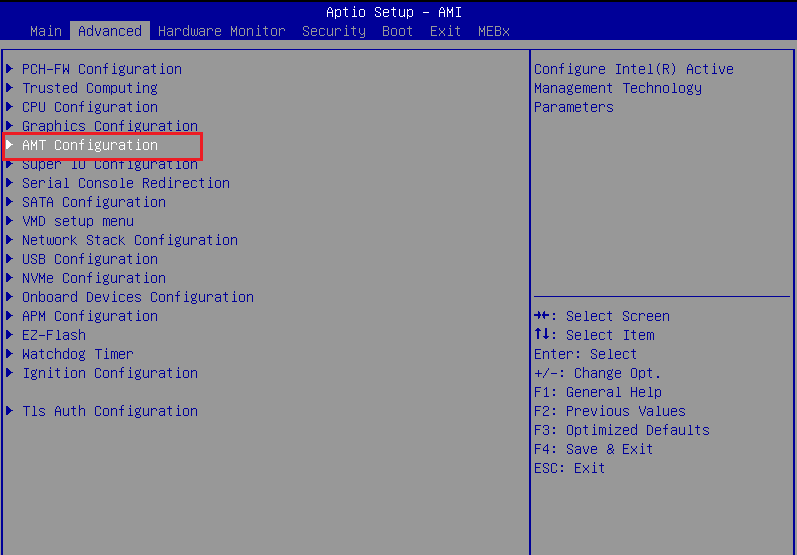
In the AMT Configuration, select the AMT BIOS Features click <Enter> to select Disabled
Press ‘F4’ to save the changes and exit the BIOS menu. The system will reboot.
Confirm and enter the BIOS menu again. The AMT BIOS Features option is disabled. You can also check by nmap scanning on port 664/tcp, 16993/tcp, and 16995/tcp in filtered state.
Set Boot Order Priorities:#
Go to BIOS Setup > Boot > UEFI NETWORK Drive BSS Priorities.
Disable unwanted boot options:
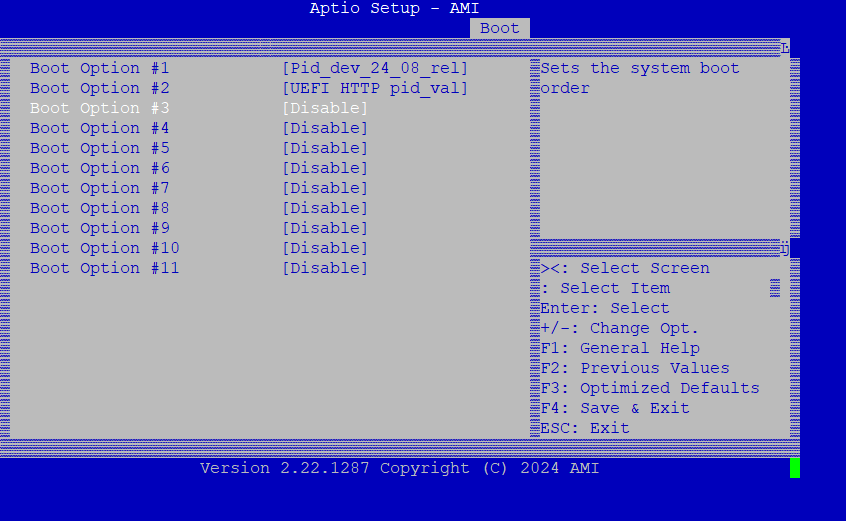
Choose the correct device in “Boot Option #1” with the configured HTTP device name:
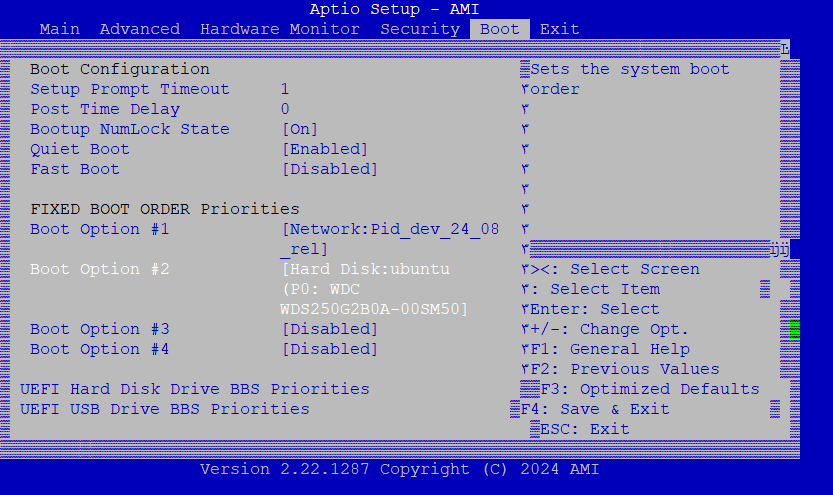
Go to Boot > FIXED BOOT ORDER Priorities > Boot Option #1.
Choose the Second Boot Option as Hard Disk and disable other boot options if they are enabled:
Press F4 to Save & Exit the configuration.
Enable UEFI Secure Boot (Optional)#
Connect the USB drive to Edge node.
Press Del to enter into BIOS setup.
Go to BIOS Setup > Security > Key Management.
Ensure the following are set to
FactoryinKey Source:Platform Key (PK)
Key Exchange Keys (KEK)
Authorized Signatures (db-emt)
Forbidden Signature (dbx)
Update the keys to
Factorymode to enable modification of the Secure Boot option.Go to BIOS Setup > Security > Enable Secure Boot > Set
CustomSecure Boot Mode.Go to Security > Key Management and append the
Authorized Signaturewithdb.deranddb-emt.der.Press F4 to save and exit configuration.
Provision the Edge Node#
Press Del to enter into BIOS setup.
Go to Main > Exit and select the USB drive from the list.
iPXE starts downloading and starts the chain loading process. The next steps are in Common Onboarding Procedures.
Troubleshooting and Recommendations#
In a few Asus/NUC12 Pro platforms, it is observed that USB-based boot is not working when the Network boot option is disabled in BIOS. Expected to enable Network/HTTPS boot in BIOS, when performing the USB boot.
Intel also recommends to disable the AMT configuration in the ASUS* IoT PE3000G System. Refer to this guide - Disable Active Management Technology (AMT) for ASUS* IoT PE3000G System.