Register Edge Nodes in Edge Orchestrator#
Edge Orchestrator supports the following registration methods:
UI-assisted registration
Bulk import of edge devices through the Bulk Import Tools
Note
When you use the LOC-A software, you must register the device there using one of the available methods. You do not need to register the device through Edge Orchestrator.
Register Using the User Interface#
To register your edge node(s) through the User Interface (UI), you must be a member of the Edge Manager Group. Then:
Manual onboarding and provisioning.
Automated onboarding and manual provisioning.
Automated onboarding and provisioning.
Note
The first two registration options with manual provisioning assumes that Near Zero Touch Provisioning (nZTP) has been disabled. To confirm if nZTP is disabled, verify that nZTP has been disabled in the provider configuration. For details on nZTP, see Near Zero Touch Provisioning.
Manual Onboarding and Provisioning#
Go to the Infrastructure tab, click Hosts on the left menu. The Hosts page appears.
On the Hosts page, click the Register Hosts option. The Register Hosts page appears:
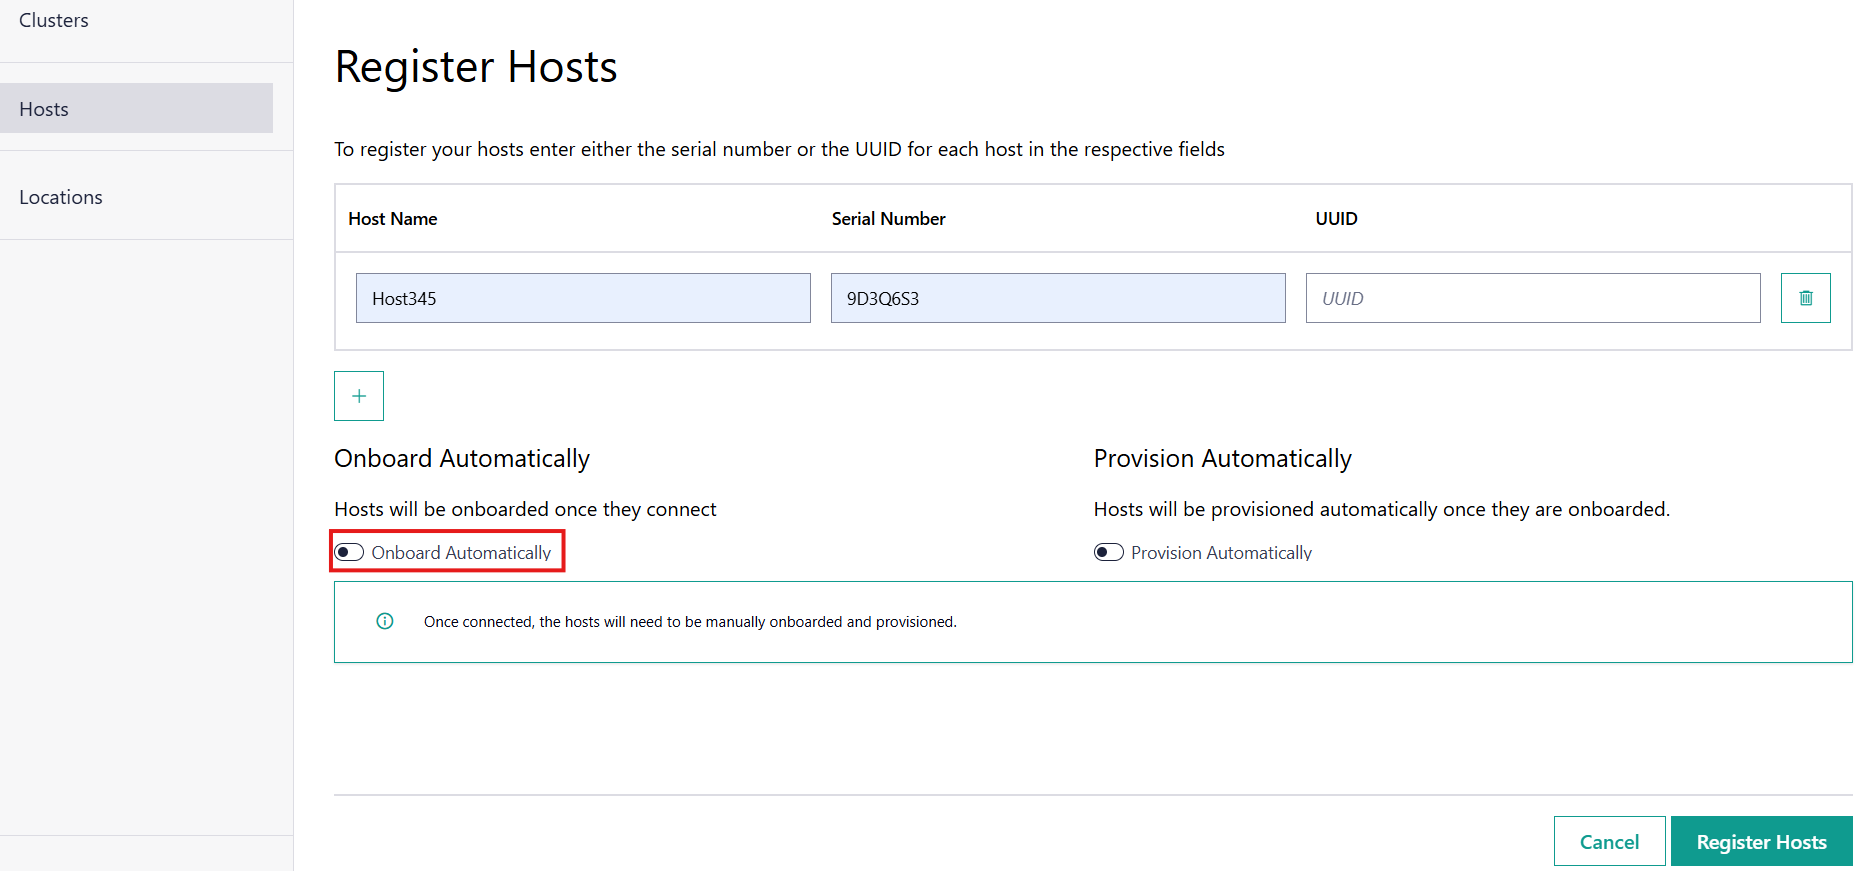
Enter in a user-friendly name in the Host Name field and either the serial number or UUID in the respective fields. At least one between the serial number or the UUID must be provided.
Note
The serial number and UUID are typically on a sticker on the device or in the device’s BIOS. Other vendors make this information available through the Base Management Controller (BMC).
To select manual onboarding, deselect the Onboard Automatically field.
Leave the Provision Automatically field deselected to enable manual provisioning.
If multiple edge nodes are to be registered, you can add additional fields using the + option below the host table.
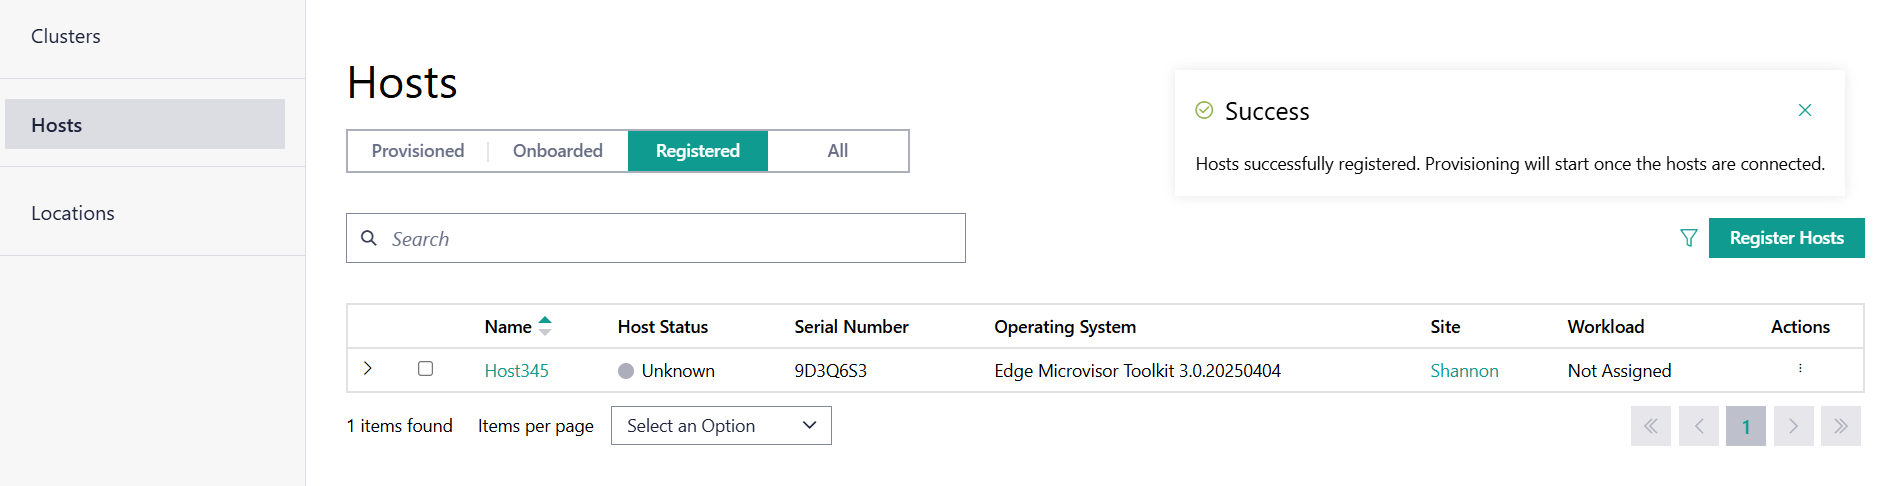
Click Register Hosts to submit the edge node(s); a redirect will happen to the list of nodes with a successful notification:
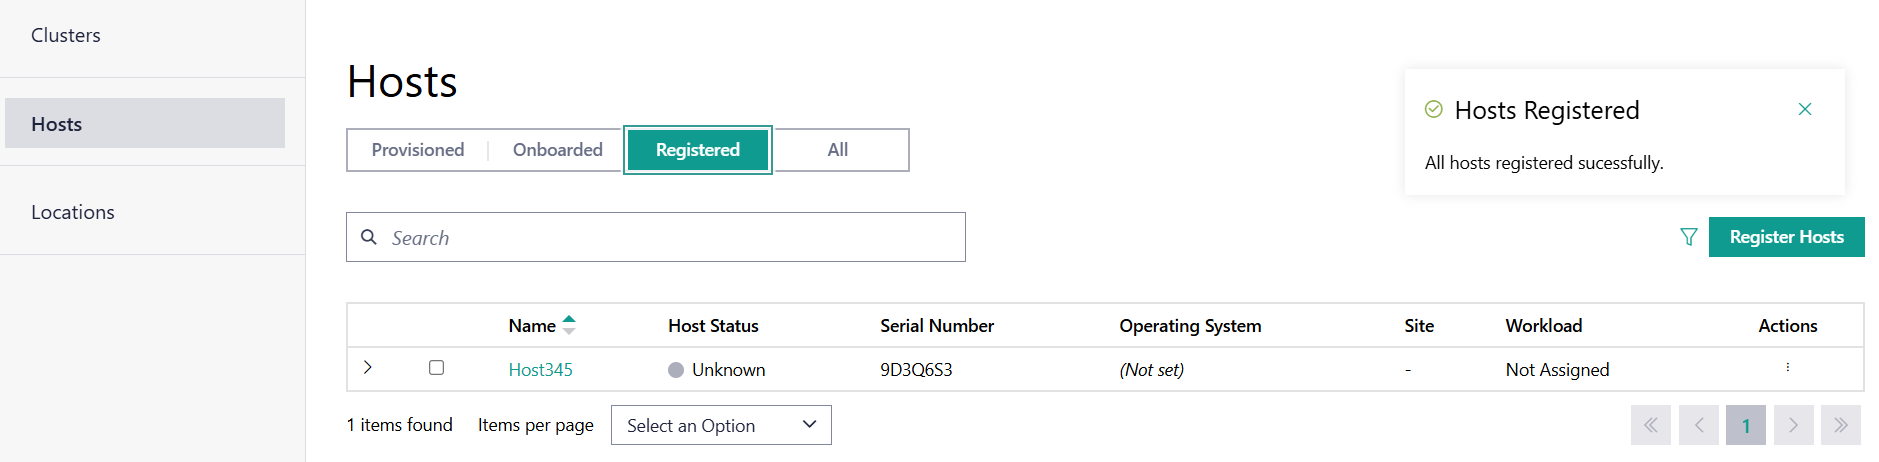
The Host will show Status as Unknown, waiting for the edge node to attempt to connect.
Once a connecting edge node reports a UUID or serial number that matches the registered information, the status will become Registered.
You can proceed to onboard the host by following the Onboard Host instructions.
To provision the host after it is onboarded, follow the Provision Host instructions.
Refer to Registered Host Mismatch for any issues in encountered during set up.
Automated Onboarding and Manual Provisioning#
Go to the Infrastructure tab, click Hosts on the left menu. The Hosts page appears.
On the Hosts page, click the Register Hosts option. The Register Hosts page appears.
Enter in a user-friendly name in the Host Name field and either the serial number or UUID in their proper fields. You must provide either the serial number or the UUID.
Note
The serial number and UUID are typically on a sticker on the device or in the device’s BIOS. Other vendors make this information available through the Base Management Controller (BMC).
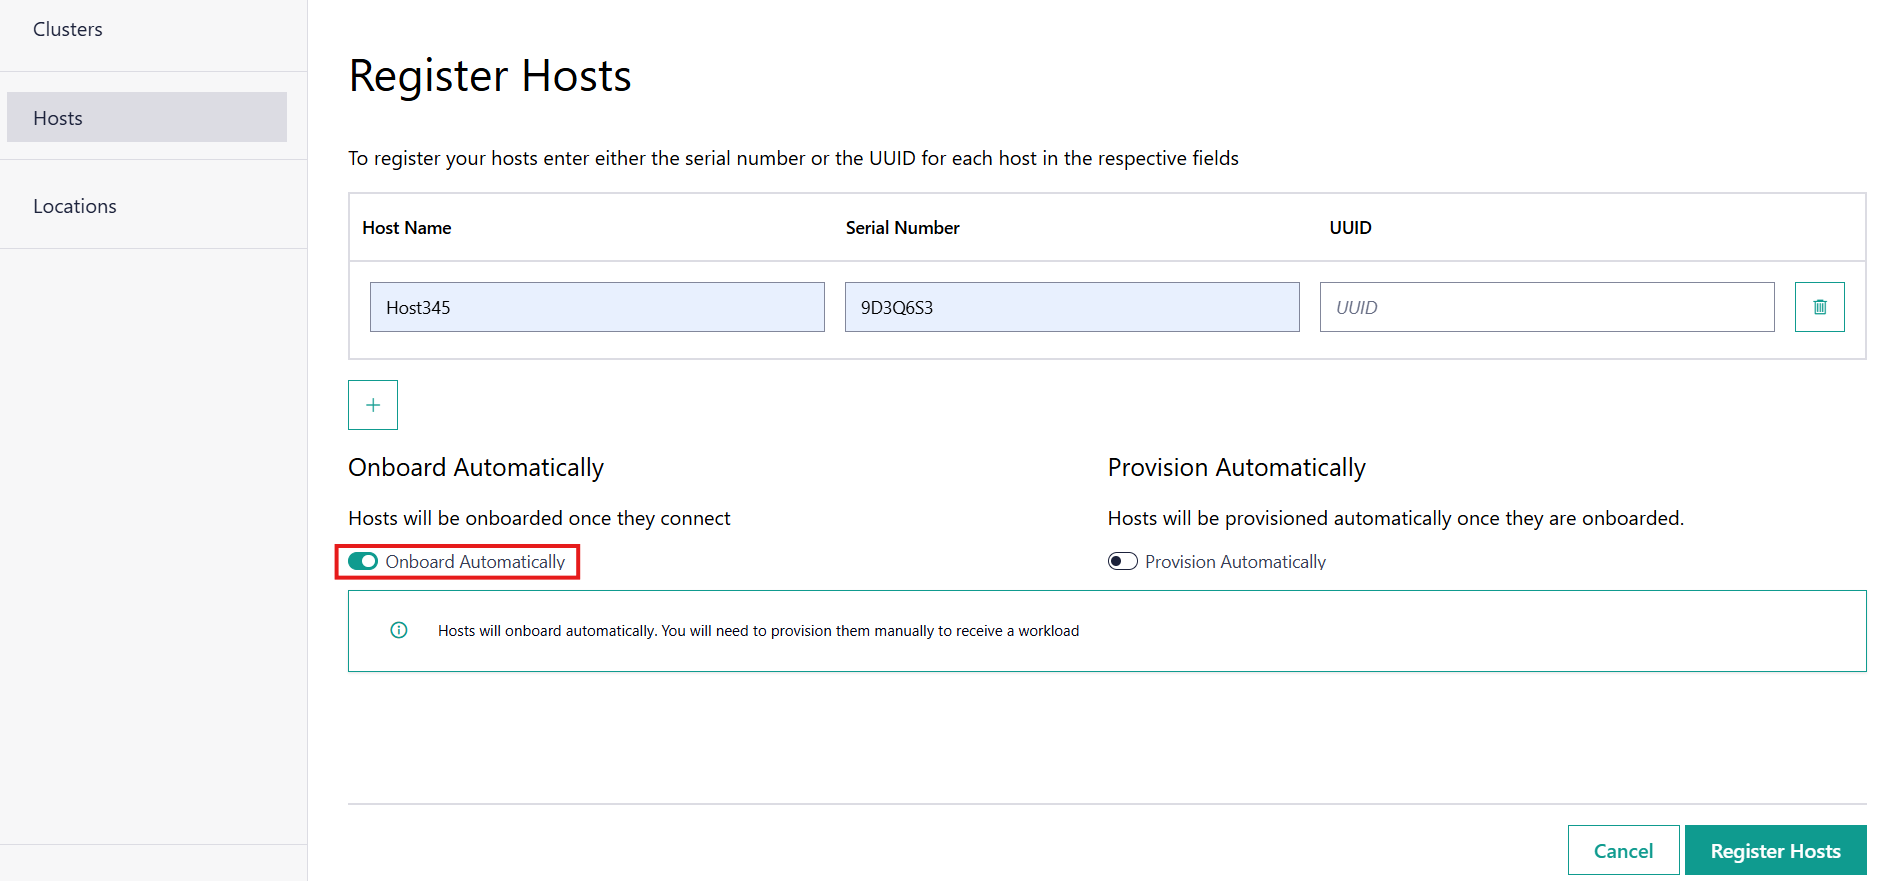
Select Onboarding Automatically if appropriate for your usage. By selecting this field, the node will automatically go through the onboarding process when connected. By default, the option is enabled.
Leave the Provision Automatically field deselected to enable manual provisioning.
If multiple edge nodes are to be registered, you can add additional fields using the + option below the host table.
Click Register Hosts to submit the edge node(s), a redirect will happen to the list of nodes with a successful notification.
The host will show the Status as Unknown; waiting for the edge node to attempt to connect.
Once a connecting edge node reports a UUID or serial number that matches the registered information, the status will become Onboarded. It will then be automatically moved to the Onboarded tab of the Hosts page.
To provision the host after it is onboarded, follow the Provision Host instructions.
Automated Onboarding and Provisioning#
Go to the Infrastructure tab, click Hosts on the left menu. The Hosts page appears.
On the Hosts page, click the Register Hosts option. The Register Hosts page appears:
Enter in a user-friendly name in the Host Name field and either the serial number or UUID in the respective fields. You must provide either the serial number or the UUID.
Note
The serial number and UUID are typically on a sticker on the device or in the device’s BIOS. Other vendors make this information available through the Base Management Controller (BMC).
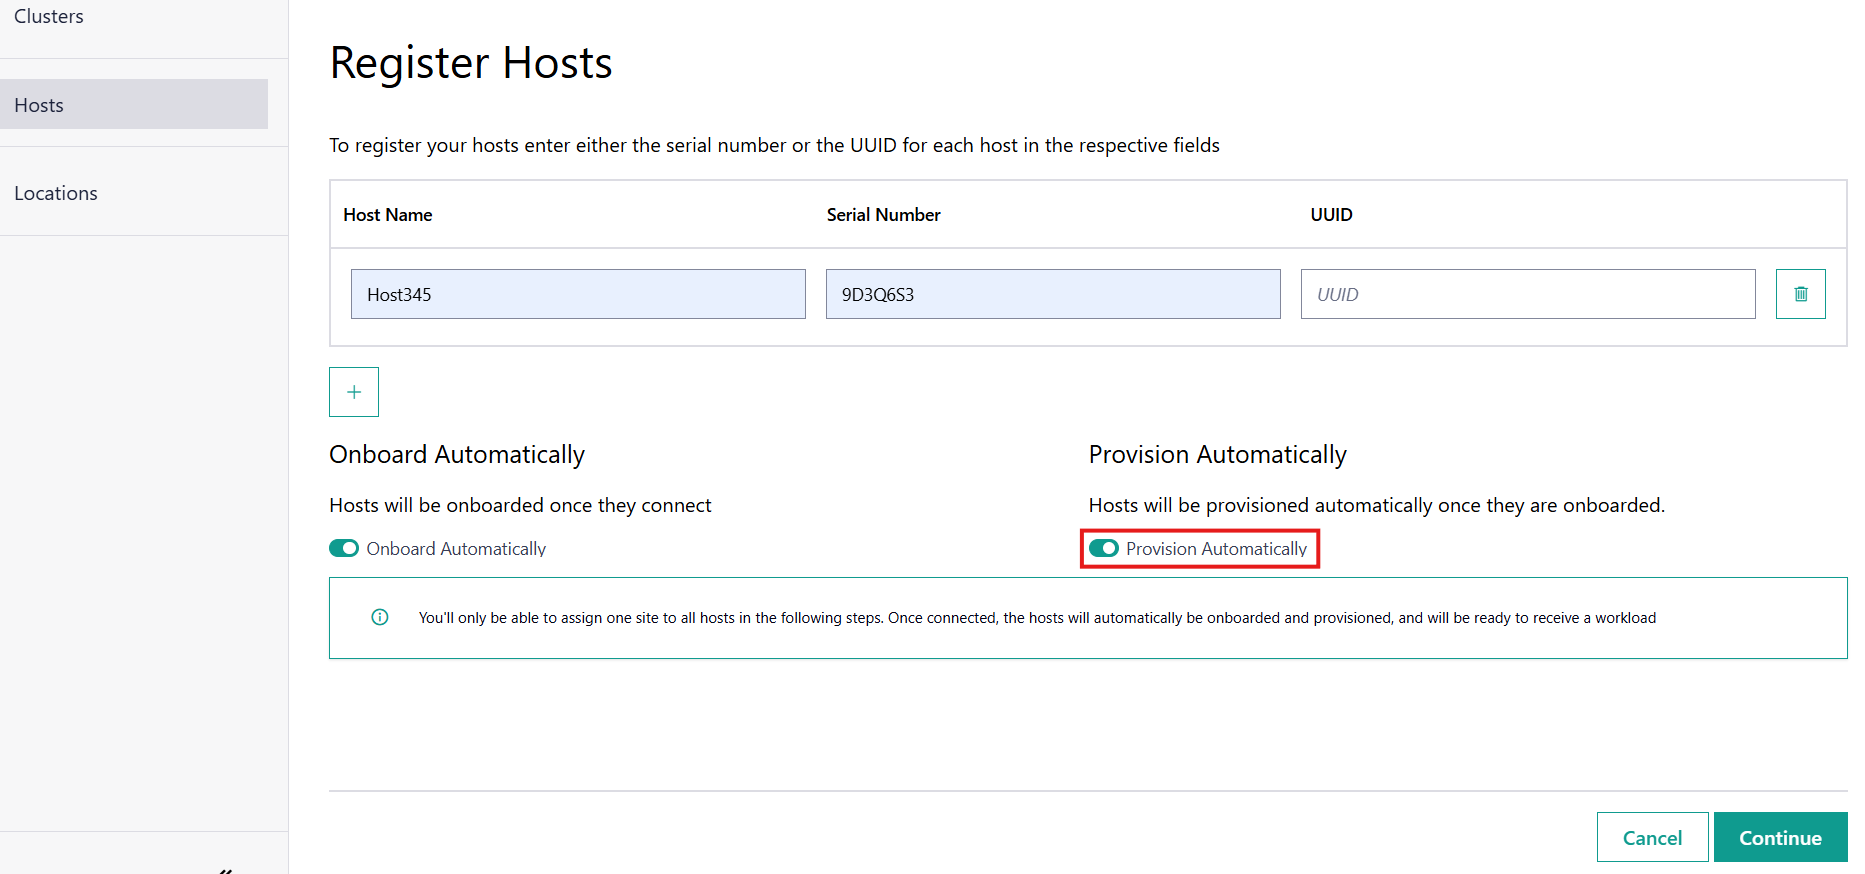
Select Onboarding Automatically if appropriate for your usage. By selecting this field, the node will automatically go through the onboarding process when connected. By default, the option is enabled.
Select Provision Automatically if appropriate for your usage. By selecting this field, the node will automatically go through the provisioning process when connected. By default, the option is disabled.
If multiple edge nodes are to be registered, you can add additional fields by clicking the + option.
Click Continue to configure the provisioning settings. This follows the Provision Host instructions.
After completing and reviewing the provisioning settings, click Provision to submit the edge node(s), a redirect will happen to the list of nodes with a successful notification.
The Host will show Status as Unknown, waiting for the edge node to attempt to connect.
Once a connecting edge node reports a UUID or serial number that matches the registered information, the node is onboarded and provisioning starts. It will then be automatically moved to the Provisioned tab of the Hosts page.
Bulk Import Edge Devices#
Edge Orchestrator offers two tools to facilitate registration of a set of hardware devices as edge nodes through a comma-separated value (CSV) file:
orch-host-preflight, which allows the creation of an empty template, and/or tests the validity of a given CSV file for it to be used with the orch-host-bulk-import tool.
orch-host-bulk-import, which facilitates the user to import in Edge Orchestrator all of the edge nodes present in a CSV file.
Download Tools#
The tools orch-host-preflight and orch-host-bulk-import are publicly available for release in
Open Container Initiative* (OCI*) compliant registries. Intel recommends using the oras client to interact with them.
Ensure that you have oras available on your system or follow the instructions in the
public documentation to install it.
Download the tools as follows:
The tools are made available in the public AWS* Elastic Container Registry. They can be pulled without any credentials using commands like below:
oras pull registry-rs.edgeorchestration.intel.com/edge-orch/files/orch-host-preflight:3.0
oras pull registry-rs.edgeorchestration.intel.com/edge-orch/files/orch-host-bulk-import:3.0
Pre-flight Tool#
Create an empty template and scrutinize input CSV file for orch-host-bulk-import tool.

Usage: orch-host-preflight COMMAND

Commands:
      generate <output.csv>  Generate a template CSV file with the given filename
      check <input.csv>      Check the contents of the given CSV file
      version                Display version information
      help                   Display this help information
Generate a .csv File#
This section guides you through the creation of a formatted .csv file with all your entries. This is optional if you already have a correct .csv file.
Go to the directory where the downloaded pre-flight tool resides (for example, ~), to run it:
cd ~
chmod +x orch-host-preflight
./orch-host-preflight generate test.csv
Now, you can populate the .csv file by appending details of systems. Do not change the first line Serial,UUID,OSProfile,Site,Secure,RemoteUser,Metadata,Error - do not fill because that is the expected format. You only need to fill in the first two columns, Serial and UUID, with the serial number and UUID of the edge node(s) you want to register. The other columns are not meant for this stage. The following is an example:
Serial,UUID,OSProfile,Site,Secure,RemoteUser,Metadata,Error - do not fill
2500JF3,4c4c4544-2046-5310-8052-cac04f515233
ICW814D,4c4c4544-4046-5310-8052-cac04f515233
FW908CX,4c4c4544-0946-5310-8052-cac04f515233
Check the CSV File#
You can now validate the CSV file that you have created yourself or through the Generate a .csv File step. Enter the filename (for example, test.csv). If there are errors in the input file, a new CSV file named preflight_error_timestamp_filename is generated with error messages corresponding to each faulty record in the CSV file.
./orch-host-preflight check test.csv
Bulk Import Tool#
This section shows how to use a CSV file to import a series of devices as edge nodes:
Import host data from input file into the Edge Orchestrator.

Usage: orch-host-bulk-import COMMAND

COMMANDS:

import [OPTIONS] <file> <url>  Import data from given CSV file to orchestrator URL
      file                     Required source CSV file to read data from
      url                      Required Edge Orchestrator URL
version                        Display version information
help                           Show this help message

OPTIONS:

--onboard                      Optional onboard option. If set, hosts will be automatically onboarded when connected
--project <name>               Required project name in Edge Orchestrator. Alternatively, set env variable EDGEORCH_PROJECT
--os-profile <name/id>         Optional operating system profile name/id to configure for hosts. Alternatively, set env variable EDGEORCH_OSPROFILE
--site <name/id>               Optional site name/id to configure for hosts. Alternatively, set env variable EDGEORCH_SITE
--secure <value>               Optional security feature to configure for hosts. Alternatively, set env variable EDGEORCH_SECURE. Valid values: true, false
--remote-user <name/id>        Optional remote user name/id to configure for hosts. Alternatively, set env variable EDGEORCH_REMOTEUSER
--metadata <data>              Optional metadata to configure for hosts. Alternatively, set env variable EDGEORCH_METADATA. Metadata format: key=value&key=value
The fields OSProfile, Site, Secure, RemoteUser, and Metadata are used for provisioning configuration of the Edge Node. OSProfile, Site, and RemoteUser are fields that allow both name and ID to be used. The Secure field is a boolean value that can be set to true or false. The Metadata field is a key-value pair separated by an = sign, and multiple key-value pairs are separated by an & sign.
Do the following before running the bulk import tool:
Complete the CSV file with the provisioning details for the edge nodes you want to register. OSProfile is a mandatory field here without which provisioning configuration cannot be completed. Also, be aware that the OSProfile and Secure fields are related. If Secure is set to true, the OSProfile must support it. If left blank, Secure defaults to false. The value in other fields are validated before consumption though an empty string is allowed for all of them. The following is an example:
Serial,UUID,OSProfile,Site,Secure,RemoteUser,Metadata,Error - do not fill
2500JF3,4c4c4544-2046-5310-8052-cac04f515233,os-7d650dd1,site-08c1e377,true,localaccount-9dfb57cb,key1=value1&key2=value2,
ICW814D,4c4c4544-4046-5310-8052-cac04f515233,ubuntu-22.04-lts-generic,Folsom,true,myuser-key,key1=value1&key2=value2,
FW908CX,4c4c4544-0946-5310-8052-cac04f515233,os-7d650dd1,Folsom,true,myuser-key,key1=value1&key2=value2,
Authenticate with Edge Orchestrator before importing hosts. The following are two ways to make credentials available to the tool:
Environment variables - Set the username and password in environment variables
EDGEORCH_USERandEDGEORCH_PASSWORD, respectively. Replace “myusername” and “mypassword” with your username and password:export EDGEORCH_USER=myusername export EDGEORCH_PASSWORD=mypassword
Interactive shell - If you did not provide credentials through environment variables, the tool will prompt for them during invocation, as follows. Replace “myusername” and “mypassword” with your username and password:
$ ./orch-host-bulk-import import test.csv https://api.CLUSTER_FQDN
Importing hosts from file: test.csv to server: https://api.CLUSTER_FQDN
Checking CSV file: test.csv
Enter Username: myusername
Enter Password: mypassword
Either set the project name in the environment or pass it later as a parameter to the import command. The following are examples:
export EDGEORCH_PROJECT=myproject
./orch-host-bulk-import import --project myproject test.csv https://api.kind.internal
There are several other optional parameters that can be set in the environment or passed as optional parameters to the import command. The following are examples:
export EDGEORCH_OSPROFILE=myosprofile
export EDGEORCH_SITE=mysite
export EDGEORCH_SECURE=true
export EDGEORCH_REMOTEUSER=myremoteuser
export EDGEORCH_METADATA=key1=value1&key2=value2
./orch-host-bulk-import import --onboard --os-profile myosprofile --site mysite --secure true --remote-user myremoteuser --metadata key1=value1&key2=value2 test.csv https://api.kind.internal
Note
For all the options (except onboard), if optional parameter is passed along with the environment variable set, the optional parameter will take precedence. If either the environment variable or the optional parameter is set, they act as global values for the corresponding field in the input file and override the local value for all rows.
Run the bulk import tool. Go to the directory where you have downloaded the file (e.g. ~). The URL in the command is a mandatory argument that points the tool towards the Edge Orchestrator where the devices will be registered. Replace test.csv with your CSV filename, and CLUSTER_FQDN with the name of the domain used during installation:
cd ~
chmod +x orch-host-bulk-import
./orch-host-bulk-import import test.csv https://api.CLUSTER_FQDN
The tool also has the –onboard option which, if specified, will signal that all the hosts in the CSV file will be automatically onboarded once they connect. For example:
./orch-host-bulk-import import --onboard test.csv https://api.CLUSTER_FQDN
The bulk import tool validates the input file again, similar to the pre-flight tool, and generates an error report if validation fails. If validation passes, the bulk import tool proceeds to the registration phase. For each host registration that succeeds, expect output similar to the following at the console:
✔ Host Serial number : 2500JF3  UUID : 4c4c4544-2046-5310-8052-cac04f515233 registered. Name : host-a835ac40
✔ Host Serial number : ICW814D  UUID : 4c4c4544-4046-5310-8052-cac04f515233 registered. Name : host-17f57696
✔ Host Serial number : FW908CX  UUID : 4c4c4544-0946-5310-8052-cac04f515233 registered. Name : host-7bd98ae8
CSV import successful
If there are errors during registration, a new CSV file with the name
import_error_timestamp_filenameis generated with each failed line having a corresponding error message.
Example of invocation and failure:
$ ./orch-host-bulk-import import --onboard --project testProject test.csv https://api.CLUSTER_FQDN
Importing hosts from file: test.csv to server: https://api.CLUSTER_FQDN
Onboarding is enabled
Checking CSV file: test.csv
Generating error file: import_error_2025-04-15T18:28:44+05:30_test.csv
error: Failed to import all hosts


$ cat import_error_2025-04-15T18\:28\:44+05\:30_test.csv
Serial,UUID,OSProfile,Site,Secure,RemoteUser,Metadata,Error - do not fill
FW908CX,4c4c4544-0946-5310-8052-cac04f515233,os-7d650dd1,Folsom,true,myuser-key,key1=value1&key2=value2,Host already registered