Deployment Example#
This section shows how to run Docker* applications on a set of distributed clusters.
Prerequisites: A working Edge Orchestrator platform with at least one edge cluster, and a basic knowledge of Docker, Helm*, and Kubernetes* systems.
Overview of the steps:
Upload the application’s Docker image to the Edge Orchestrator’s Harbor* registry.
Create a Helm chart to run the image and upload it to the Edge Orchestrator Harbor registry.
Create a deployment package and upload it to the Edge Orchestrator’s catalog service.
Deploy the application onto a cluster.
Verify that the application is successfully deployed.
Note
In the following, replace:
<CLUSTER_FQDN> with domain name of your Edge Orchestrator cluster
<ORG_NAME> with the name of your organization
<PROJECT_NAME> with the name of your project
Prerequisites#
Install the following tools on a machine that has connectivity to the Edge Orchestrator services:
Docker software: https://www.docker.com/get-started/
Helm command-line interface: https://helm.sh/docs/intro/install/
Get Harbor Credentials#
To get the Edge Orchestrator’s Harbor credentials:
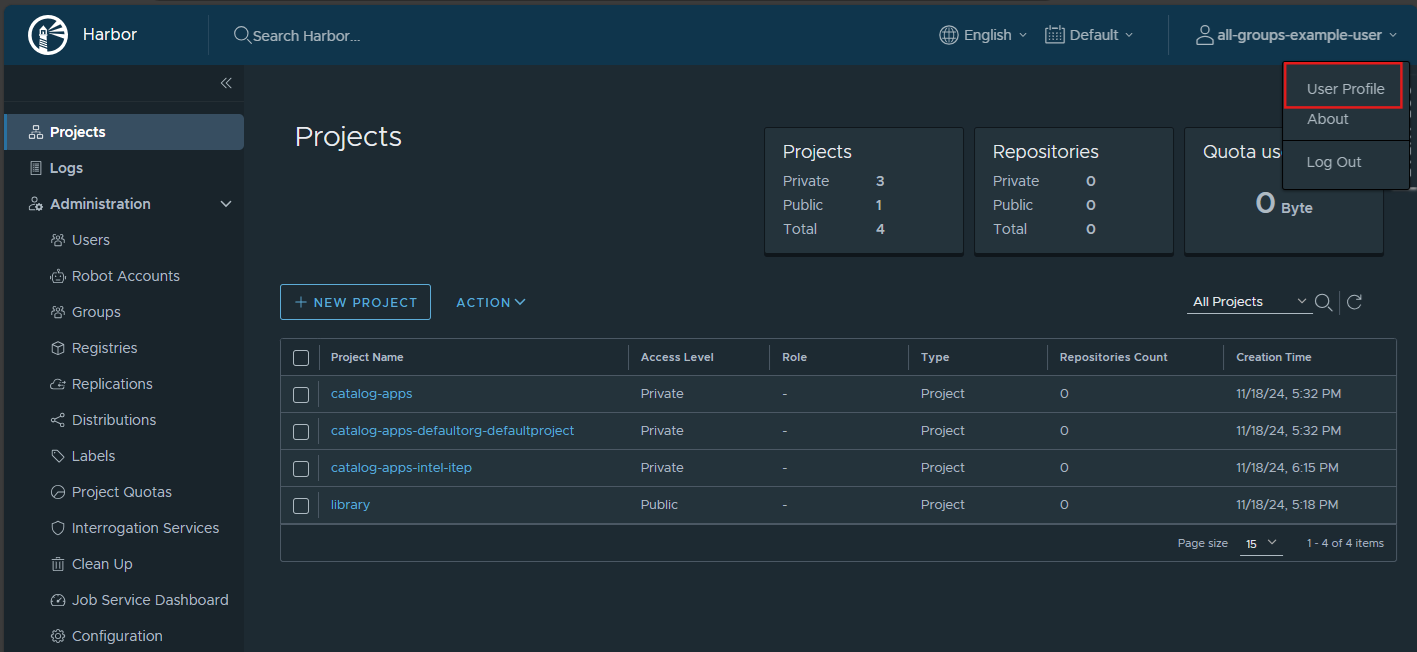
Log in to
https://registry-oci.<CLUSTER_FQDN>using your Edge Orchestrator IAM credentials. You must be in the Edge-Manager-Group for your project, to access the registry. See Edge Orchestrator Groups and Roles for details.Access User Profile at top right:
Note
In this figure, the catalog-apps-<ORG_NAME>-<PROJECT_NAME> is the default project where you will upload your Docker images and Helm charts. You can create additional projects if needed.
You will see the following:
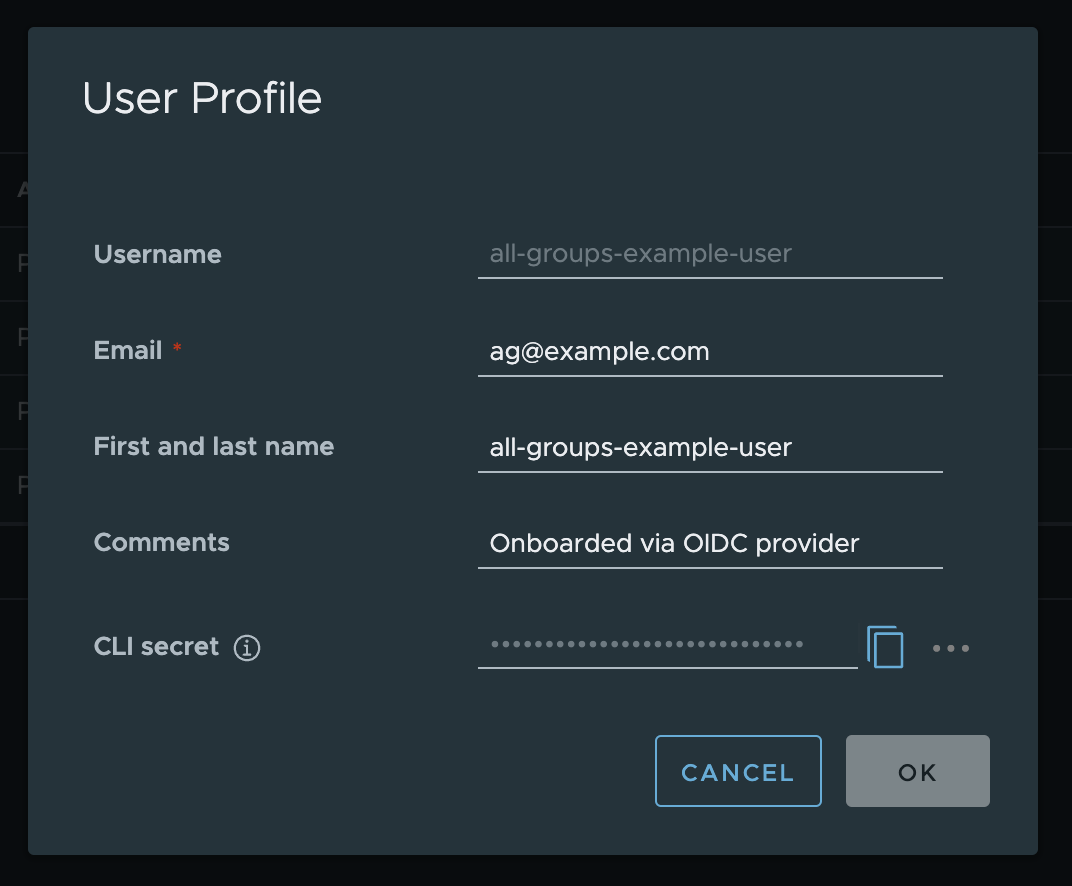
Copy the CLI secret
To log in to Docker software and Helm software as follows, use your KeyCloak username as the user and the CLI secret as the password.
Upload the Docker Image#
This example uses the Official Docker image for NGINX* web server. You can use any Docker image.
To upload the Docker image:
Log in to the Harbor registry using the Harbor username and password obtained earlier. Replace <CLUSTER_FQDN> with the DNS name of your Edge Orchestrator cluster:
export CLUSTER_FQDN=<CLUSTER_FQDN>
export ORG_NAME=<ORG_NAME>
export PROJECT_NAME=<PROJECT_NAME>
docker login registry-oci.${CLUSTER_FQDN}
Pull the NGINX image from Docker Hub, tag it for the Edge Orchestrator registry, and push it:
docker pull nginx:1.27.0-alpine
docker tag nginx:1.27.0-alpine registry-oci.${CLUSTER_FQDN}/catalog-apps-${ORG_NAME}-${PROJECT_NAME}/nginx:1.27.0-alpine
docker push registry-oci.${CLUSTER_FQDN}/catalog-apps-${ORG_NAME}-${PROJECT_NAME}/nginx:1.27.0-alpine
For details on packaging your own applications, see Package the Application as a Container Image.
Create and Upload the Helm Chart#
The next step is to create a Helm chart for the application:
Generate a basic Helm chart:
helm create hello-world
This will create a new directory, hello-world, with several files in it.
In the file hello-world/values.yaml, change the image repository (replace <CLUSTER_FQDN>, <ORG_NAME>, and <PROJECT_NAME> with your values):
image:
  repository: registry-oci.<CLUSTER_FQDN>/catalog-apps-<ORG_NAME>-<PROJECT_NAME>/nginx
In file hello-world/Chart.yaml, change the appVersion:
appVersion: "1.27.0-alpine"
In the file hello-world/templates/service.yaml, add the following annotations block after the labels. Note the indentation:
apiVersion: v1
kind: Service
metadata:
  name: {{ include "hello-world.fullname" . }}
  labels:
    {{- include "hello-world.labels" . | nindent 4 }}
  annotations:
    service-proxy.app.orchestrator.io/ports: "80"
Note
Generally it is a bad practice to hardcode annotations into a Helm chart, but for this example it is acceptable.
Package the new Helm chart:
helm package hello-world
This will create the file hello-world-0.1.0.tgz.
Upload the new Helm chart to the Edge Orchestrator’s Harbor registry; login using the same Harbor credentials as before:
helm registry login registry-oci.${CLUSTER_FQDN}
helm push hello-world-0.1.0.tgz oci://registry-oci.${CLUSTER_FQDN}/catalog-apps-${ORG_NAME}-${PROJECT_NAME}
For details on packaging your own Helm charts, see Create a Helm Chart for an Application.
Create and Upload the Deployment Package#
A deployment package wraps one or more Helm charts into a package deployable by Edge Orchestrator.
To create a deployment package for the application:
In the Edge Orchestrator UI, click on Deployments at top, then Applications at left.
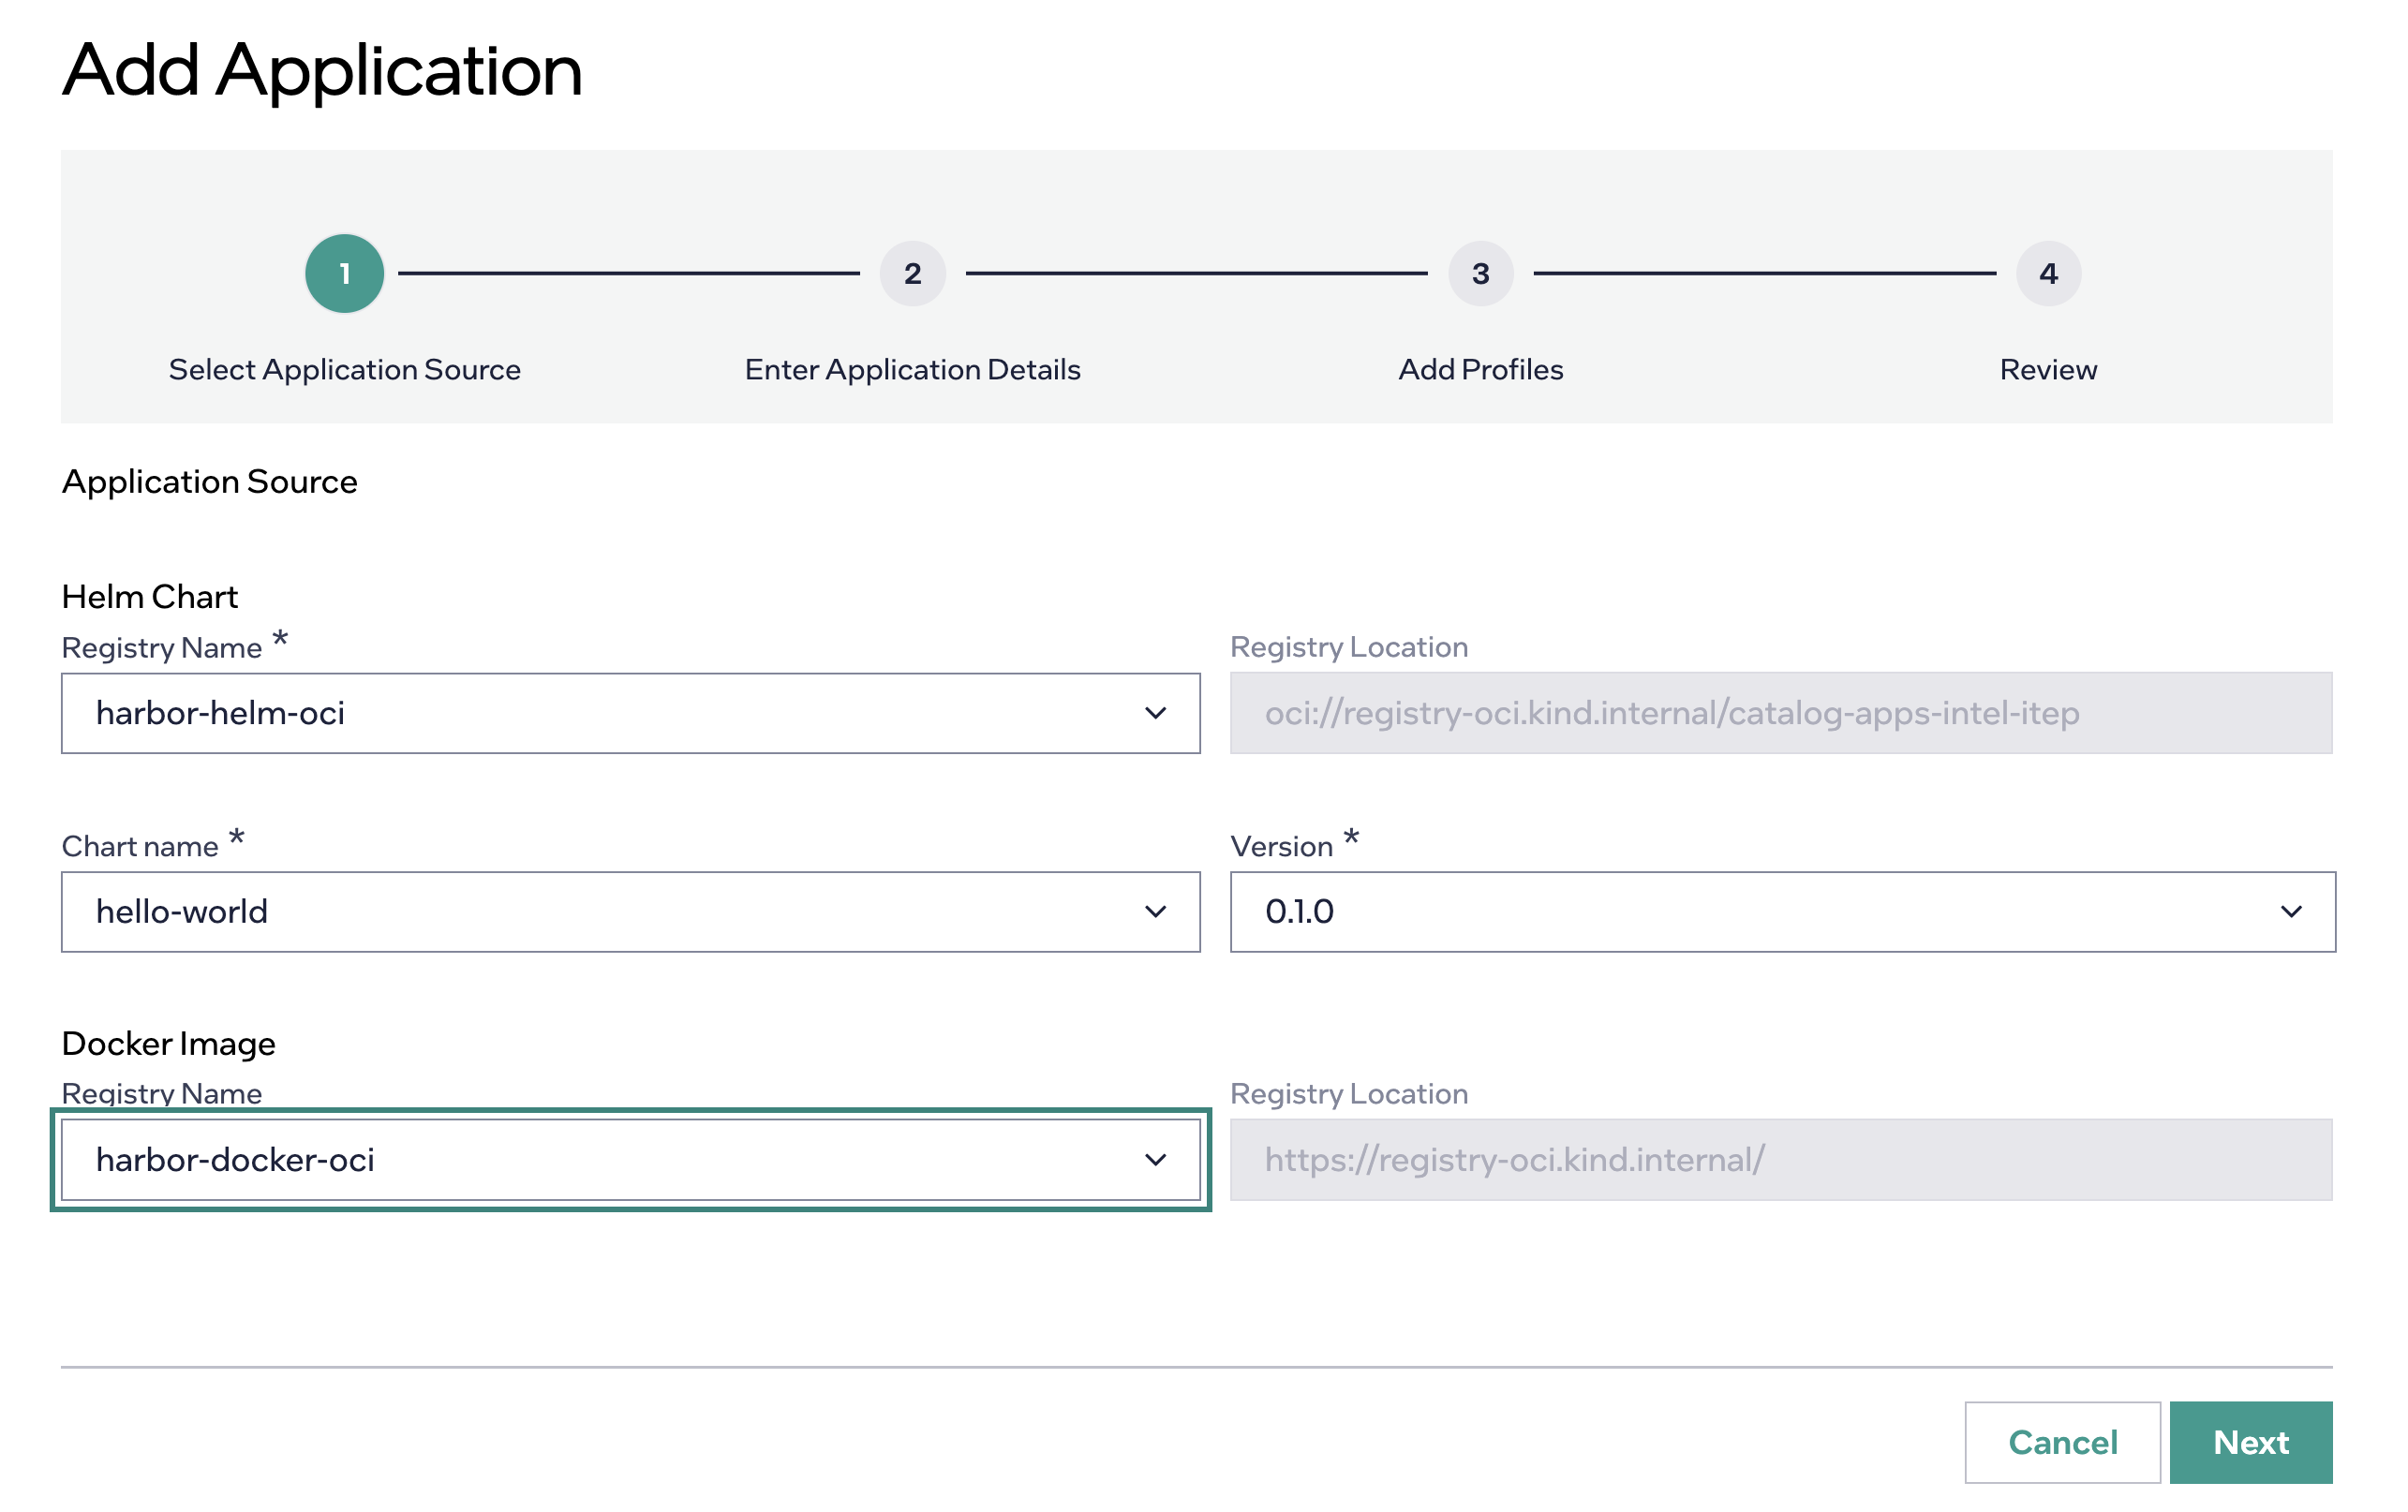
Click the Add Application button. Under Helm Chart, enter:
Helm Chart Registry Name: harbor helm oci(harbor-helm-oci)
Chart name: hello-world
Version: 0.1.0
Docker Image Registry Name: harbor docker oci(harbor-docker-oci)
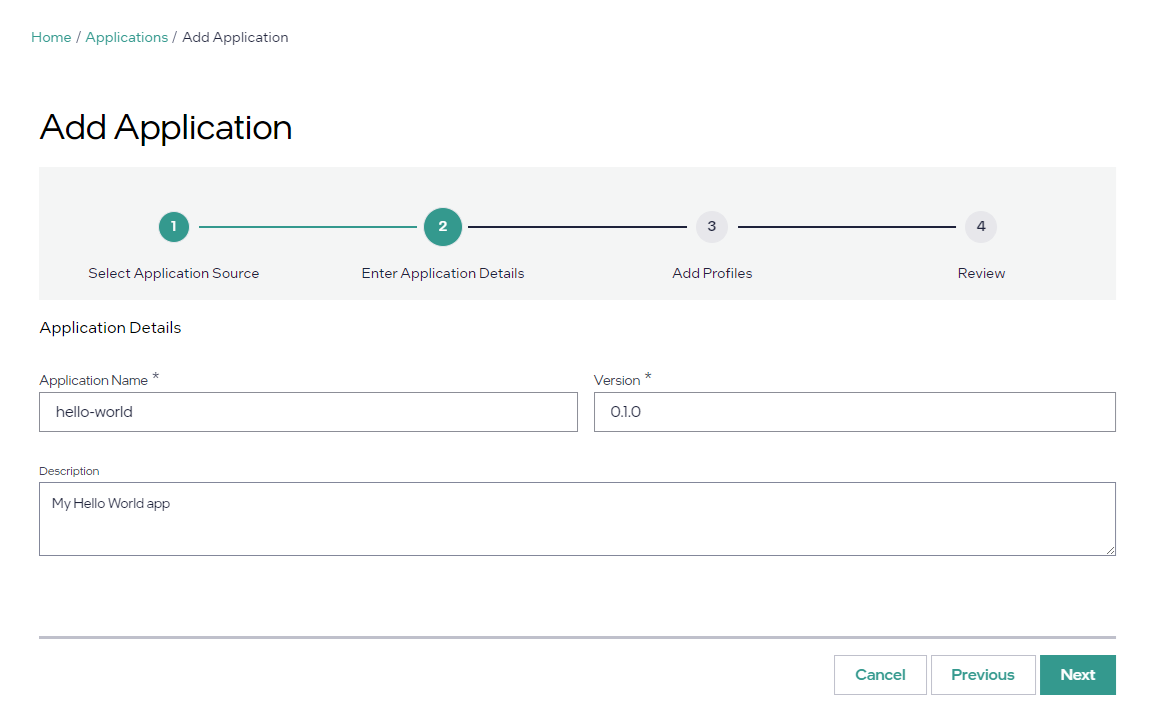
Click Next. Under Application Details, enter:
Application Name: hello-world
Version: 0.1.0
Click Next and then click Add Profile. A profile is where you can specify parameter templates for the Helm chart. Enter:
Name: default-profile
Description: “Default profile”
Chart values:
---
service:
  type: ClusterIP
replicaCount: 1
imagePullSecrets:
  - name: '%GeneratedDockerCredential%'
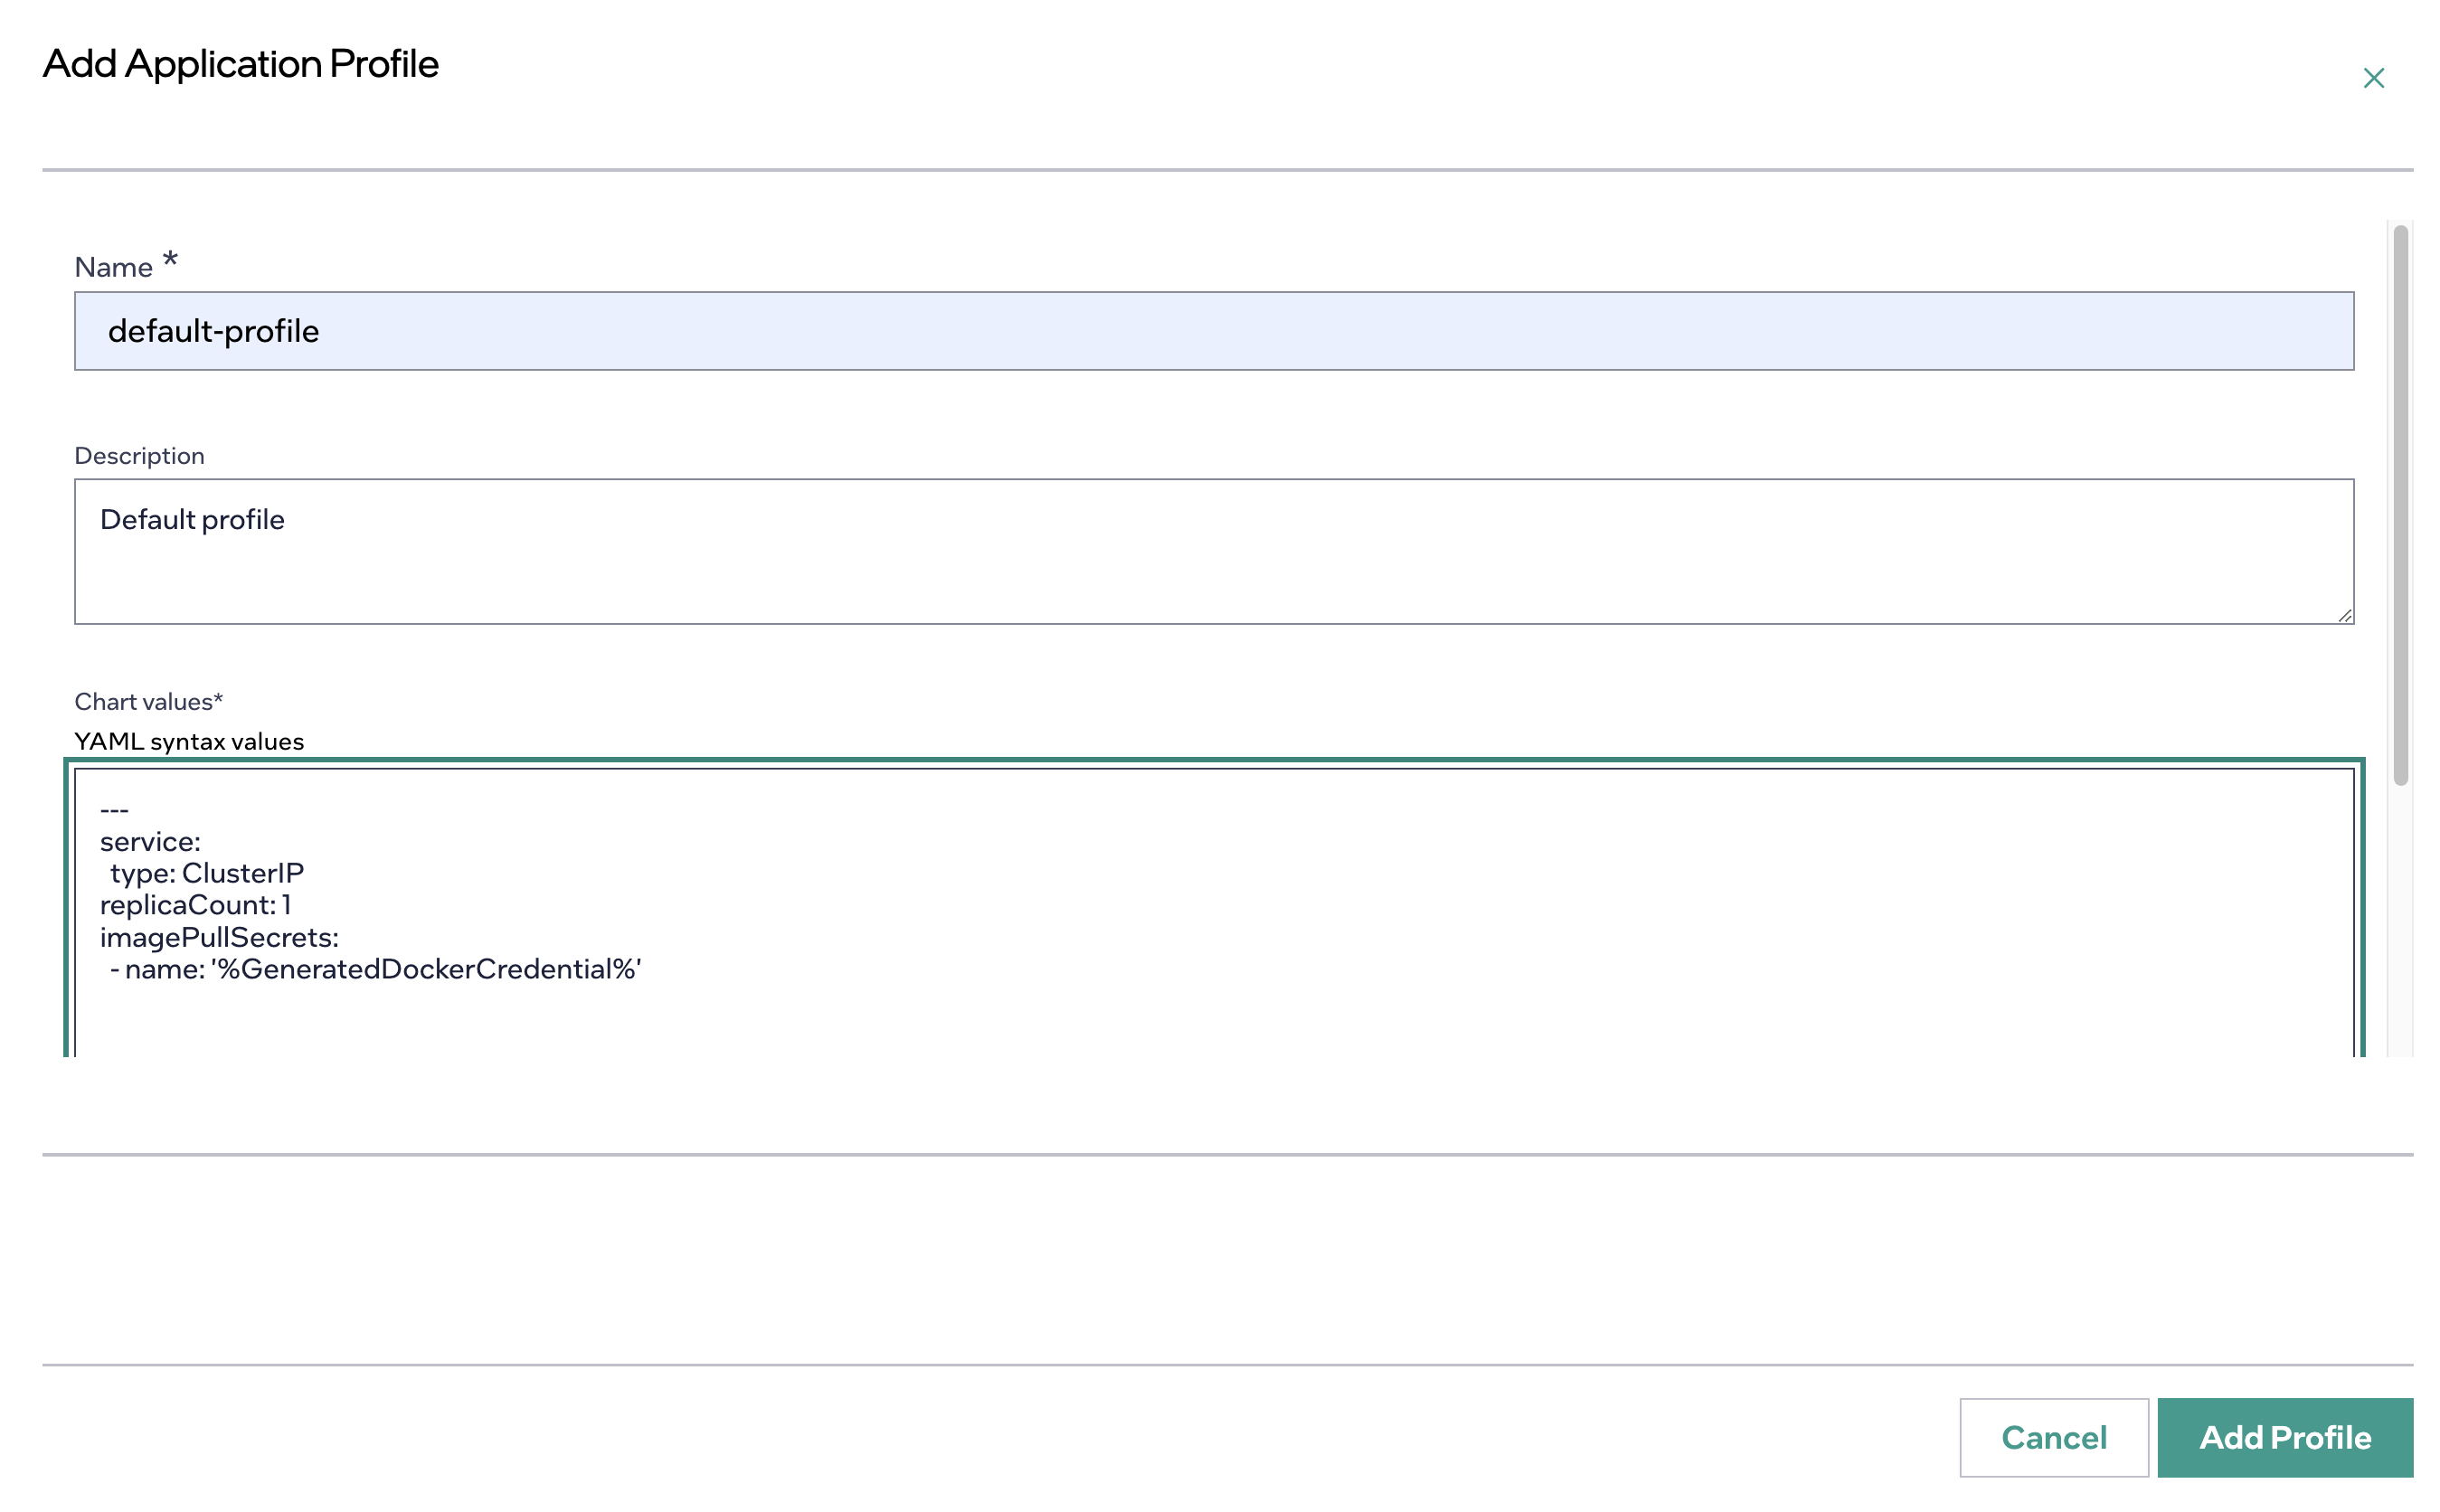
Click Add Profile > Next > Add Application.
For details on adding applications, see Add Application.
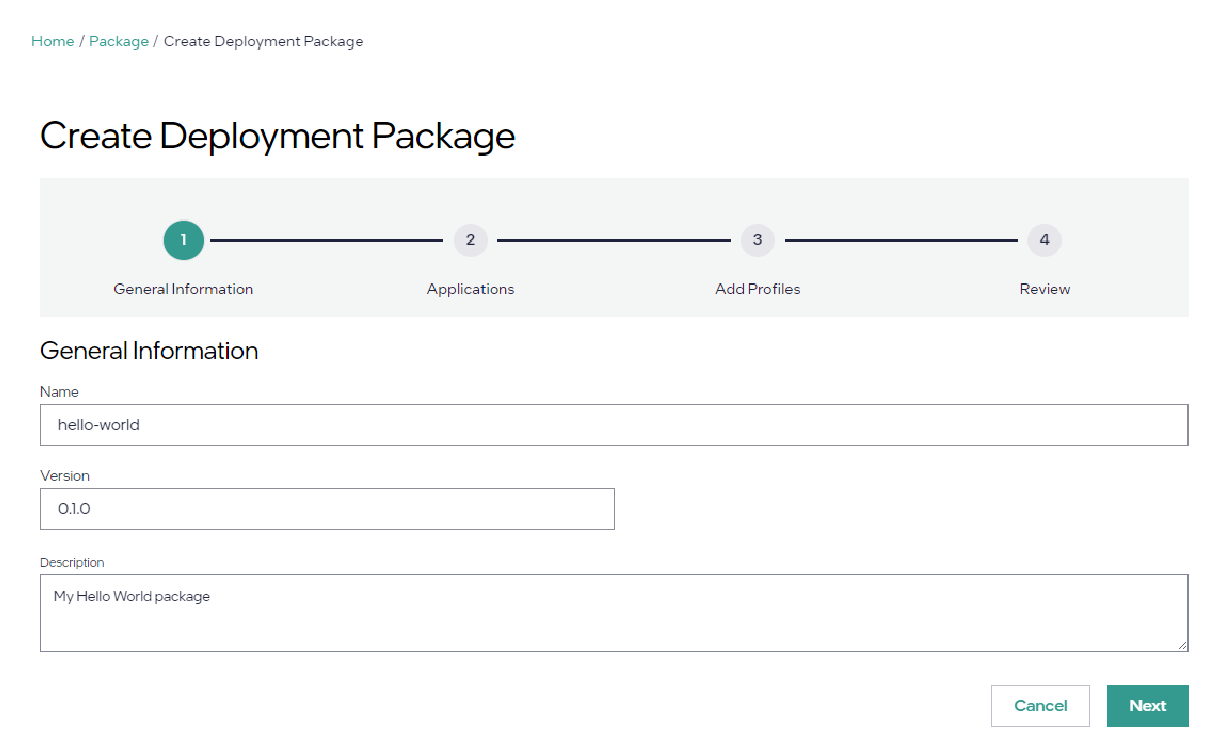
Click Deployment Packages at left, and then click the Create Deployment Package button. Under General Information, enter:
Name: hello-world
Version: 0.1.0
Click Next. On the next screen, select the “hello-world” application:
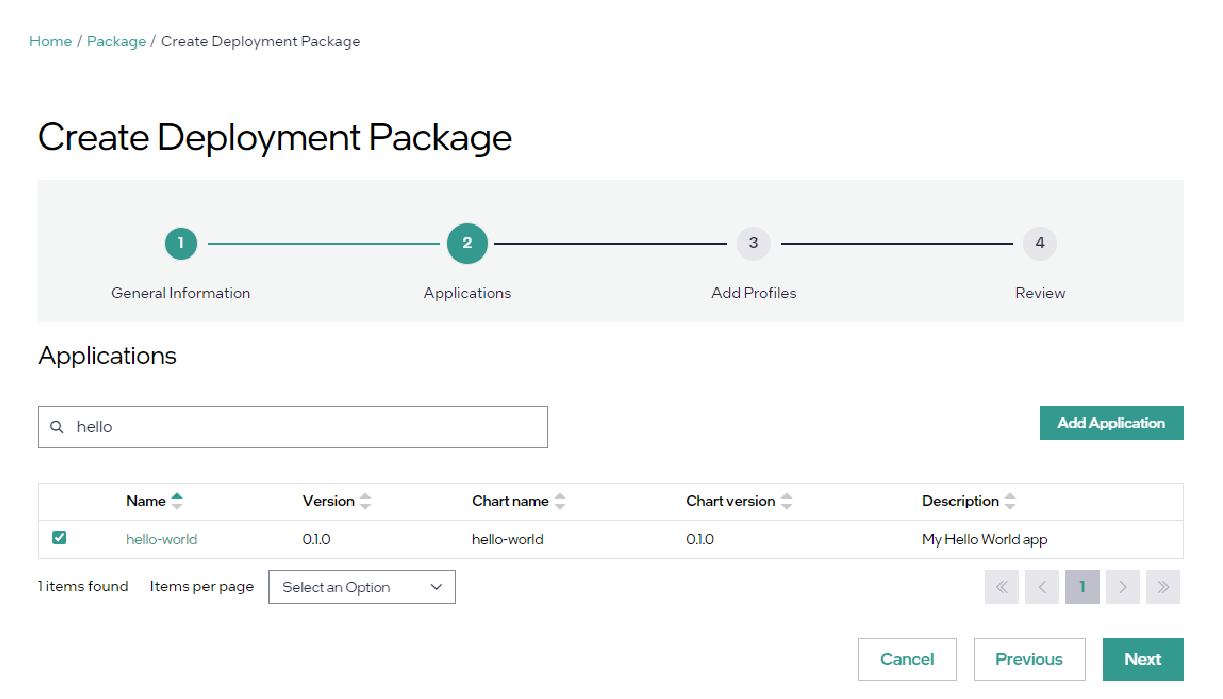
Click Next twice, and then click Add Deployment Package. You will return to the Deployment Packages page and you will see “hello-world” in the list.
For details on creating deployment packages, see Create Deployment Packages.
Deploy the Application#
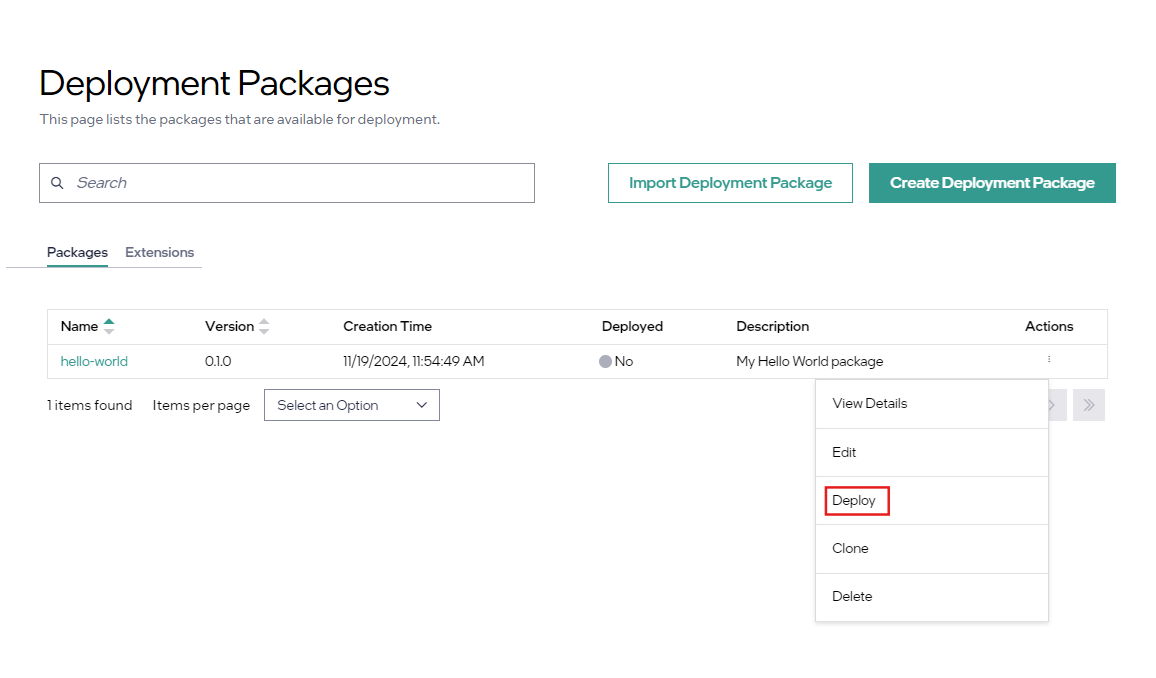
To deploy your application to an edge cluster:
Click on the three-dot-button to the right of the “hello-world” Deployment Package and select Deploy:
Click Next twice, until you get to Select a Deployment Type. Choose Manual and click Next:
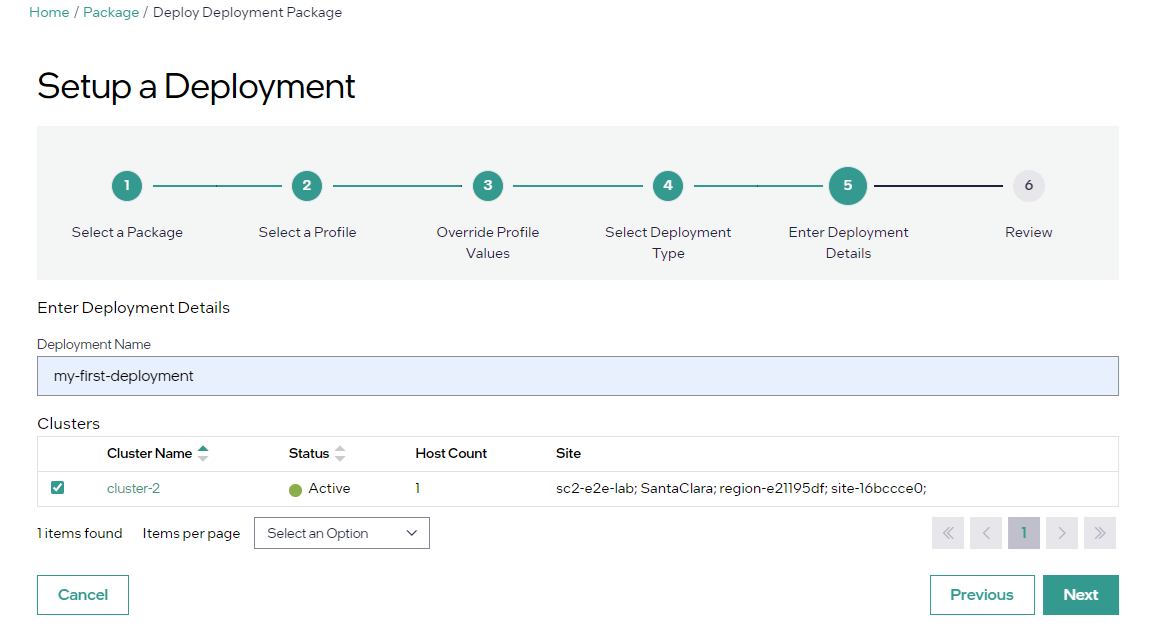
For deployment name, enter “my-first-deployment”. Then choose a target cluster from the list and click Next.
Click the Deploy button to start deploying the app.
For details on deploying applications, see Set up a Deployment.
Verify that the Application is Deployed#
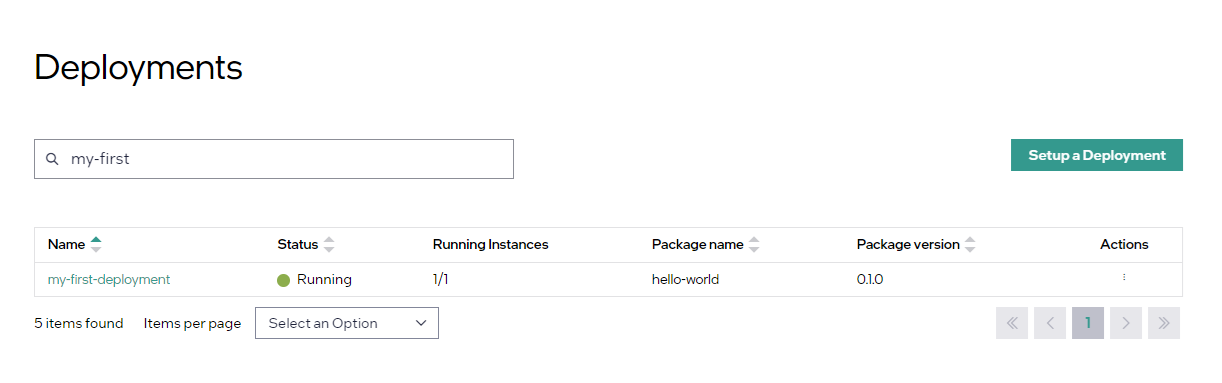
While the application is deploying, the Status column will display “Deploying”. After a few minutes it will be done, and the status will change to “Running”:
Click “my-first-deployment” to drill down into the deployment details. You will see that the application is running on the selected cluster. Click the Cluster ID to drill down into the cluster view:
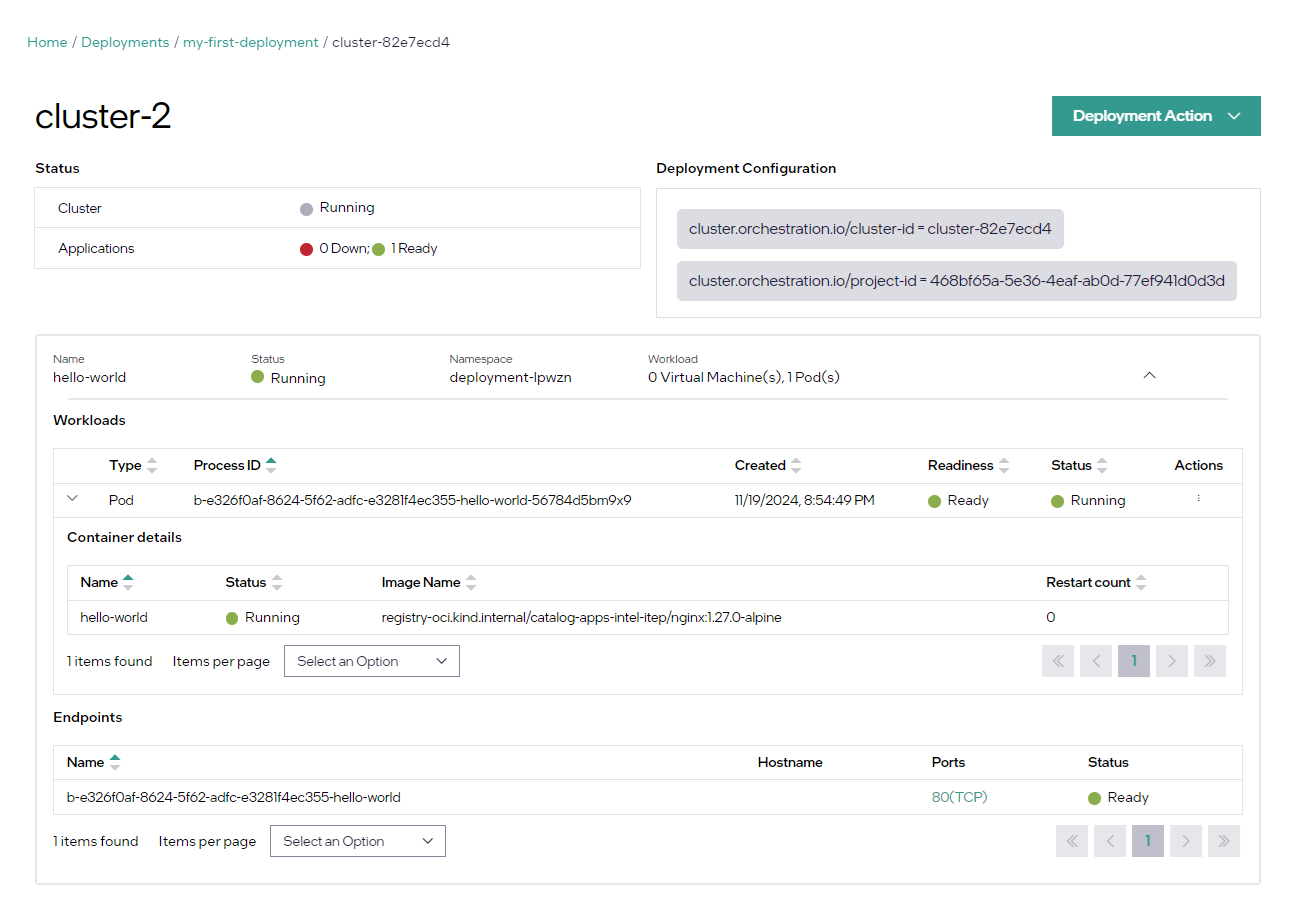
Click the down arrow to the right of Workload to expand the view; you will see that the application pod has a “Running” status.
In the Endpoints list at bottom, the “80(TCP)” value is a link; the service annotation you added to the Helm chart instructed Edge Orchestrator to create this link in the UI. Click on it to see the welcome screen served by the application pod:
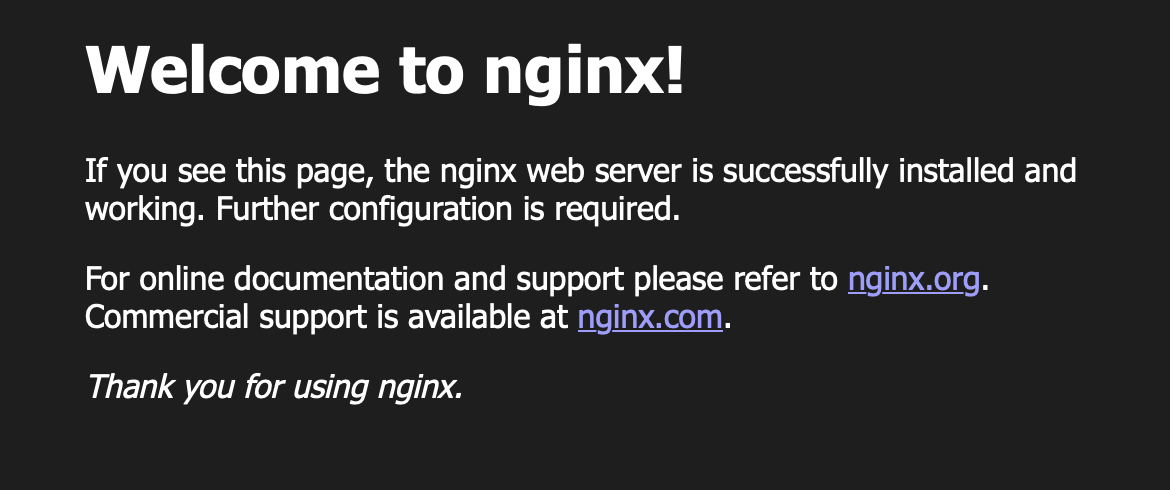
You have now successfully deployed an application using Edge Orchestrator.
For details on viewing deployment details, see View Deployment Details.