Boot to Hard Disk OS after Edge Node Provision#
Guide to boot from the OS installed by the provisioning process in case the Edge Node comes up with the Hook OS. This happens if the node gets re- provisioned multiple times.
Edge Node boots into unexpected hard disk#
Symptom - boot into unexpected hard disk#
After a successful provision of Edge Node software, the Edge Node is not directly booting to the Hard disk.
Cause - boot into unexpected hard disk#
On the edge node, a new boot entry, for example, Ubuntu is created in the BIOS menu after a successful provision. In some cases, multiple entries in BIOS are present due to having previously created doing previous EN provision runs. The presence of multiple entries causes issues with the boot order sequence. Thus, the node does not boot from the correct boot entry.
Solution - boot into unexpected hard disk#
Edge Node Software has a fix to delete all invalid entries from the BIOS menu, but the Edge node must boot successfully to the correct OS.
Steps:
Select only valid boot entries shown in the following figure, from Configurations -> BOOT Settings -> UEFI BOOT Settings:
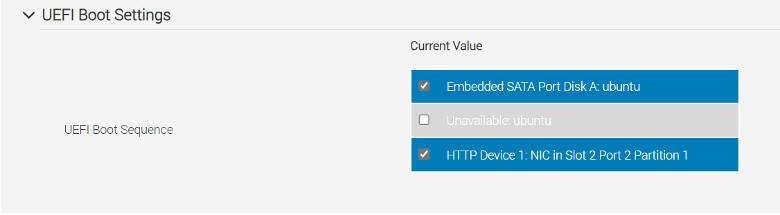
Deselect any option in the state Unavailable: <name> as seen in the previous figure, for example, Unavailable: Ubuntu.
Select only Embedded STATA Port and HTTP Device1: NIC in Slot options (per your system).
Apply the changes and click the Apply and Reboot option.
Verify that the node comes up with the correct OS installation, for example, Ubuntu.
Edge Node fails to boot into OS due to “Volume Full” error#
Symptom - “Volume Full” error#
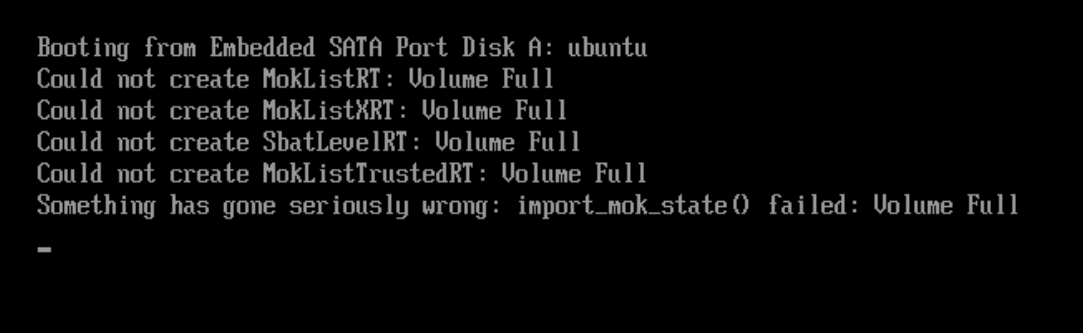
After a Successful Provision of Edge Node software, the Edge Node fails to boot into the target OS due to the “Full Volume” issue, as depicted in the screenshot below.
Cause - “Volume Full” error#
This issue may happen due to two reasons:
Integrated Dell* Remote Access Controller (iDRAC) certificate storage is full of DER keys.
TPM (Trusted Platform Module) is tainted.
Solution - “Volume Full” error#
An administrator should enter BIOS to delete all remaining DER keys and clear TPM.
To delete remaining DER keys using Remote Access Controller Admin (RACADM):
List all BIOS certificates with: .. code-block:
racadm bioscert view --all

SecureBootCert Policy  :Custom
Certificate Type       :DBX
Certificate SubType    :SHA-256

Hash                   :939AEEF4F5FA51E23340C3F2E49048CE8872526AFDF752C3A7F3A3F2BC9F6049

-------------------------------------------------------------------------

SecureBootCert Policy  :Custom
Certificate Type       :DBX
Certificate SubType    :SHA-256

Hash                   :64575BD912789A2E14AD56F6341F52AF6BF80CF94400785975E9F04E2D64D745

-------------------------------------------------------------------------
#. The above command returns a list of all certificates. Remove all DBX certificates with the following command (use SHA-256 hash as a key):
racadm bioscert delete -t 3 -k 1 -v
64575BD912789A2E14AD56F6341F52AF6BF80CF94400785975E9F04E2D64D745
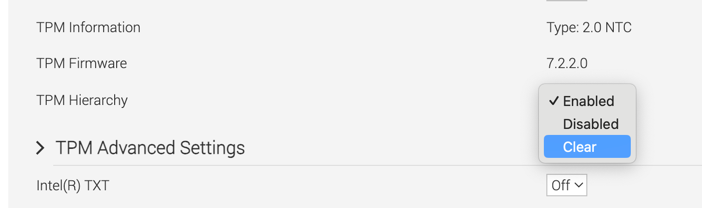
To clear TPM:
Enter iDRAC UI and log in.
Go to Configuration> BIOS Settings> System Security.
Select Clear option from TPM Hierarchy, as shown.
Disable Secure Boot temporarily by selecting Disabled in the Secure Boot field.
Click Apply in the System Security tab and choose when to apply new configurations (Apply And Reboot or At Next Reboot).
The node should reboot and clear TPM.
After node is rebooted, go to iDRAC UI again and re-enable Secure Boot.
You must re-provision the node after executing all the steps.