Get Started#
The Smart Intersection Sample Application is a modular sample application designed to help developers create intelligent intersection monitoring solutions. By leveraging AI and sensor fusion, this sample application demonstrates how to achieve accurate traffic detection, congestion management, and real-time alerting.
To get started:
Set up the sample application: use Docker Compose to quickly deploy the application in your environment.
Run a predefined pipeline: execute a sample pipeline to see real-time transportation monitoring and object detection in action.
Access the application’s features and user interfaces: explore the Scenescape Web UI, Grafana dashboard, Node-RED interface, and DL Streamer Pipeline Server to monitor, analyze and customize workflows.
Consider Enabling Security features: use hardware-based security measures to make your application safer.
Prerequisites#
Verify that your system meets the minimum requirements.
Install Docker: Installation Guide.
Enable running docker without “sudo”: Post Install.
Install Git: Installing Git.
Setup and First Use#
Clone the Suite:
Go to the target directory of your choice and clone the suite. If you want to clone a specific release branch, replace
mainwith the desired tag. To learn more on partial cloning, check the Repository Cloning guide.git clone --filter=blob:none --sparse --branch main https://github.com/open-edge-platform/metro-ai-suite.git cd metro-ai-suite git sparse-checkout set metro-vision-ai-app-recipe cd metro-vision-ai-app-recipe/
Setup Application and Download Assets:
Use the installation script to configure the application and download required models:
./install.sh smart-intersection
Note
For environments requiring a specific host IP address (for example, when deploying across different network interfaces), you can explicitly
specify the IP address (Replace <HOST_IP> with your target IP address.):
./install.sh smart-intersection <HOST_IP>
Run the Application#
Start the Application:
Export admin password as environment variable:
export SUPASS=$(cat ./smart-intersection/src/secrets/supass)
Download container images with Application microservices and run with Docker Compose:
docker compose up -d
Check Status of Microservices
The application starts the following microservices.
To check if all microservices are in Running state:
docker ps
Expected Services:
Grafana Dashboard
DL Streamer Pipeline Server
MQTT Broker
Node-RED (for applications without Scenescape)
Scenescape services (for Smart Intersection only)
View the Application Output:
Open a browser and go to
https://localhost/grafana/to access the Grafana dashboard.Change the localhost to your host IP if you are accessing it remotely.
Log in with the following credentials:
Username:
adminPassword:
admin
Check under the Dashboards section for the application-specific preloaded dashboard.
Expected Results: The dashboard displays real-time video streams with AI overlays and detection metrics.
Access the Application and Components#
Application UI#
Open a browser and go to the following endpoints to access the application. Use <actual_ip>
instead of localhost for external access:
Note
All services are accessed through the nginx reverse proxy at
https://localhostwith appropriate paths.For passwords stored in files (e.g.,
supassorinfluxdb2-admin-token), refer to the respective secret files in your deployment under ./src/secrets (Docker) or chart/files/secrets (Helm).Since the application uses HTTPS with self-signed certificates, your browser may display a certificate warning. For the best experience, use Google Chrome and accept the certificate.
Scenescape supports uploading GLB 3D base map files. The upload limit is configurable via
NGINX_CLIENT_MAX_BODY_SIZEin the.envfile (Docker Compose) ornginx.clientMaxBodySizeinchart/values.yaml(Helm).
URL: https://localhost
Log in with credentials:
Username:
adminPassword: Stored in
supass. (Check./smart-intersection/src/secrets/supass)
Note
After starting the application, wait approximately 1 minute for the MQTT broker to initialize. You can confirm it is ready when green arrows appear for MQTT in the application interface. Since the application uses HTTPS, your browser may display a self-signed certificate warning. For the best experience, use Google Chrome.
Grafana UI#
Log in with credentials:
Username:
adminPassword:
admin(You will be prompted to change it on first login.)
InfluxDB UI#
Log in with credentials:
Username:
<your_influx_username>(Check./smart-intersection/src/secrets/influxdb2/influxdb2-admin-username)Password:
<your_influx_password>(Check./smart-intersection/src/secrets/influxdb2/influxdb2-admin-password).
NodeRED UI#
DL Streamer Pipeline Server#
REST API: https://localhost/api/pipelines/status
Check Pipeline Status:
curl -k https://localhost/api/pipelines/status
Verify the Application#
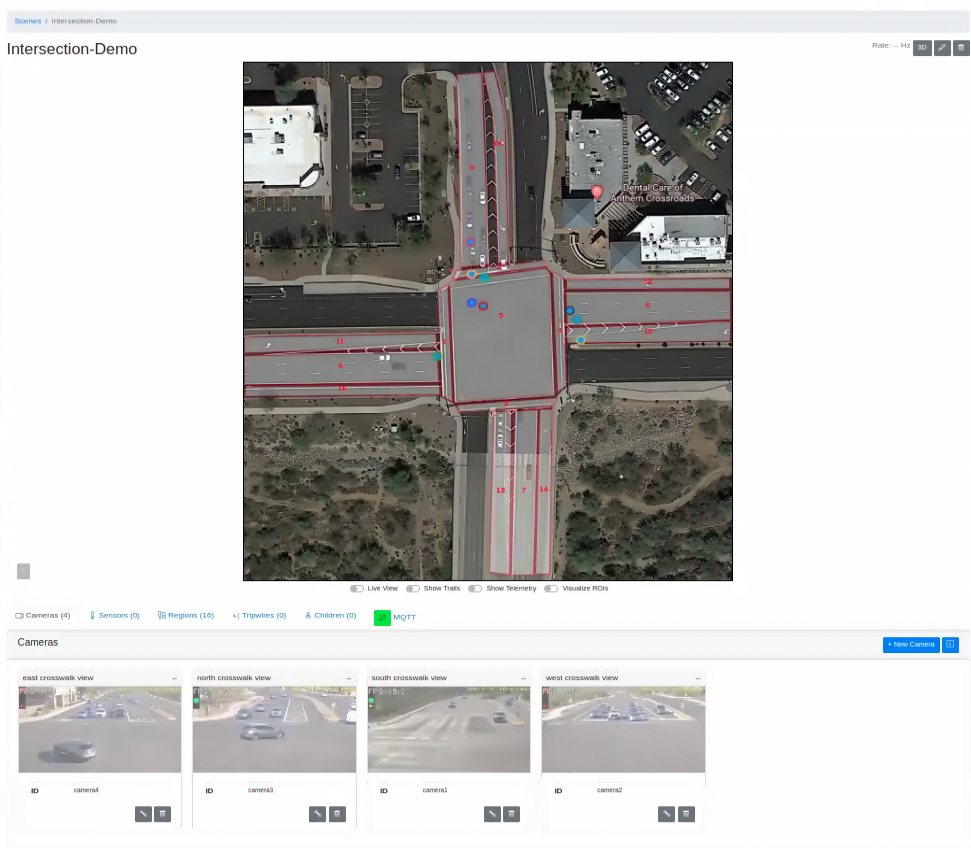
Fused object tracks: in Scene Management UI, click on the Intersection-Demo card to navigate to the Scene. On the Scene page, you will see fused tracks moving on the map. You will also see greyed out frames from each camera. Toggle the “Live View” button to see the incoming camera frames. The object detections in the camera feeds will correlate to the tracks on the map.
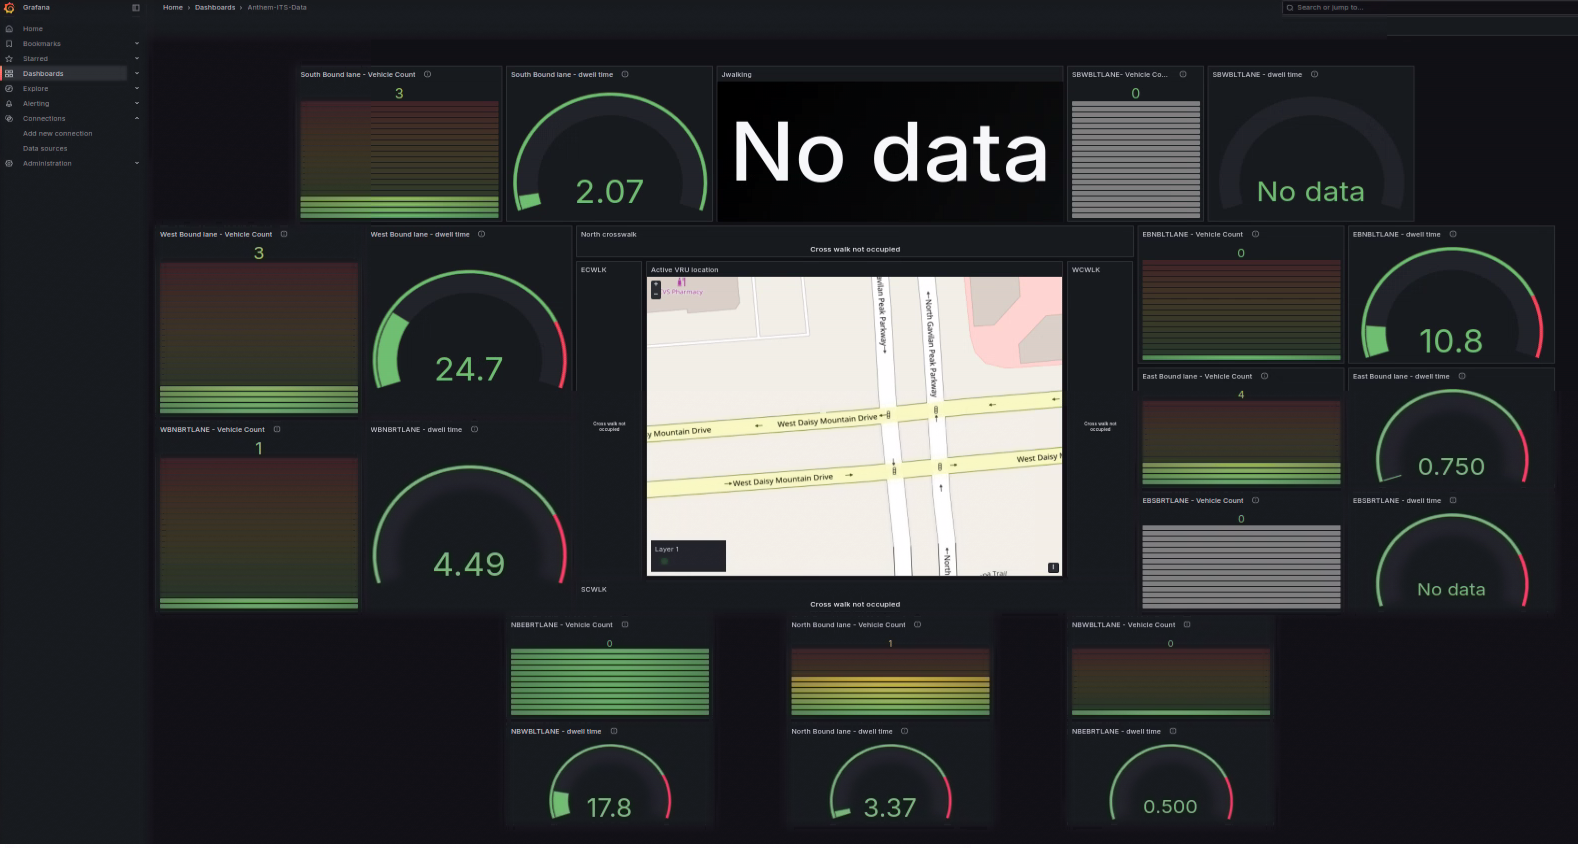
Grafana Dashboard: In Grafana UI, observe aggregated analytics of different regions of interests in the grafana dashboard. After navigating to Grafana home page, click on “Dashboards” and click on item “Anthem-ITS-Data”.
Stop the Application#
To stop the application microservices, use the following command:
docker compose down
Deploy with Trusted Compute#
To deploy the Smart Intersection application with Intel Trusted Compute for hardware-isolated workloads, refer to the Deploy with Trusted Compute guide.
Other Deployment Options#
Choose one of the following methods to deploy the Smart Intersection Sample Application:
Deploy Using Helm: Use Helm to deploy the application to a Kubernetes cluster for scalable and production-ready deployments.
Security Enablement#
With AI systems handling sensitive city data and making autonomous decisions, robust security is essential. Intel platforms provide built-in security features to protect data, infrastructure, and AI processing. See the Security Enablement Guide that uses the example of Smart Intersection to show how to secure Open Edge Platform applications.
Learn More#
Troubleshooting: Find detailed steps to resolve common issues during deployments.
DL Streamer Pipeline Server: Intel microservice based on Python for video ingestion and deep learning inferencing functions.
Scenescape: Intel Scene-based AI software framework.