Deploy with Helm#
This section provides step-by-step instructions for deploying the Smart Parking sample application using Helm.
The estimated time to complete this procedure is 30 minutes.
Get Started#
Complete this section to confirm that your setup is working correctly and try out workflows in the sample application.
Prerequisites#
Kubernetes Cluster: Ensure you have a properly installed and configured Kubernetes cluster.
Tools Installed: Install the required tools:
Kubernetes CLI (kubectl)
Helm 3 or later
For Helm installation, refer to Helm website
Intel NFD and Device Plugins (required for GPU/NPU workloads): Install Node Feature Discovery (NFD) and the Intel GPU/NPU device plugins to enable hardware detection and scheduling. This ensures pods requesting GPU or NPU resources are only deployed on nodes with available hardware. Refer to release tags for available versions (tested with
v0.35.0):# Pick a release version compatible with your cluster export RELEASE_VERSION=v0.35.0 # Step 1: Create namespace for the Intel device plugins kubectl create namespace intel-device-plugins # Step 2: Allow privileged pods in the device plugin namespace # Required because the plugin needs hostPath mounts and access to host device files. kubectl label namespace intel-device-plugins \ pod-security.kubernetes.io/enforce=privileged \ pod-security.kubernetes.io/audit=privileged \ pod-security.kubernetes.io/warn=privileged \ --overwrite # Step 3: Install Node Feature Discovery (NFD) # NFD uses its own namespace: node-feature-discovery kubectl apply -k "https://github.com/intel/intel-device-plugins-for-kubernetes/deployments/nfd?ref=${RELEASE_VERSION}" # Step 4: Allow privileged pods in the NFD namespace kubectl label namespace node-feature-discovery \ pod-security.kubernetes.io/enforce=privileged \ pod-security.kubernetes.io/audit=privileged \ pod-security.kubernetes.io/warn=privileged \ --overwrite # Step 5: Install Intel GPU NodeFeatureRules # These rules let NFD detect and label Intel GPU nodes. kubectl apply -k "https://github.com/intel/intel-device-plugins-for-kubernetes/deployments/nfd/overlays/node-feature-rules?ref=${RELEASE_VERSION}" # Step 6: Verify NFD pods are running kubectl get pods -n node-feature-discovery # Step 7: Verify the node got Intel GPU and NPU labels kubectl get node $(hostname) --show-labels | tr ',' '\n' | grep intel # Step 8: Install the Intel GPU device plugin kubectl apply -n intel-device-plugins -k "https://github.com/intel/intel-device-plugins-for-kubernetes/deployments/gpu_plugin/overlays/nfd_labeled_nodes?ref=${RELEASE_VERSION}" # Step 9: Install the Intel NPU device plugin kubectl apply -n intel-device-plugins -k "https://github.com/intel/intel-device-plugins-for-kubernetes/deployments/npu_plugin/overlays/nfd_labeled_nodes?ref=${RELEASE_VERSION}"
Verify the Intel Device Plugin pods are running:
kubectl get pods -n intel-device-plugins
Verify the GPU and NPU resources are advertised on nodes:
kubectl get nodes -o json | jq '.items[] | {name: .metadata.name, gpu: .status.allocatable["gpu.intel.com/i915"], npu: .status.allocatable["npu.intel.com/accel"]}'
Note
If your node uses Intel Xe discrete GPUs (Arc), set
gpu:to.status.allocatable["gpu.intel.com/xe"].
Note
If Ubuntu Desktop is not installed on the target system, follow the instructions from Ubuntu to install Ubuntu desktop.The target system refers to the system where you are installing the application.
Step 1: Download the Helm chart#
Follow this procedure on the target system to download the package.
Note
Skip this step if you have already followed the steps as part of the Get Started guide.
Before you can deploy with Helm, you must clone the repository and download the Helm chart:
# Clone the repository
git clone https://github.com/open-edge-platform/metro-ai-suite.git -b main

# Navigate to the Metro AI Suite directory
cd metro-ai-suite/metro-vision-ai-app-recipe/
Optional: Pull the Helm chart and replace the existing helm-chart folder with it.
Note
The Helm chart should be downloaded when you are not using the Helm chart provided
in metro-ai-suite/metro-vision-ai-app-recipe/smart-parking/helm-chart.
#Navigate to Smart Parking directory
cd smart-parking

#Download helm chart with the following command
helm pull oci://registry-1.docker.io/intel/smart-parking --version 1.6.0

#unzip the package using the following command
tar -xvf smart-parking-1.6.0.tgz

#Replace the helm directory
rm -rf helm-chart && mv smart-parking helm-chart

cd ..
Step 2: Configure and update the environment variables#
Update the below fields in
values.yamlfile in the Helm chart# Edit the values.yml file to add proxy configuration nano ./smart-parking/helm-chart/values.yaml
HOST_IP: # replace localhost with system IP example: HOST_IP: 10.100.100.100
http_proxy: # example: http_proxy: http://proxy.example.com:891
https_proxy: # example: http_proxy: http://proxy.example.com:891
no_proxy: # example: no_proxy: localhost,127.0.0.1,.local,.cluster.local
webrtcturnserver:
    username: # example: username: myuser
    password: # example: password: mypassword
Note
To run the pipeline on GPU, make sure to set
gpu.enabled:trueandnpu.enabled:falseinvalues.yaml. [!NOTE] To run the pipeline on NPU, make sure to setnpu.enabled:trueandgpu.enabled:falseinvalues.yaml. [!NOTE] For both GPU and NPU deployments, make sure the gpu.type invalues.yamlis set correct. By default, gpu.type is set to"gpu.intel.com/i915"but for Intel Arc (Xe) discrete GPUs, set gpu.type to"gpu.intel.com/xe".
Step 3: Deploy the application and Run multiple AI pipelines#
Follow this procedure to run the sample application. In a typical deployment, multiple cameras deliver video streams that are connected to AI pipelines to improve the classification and recognition accuracy. The following demonstrates running multiple AI pipelines and visualization in the Grafana.
Deploy the Helm chart
helm install smart-parking ./smart-parking/helm-chart -n sp --create-namespace --set timezone=$(cat /etc/timezone)
Wait for all pods to be ready:
kubectl wait --for=condition=ready pod --all -n sp --timeout=300s
Start the application with the Client URL (cURL) command by replacing the <HOST_IP> with the Node IP. (Total 4 places)
#!/bin/bash
curl -k https://<HOST_IP>:30443/api/pipelines/user_defined_pipelines/yolov11s -X POST -H 'Content-Type: application/json' -d '
{
    "source": {
        "uri": "file:///home/pipeline-server/videos/new_video_1.mp4",
        "type": "uri"
    },
    "destination": {
        "metadata": {
            "type": "mqtt",
            "topic": "object_detection_1",
            "publish_frame":false
        },
        "frame": {
            "type": "webrtc",
            "peer-id": "object_detection_1",
            "overlay-properties": {
                "font-scale": 1.0,
                "draw-txt-bg": false
            }
        }
    },
    "parameters": {
        "detection-device": "CPU"
    }
}'

curl -k https://<HOST_IP>:30443/api/pipelines/user_defined_pipelines/yolov11s -X POST -H 'Content-Type: application/json' -d '
{
    "source": {
        "uri": "file:///home/pipeline-server/videos/new_video_2.mp4",
        "type": "uri"
    },
    "destination": {
        "metadata": {
            "type": "mqtt",
            "topic": "object_detection_2",
            "publish_frame":false
        },
        "frame": {
            "type": "webrtc",
            "peer-id": "object_detection_2",
            "overlay-properties": {
                "font-scale": 1.0,
                "draw-txt-bg": false
            }
        }
    },
    "parameters": {
        "detection-device": "CPU"
    }
}'

curl -k https://<HOST_IP>:30443/api/pipelines/user_defined_pipelines/yolov11s -X POST -H 'Content-Type: application/json' -d '
{
    "source": {
        "uri": "file:///home/pipeline-server/videos/new_video_3.mp4",
        "type": "uri"
    },
    "destination": {
        "metadata": {
            "type": "mqtt",
            "topic": "object_detection_3",
            "publish_frame":false
        },
        "frame": {
            "type": "webrtc",
            "peer-id": "object_detection_3",
            "overlay-properties": {
                "font-scale": 1.0,
                "draw-txt-bg": false
            }
        }
    },
    "parameters": {
        "detection-device": "CPU"
    }
}'

curl -k https://<HOST_IP>:30443/api/pipelines/user_defined_pipelines/yolov11s -X POST -H 'Content-Type: application/json' -d '
{
    "source": {
        "uri": "file:///home/pipeline-server/videos/new_video_4.mp4",
        "type": "uri"
    },
    "destination": {
        "metadata": {
            "type": "mqtt",
            "topic": "object_detection_4",
            "publish_frame":false
        },
        "frame": {
            "type": "webrtc",
            "peer-id": "object_detection_4",
            "overlay-properties": {
                "font-scale": 1.0,
                "draw-txt-bg": false
            }
        }
    },
    "parameters": {
        "detection-device": "CPU"
    }
}'
Note
To run the pipeline on GPU replace
yolov11swithyolov11s_gpuand change value ofdetection-devicetoGPUfor all the above pipelines. Simimlarly, to run the pipeline on NPU replaceyolov11swithyolov11s_npuand change value ofdetection-devicetoNPUfor all the above pipelines.View the Grafana and WebRTC streaming on
https://<HOST_IP>:30443/grafana/.Log in with the following credentials:
Username:
adminPassword:
admin
Check under the Dashboards section for the default dashboard named “Video Analytics Dashboard”.
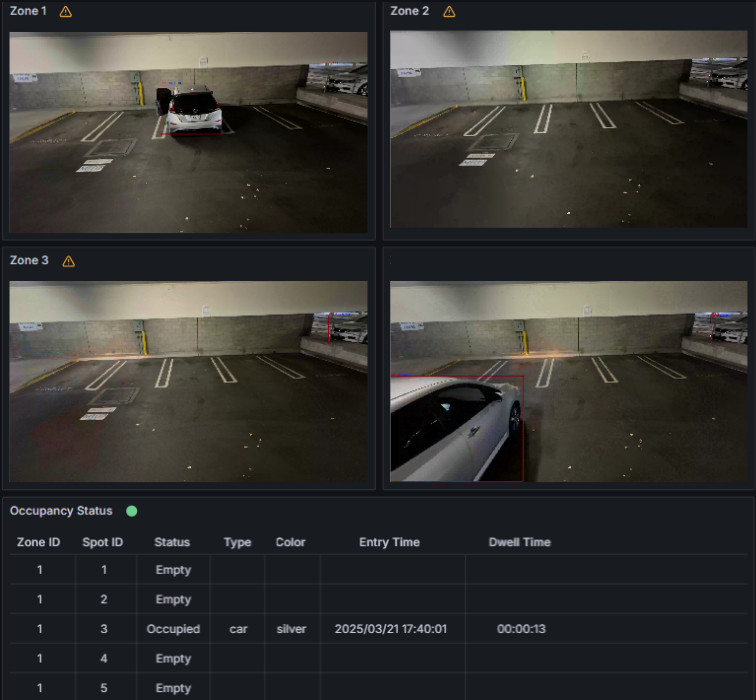
Figure 1: Grafana and WebRTC streaming
Step 4: End the demonstration#
Follow this procedure to stop the sample application and end this demonstration.
Stop the sample application with the following command that uninstalls the release smart-parking.
helm uninstall smart-parking -n sp
Confirm the pods are no longer running.
kubectl get pods -n sp
Error Logs#
View the container logs using the following command:
kubectl logs -f <pod_name> -n sp
Troubleshooting#
For troubleshooting, refer to Troubleshooting Helm Deployments.