Get Started#
The Smart Traffic Intersection Agent (STIA) provides analytics that include real-time intersection, directional traffic density, and VLM-powered traffic, among others. This section shows you how to:
Set up the agent using the automated setup script for quick deployment.
Run predefined tasks to explore the agent’s functionality.
Edit configurations to suit specific requirements.
Prerequisites#
Before you begin, ensure the following:
System requirements: Verify that your system meets the minimum requirements.
Docker platform: Install Docker platform. For installation instructions, see Get Docker.
Message Queuing Telemetry Transport (MQTT) Broker: Ensure access to an MQTT broker for traffic data streaming, or use the included broker.
Docker commands and terminal usage: You are familiar with Docker commands and using the terminal. If you are new to Docker, see Docker Documentation for an introduction.
Hugging Face token: Set your token using
export HUGGINGFACE_TOKEN="<your-huggingface-token>"Registry configuration: To pull pre-built images from a specific registry, set the
REGISTRYandTAGparameters. The recommended default setting is below.export REGISTRY="intel" export TAG="latest"
Using Edge Microvisor Toolkit#
If you are running STIA on an OS image built with Edge Microvisor Toolkit (EMT) — an Azure Linux-based build pipeline for Intel® platforms — the deployment approach depends on the EMT flavor. Refer to the detailed documentation for EMT-D and EMT-S for full details.
EMT-D (Mutable)#
EMT-D is a mutable image that supports standard package management. You can run the setup.sh script directly on the node after installing any required dependencies using dnf or tdnf.
EMT-S (Immutable)#
EMT-S is an immutable OS image — standard package managers such as apt are not available, and the setup.sh script cannot be run directly on the EMT-S node (doing so will fail with sudo: apt: command not found). Use one of the following approaches:
Option 1 (USB provisioning): While preparing the USB drive, copy the required Docker images under
/opt/user-appson the image, then flash and deploy the Edge node.Option 2 (Remote copy): On a Ubuntu development system, pull/build all required Docker images and prepare the project directory. Copy the entire directory to the EMT-S node without modifications and deploy from there. This approach has been verified to successfully bring up all containers.
If any packages must be installed on EMT-S, use the installroot method (replace <package> with the required package name):
sudo env no_proxy="localhost,127.0.0.1" dnf --installroot=/opt/user-apps/tools/ -y install <package>
export LD_LIBRARY_PATH=$LD_LIBRARY_PATH:/opt/user-apps/tools/usr/lib/
Refer to the EMT-S documentation for further details.
Quick Start with Setup Script#
Intel recommends using the automated setup script that handles environment configuration, dependencies setup, secrets generation, building, and deployment of the Smart Traffic Intersection Agent.
1. Clone the Suite#
Go to the target directory of your choice and clone the suite.
If you want to clone a specific release branch, replace main with the desired tag.
To learn more on partial cloning, check the Repository Cloning guide.
git clone --filter=blob:none --sparse --branch main https://github.com/open-edge-platform/edge-ai-suites.git
cd edge-ai-suites
git sparse-checkout set metro-ai-suite
cd metro-ai-suite/smart-traffic-intersection-agent/
2. Set the required environment variables#
export VLM_MODEL_NAME=<supported_model_name> # eg. OpenVINO/Phi-3.5-vision-instruct-int8-ov, OpenVINO/InternVL2-1B-int4-ov
IMPORTANT: See this disclaimer before using any AI Model.
3. Run the Complete Setup#
The easiest way to set up the service is to use default configurations without making any
changes. Run the setup script with the --setup option to set up the agent quickly with
the default configurations:
source setup.sh --setup
This single command will:
Set required environment variables with default values
Set up dependencies required for Smart Traffic Intersection Agent
Generate the required TLS certificates and authentication files
Download demo video files for testing
Build Docker images
Start services in the Smart Traffic Intersection Agent’s application stack
4. Run alternative setup options#
For a more granular control, run these commands:
#  Set environment variables without building image or starting any containers
source setup.sh --setenv

# Build service images only (without starting containers)
source setup.sh --build

# Start services without building the image
source setup.sh --run

# Stop services
source setup.sh --stop

# Restart services. The variable `service_type` can be set to `agent`, `deps`, and `all`. Run with --help to get details of each type.
source setup.sh --restart [service_type]

# Clean up containers. Run with --help to get details of the option.
source setup.sh --clean [option]
5. Access Services#
When the script completes, it will show the URLs to access the services. Go to these URLs so that the respective services can access them in a web browser.
Running Multiple Instances (Test or Development Only)#
For testing or development purposes, you can run multiple instances of the Smart Traffic
Intersection Agent to simulate multiple intersections on the same development machine or node.
The easiest way to do this is to clone and set up the application n times in n different
locations on the same machine for n required instances.
Note: In production environments, only a single Traffic Intersection Agent instance is deployed on a given node.
Intel’s recommendation: The number of instances you can run on a single machine depends on available resources. Systems with higher resources can support more instances.
Set up Instance #1#
Clone the repository into a new directory:
git clone --depth 1 https://github.com/open-edge-platform/edge-ai-suites.git edge-ai-suites-instance1
cd edge-ai-suites-instance1/metro-ai-suite/smart-traffic-intersection-agent/
Edit the deployment configuration file for instance #1:
nano src/config/deployment_instance.jsonUpdate
name,latitudeandlongitudevalues as required. Following is a sample value for the Instance #1 deployment config:{ "name": "intersection_1", "latitude": 37.5879818, "longitude": -122.0534334, "agent_backend_port": "8081", "agent_ui_port": "7860" }
TIPS: Leave
agent_backend_portandagent_ui_portempty to avoid port conflicts. Random ports would be assigned and application URLs with assigned ports will be shown when setup finishes.Set the required environment variable.
export VLM_MODEL_NAME=<supported_model_name> # eg. OpenVINO/Phi-3.5-vision-instruct-int8-ov, OpenVINO/InternVL2-1B-int4-ov
IMPORTANT: See this disclaimer before using any AI Model.
Run the setup for instance #1:
source setup.sh --setup
Set up Instance #2#
Open a new terminal window and move to new directory. Clone the repository into the new directory:
git clone --depth 1 https://github.com/open-edge-platform/edge-ai-suites.git edge-ai-suites-instance2
cd edge-ai-suites-instance2/metro-ai-suite/smart-traffic-intersection-agent/
Edit the deployment configuration for instance #2:
nano src/config/deployment_instance.jsonThe following is a sample value for instance #2 deployment configuration:
{
    "name": "intersection_2",
    "latitude": 37.33874,
    "longitude": -121.8852525,
    "agent_backend_port": "8082",
    "agent_ui_port": "7861"
}
TIPS: Leave
agent_backend_portandagent_ui_portempty to avoid port conflicts. Random ports would be assigned and application URLs with assigned ports will be shown when setup finishes.Set the required environment variable.
export VLM_MODEL_NAME=<supported_model_name> # eg. OpenVINO/Phi-3.5-vision-instruct-int8-ov, OpenVINO/InternVL2-1B-int4-ov
IMPORTANT: See this disclaimer before using any AI Model.
Run Setup for Instance #2
source setup.sh --setup
Ensure each instance has their deployment_instance.json updated with:
A unique value for
namefieldUnique
latitudeandlongitudeco-ordinatesDifferent
agent_backend_portandagent_ui_portvalues to avoid port conflicts. This is optional. If not specified, an ephemeral port is picked automatically.
Deploying More Instances#
There are functionally no limits on the number of instances that you can spin up to simulate a multi-node setup using the provided script. However, the machine on which the multiple deployments are deployed to, will likely start throttling these instances if resource limits are reached. Hence, deploy new instances only if you have the required resource bandwidth.
To spin-up more instances - say n number of new instances, repeat the steps mentioned in
Set up Instance #2, by changing to a new directory n times.
Disclaimer for Using Third-Party AI Models#
Compliance with all license obligations and responsible use for a third-party AI Model is the user’s responsibility.
Advanced Environment Configuration#
For advanced users who need more control over the configuration, you can configure the following environment variables before running the setup script to override the default behaviour:
# Set log level to debug to help in debugging issues, default value is info
export LOG_LEVEL=DEBUG

# Select iGPU as the accelerator to perform VLM inference. By default, it is set to CPU
export VLM_TARGET_DEVICE=GPU

# Other VLM related config, sample values
export VLM_TIMEOUT_SECONDS=600          # Default 300
export VLM_MAX_COMPLETION_TOKENS=1000   # Default 1500
export VLM_TEMPERATURE=0.4              # Default 0.1, range 0-1; controls randomness of response
export VLM_TOP_P=0.3                    # Default 0.1, range 0-1; another parameter to control randomness and diversity of response

# Some sample values for Traffic Intersection configuration
export HIGH_DENSITY_THRESHOLD=5        # Default value 10
export MODERATE_DENSITY_THRESHOLD=3    # Default value 5; Make sure this is less than HIGH_DENSITY_THRESHOLD
export TRAFFIC_BUFFER_DURATION=20      # Default value 30; Analysis window of traffic feeds in seconds

# To mock the weather data (say in airgapped deployment)
export WEATHER_MOCK=True
Customizing the video used by sample application#
The video used by this sample application is determined by the configuration in Smart Intersection application. Refer to its documentation for further details.
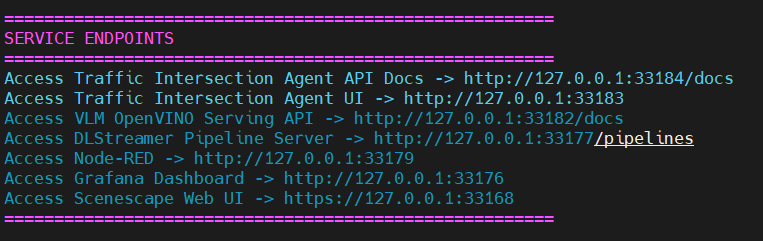
Accessing the Services#
After the setup process completes, the URLs for all services are displayed on the terminal. You can get the URL for Traffic Intersection Agent UI and Traffic Intersection Agent API Docs from the response, and access it in a web browser.
The following is a sample response that you might get at script completion, which displays the URLs for accessing the relevant services:
Deploy with Trusted Compute#
Intel Trusted Compute runs workloads inside a hardware-isolated virtual machine, providing an additional layer of security for sensitive AI workloads.
Note: GPU acceleration is currently not supported when deploying with Trusted Compute.
1. Install Trusted Compute#
Follow the Trusted Compute baremetal installation guide to install Trusted Compute runtime version 1.5.0 on your host system. Complete the following sections:
Note: Trusted Compute version 1.5.0 is required for this deployment. However, Trusted Compute 1.5.0 is not compatible with Docker version 29.5 or later. Docker version 29.4.x is required (tested with 29.4.3).
2. Deploy the Smart Traffic Intersection Agent with Trusted Compute#
Configure Network Settings#
By default, Trusted Compute uses the subnet 172.20.0.0/16 for isolated container networking. If this subnet conflicts with your existing networks, you can customize it before deployment.
Requirements:
Subnet format must be exactly
172.X.0.0/16where X is between 18-31 (RFC 1918 private IP range)The subnet must not conflict with existing Docker networks on your system
DNS relay service will be automatically configured at
172.X.0.200
Example:
# Optional: Customize the subnet if needed (default is 172.20.0.0/16)
export TC_SUBNET=172.25.0.0/16  # DNS relay will be at 172.25.0.200
Perform the STIA Deployment with Trusted Compute#
export ENABLE_TC=true
source ./setup.sh --setup
The DL Streamer Pipeline Server and OpenVINO model server (OVMS) containers will run inside hardware-isolated TC VMs, protecting inference workloads and video data from untrusted co-tenants on the same host.
Note: All other setup and configuration steps remain the same as described in the Quick Start with Setup Script section above.
3. Clean Up the Deployment#
To stop and remove the Smart Traffic Intersection Agent containers:
source ./setup.sh --clean
To uninstall Trusted Compute from the host, refer to the Trusted Compute documentation.
Upgrading#
When upgrading to a new release of the Smart Traffic Intersection Agent, follow these steps to avoid common issues caused by stale data or configuration from a prior version.
1. Pull the Latest Code#
git pull origin <branch-or-tag>
2. Re-fetch Dependencies#
The RI dependency (deps/metro-vision) is fetched automatically by setup.sh via git clone.
After pulling new code, delete the old dependency directory so that setup.sh --setup clones
the version required by the new release:
cd metro-ai-suite/smart-traffic-intersection-agent
rm -rf deps/metro-vision
Note:
setup.sh --setupautomatically re-clonesdeps/metro-visionwhen the directory is absent. Removing it before upgrading ensures the correct version is fetched.
3. Clean and Re-setup#
For major version upgrades (for example, from Scenescape v1.x to v2026.x), stale data volumes and secrets can cause failures. Clean up old containers and re-run setup:
source setup.sh --clean --keep-models
export VLM_MODEL_NAME=<supported_model_name>
source setup.sh --setup
The --keep-models flag preserves downloaded VLM model files so they don’t need to be
re-downloaded.
IMPORTANT: If the PostgreSQL version has changed between releases, the existing data volume is incompatible. The
--cleanstep removes it. If you need to preserve data, export it before cleaning.
Troubleshooting#
Port Conflicts for Traffic Intersection Agent Backend or UI#
Ensure that the config file at src/config/deployment_instance.json for all instances
(deployed from different directories, in case of multiple deployment on same machine) has
empty values for the agent_backend_port and agent_ui_port fields:
    ...
    "agent_backend_port": "",
    "agent_ui_port": ""
    ...
Intel recommends to keep these values empty and let the Docker engine use ephemeral ports. However, if you need to provide an explicit port, ensure port values for all instances are unique. Additionally, ensure no other external services are running on these ports.
PostgreSQL Container Fails to Start After Upgrade#
Symptom: The PostgreSQL container exits immediately with an error like
incompatible data directory or was created by PostgreSQL <old_version>.
Cause: A major PostgreSQL version change (for example, 15 → 17) makes existing data volumes incompatible.
Fix: Remove the stale volume and re-run setup:
source setup.sh --clean --keep-models
source setup.sh --setup
Secrets or Certificate Errors on Startup#
Symptom: Services fail to start with TLS or authentication errors, or the
pgserver.env file is missing.
Cause: A partial or stale secrets directory from a prior installation. The setup script may skip secret generation if it detects existing files.
Fix: Force secret regeneration by cleaning and re-running setup:
source setup.sh --clean --keep-models
source setup.sh --setup
Demo Video Files Not Found by DL Streamer#
Symptom: DL Streamer containers exit or log errors about missing video files.
Cause: Video filenames may change between releases (for example, 1122north.ts →
1122north_h264.ts). The download step is skipped if files with .ts extension already
exist in the video directory.
Fix: Remove old video files and re-run setup to download the correct versions:
rm -f deps/metro-vision/smart-intersection/sample-videos/*.ts
source setup.sh --setup