Videos#
Available videos#
From the left-side menu, choose Videos to open the video management page. This page lists all available videos, along with their basic properties and previews. The application includes a set of sample videos that can be used as pipeline input.
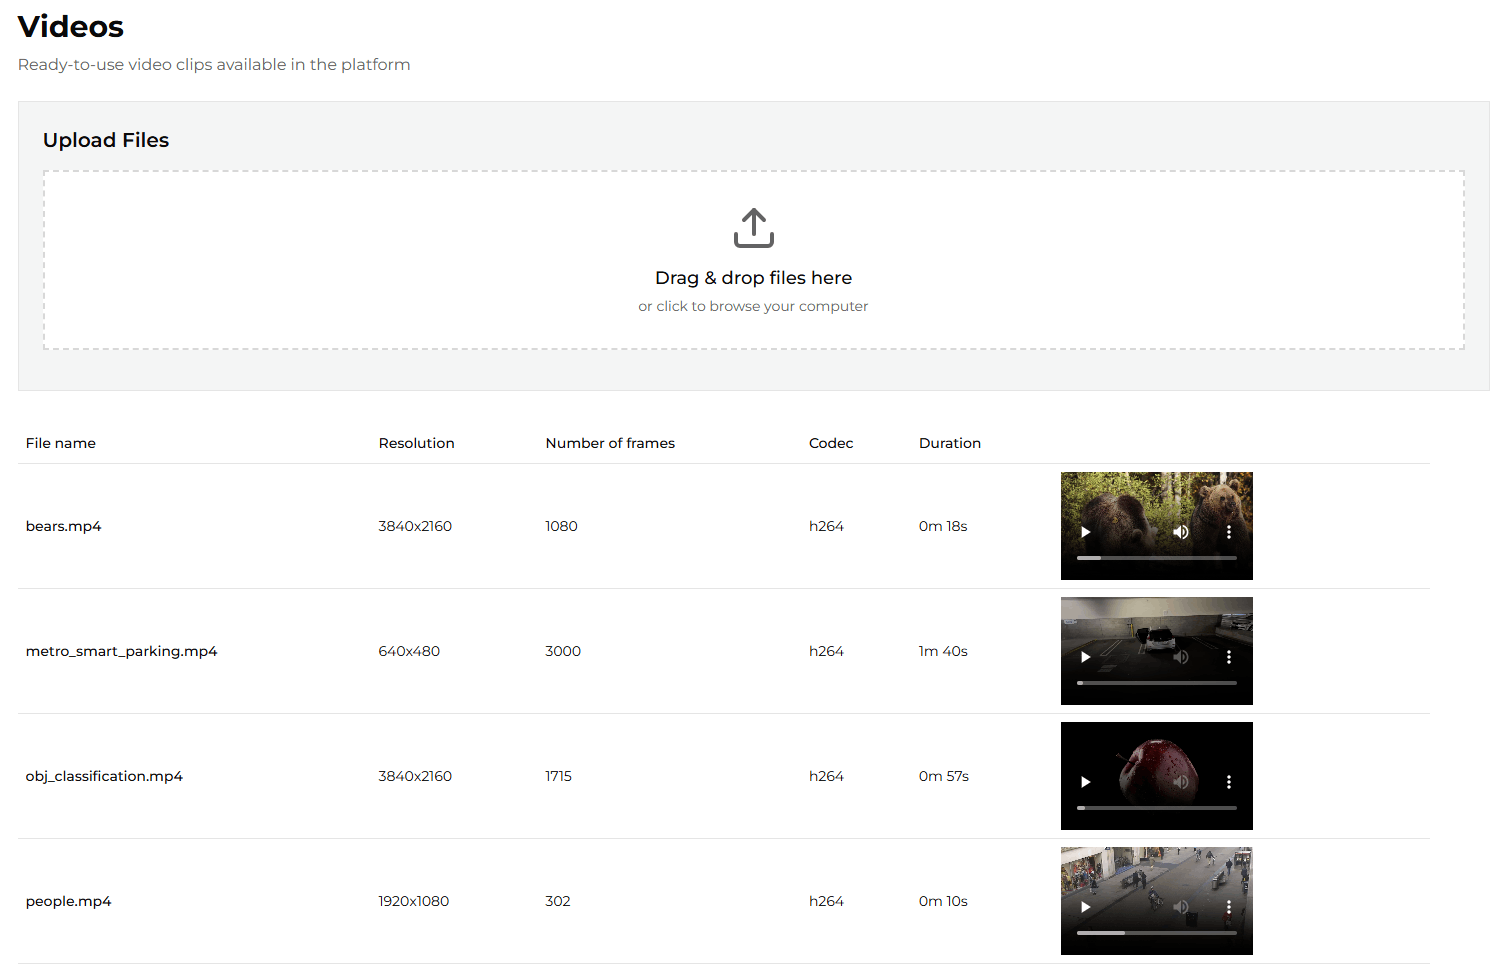
You can also upload your own videos to use as pipeline input. The maximum allowed file size is 2 GB.
Uploading a video#
To upload a video, click the Upload button on the Videos page and pick a file from your machine. The UI shows progress while the file is being transferred, then a success confirmation or, if the upload is rejected, an error message explaining what went wrong.
Before the file is accepted, ViPPET runs two layers of validation:
Pre-write checks (before any bytes touch disk):
the filename is present and contains only safe characters (letters, digits, dot, underscore, hyphen and space; no path separators);
the file extension is in the allow-list;
no video with the same basename already exists on the server.
Post-write checks (after the upload finishes streaming to a temporary file):
the container format is in the allow-list;
the codec is in the allow-list;
the file can be opened by the video decoder.
If any check fails, the temporary file is removed and the request is rejected with an explanatory error (see Upload errors and how to resolve them below).
Supported formats#
The following extensions, container formats, and codecs are accepted by default. Operators can narrow or widen each list through environment variables (see Configuring upload limits).
Group |
Default allow-list |
|---|---|
File extensions |
|
Container formats |
|
Video codecs |
|
The raw container covers H.264 / H.265 elementary streams (files with the .264, .avc, .h265,
or .hevc extension), which have no container wrapper.
What happens after upload#
When all checks pass, ViPPET:
Moves the temporary file into the
uploadeddirectory under its original basename.Probes the video to extract metadata (width, height, frame rate, frame count, codec, duration) and writes a JSON sidecar next to the video.
Converts the video to MPEG-TS (kept alongside the original file) so that pipelines requiring a seekable TS source can use it without re-encoding at run time.
Registers the new entry in the in-memory video cache so it appears immediately in the Videos page and in the Pipeline Builder’s input dropdown.
Where uploaded videos live#
ViPPET stores input videos in two parallel locations inside the shared videos/input/ folder:
Subdirectory |
Contents |
|---|---|
|
Videos auto-downloaded at startup from |
|
Videos uploaded by the user through the Upload button or the |
Filenames are globally unique across the two subdirectories: an upload that collides with an
auto-downloaded recording is rejected with a file_exists error. The auto-generated MPEG-TS copy
and the metadata JSON sidecar live in the same subdirectory as their source file.
Configuring upload limits#
Four environment variables on the vippet-app service control what the upload endpoint accepts.
Change them in compose.yml and restart the stack to take effect.
Variable |
Default |
Description |
|---|---|---|
|
|
Comma-separated list of file extensions accepted by |
|
|
Comma-separated list of container formats accepted after probing the uploaded file. |
|
|
Comma-separated list of video codecs accepted after probing. |
|
|
Maximum accepted upload body size in bytes. Enforced per chunk while streaming the upload to disk. Keep in sync with the |
Tightening these allow-lists never deletes files that are already on disk; it only prevents new
uploads from being accepted. Widening the codec or container list does not implicitly add the
matching file extensions - extend UPLOAD_ALLOWED_EXTENSIONS as well.
Upload errors and how to resolve them#
Every rejected upload returns HTTP 422 with a structured body that carries an error discriminator,
a human-readable detail message, and (where useful) the offending found value plus the allowed
list. The UI surfaces the detail text in the upload dialog.
|
What it means |
How to resolve |
|---|---|---|
|
The request did not include a usable filename, or the filename contained unsafe characters (path separators, control characters, etc.). |
Rename the file to use only letters, digits, dot, underscore, hyphen, and space, and try again. |
|
The file extension is not in |
Convert the file to one of the allowed formats, or ask the operator to extend the allow-list. |
|
The streamed body exceeded |
Split or re-encode the video to a smaller size, or ask the operator to raise the limit (and the matching nginx limit). |
|
Another video with the same basename already exists in |
Rename the file before uploading, or delete the existing entry first. |
|
The probed container format is not in |
Re-encode into a supported container, or ask the operator to extend the allow-list. |
|
The probed video codec is not in |
Re-encode the video into H.264 or H.265, or ask the operator to extend the allow-list. |
|
The video decoder could not open the file. The file is most likely corrupted, truncated, or not actually a video. |
Re-export the file from the original source and try again. |
The endpoint, request body, and full response schema (including the VideoUploadError model) are
also documented in the live OpenAPI reference at /docs (Swagger UI) and /redoc.
Selecting a video as pipeline input#
To use a video as pipeline input, open the Pipeline Builder and click the Input block to see the properties.

From the Source Type dropdown, select Video.
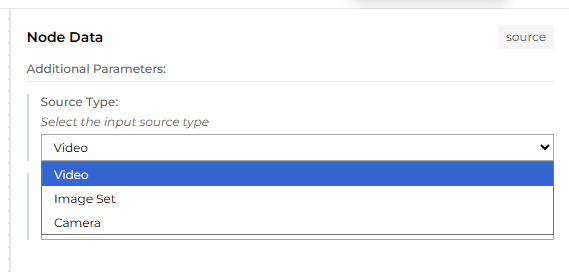
Then, from the Source dropdown, select the desired video.

The selected video will now be used as the pipeline input.