Installation#
Time to Complete: 30-45 minutes
Prerequisites#
Verify you meet the System Requirements.
Install required software such as Docker; see System Requirements for details.
Step 1: Get Scenescape#
Note that these operations must be executed when logged in as a standard (non-root) user. Do NOT use root or sudo.
Download the Scenescape software archive from open-edge-platform/scenescape.
Extract the Scenescape archive on the target Ubuntu system. Change directories to the extracted Scenescape folder.
cd scenescape-<version>
Clone the repository and change directories to the cloned repository:
git clone https://github.com/open-edge-platform/scenescape.git -b main
cd scenescape/
Note: The default branch is main. To work with a stable release version, list the available tags and checkout a specific version tag:
git tag
git checkout <tag-version>
Step 2: Build Scenescape container images#
Build container images:
make
The build may take around 15 minutes depending on target machine. This step generates common base docker image and docker images for all microservices.
By default, a parallel build is being run with the number of jobs equal to the number of processors in the system.
Optionally, the number of jobs can be adjusted by setting the JOBS variable, e.g. to achieve sequential building:
make JOBS=1
(Optional): Build dependency list of Scenescape container images#
make list-dependencies
This step generates dependency lists. Two separate files are created for system packages and Python packages per each microservice image.
Step 3: Deploy Scenescape demo to the target system#
Before deploying the demo of Scenescape for the first time, please set the environment variable SUPASS with the super user password for logging into Scenescape. Important: This should be different than the password for your system user.
export SUPASS=<password>
make demo
make demo uploads the sample scenes once the deployment is healthy by running
make demo-scenes, which creates a local Python virtual environment at
tools/upload_scenes/.venv (installing the requests package there) the
first time it runs. No system-wide package installation is required.
The Docker Compose demo targets are tiered, each building on the previous one:
Target |
Includes |
|---|---|
|
Core services with tracking, without ReID |
|
|
|
|
The ReID targets use VDMS by default. Set REID_BACKEND=qdrant to use Qdrant:
make demo-reid
make demo-reid REID_BACKEND=qdrant
make demo-close remembers the selected override and stops the matching
deployment.
Step 4: Verify a successful deployment#
If you are running remotely, connect using https://<ip_address> or https://<hostname>, using the correct IP address or hostname of the remote Scenescape system. If accessing on a local system use https://localhost. If you see a certificate warning, click the prompts to continue to the site. For example, in Chrome click “Advanced” and then “Proceed to <ip_address> (unsafe)”.
Note: These certificate warnings are expected due to the use of a self-signed certificate for initial deployment purposes. This certificate is generated at deploy time and is unique to the instance.
Logging In#
Enter “admin” for the user name and the value you typed earlier for SUPASS.
Docker Compose Profiles#
Scenescape uses Docker Compose profiles to organize services into logical groups. When starting or stopping services, you must specify the same profile(s) used during deployment.
The following profiles are available:
Profile |
Description |
|---|---|
|
Scene Controller (tracking) + Analytics service. Used by |
|
Enables mapping service. |
|
Enables cluster-analytics service. |
|
Tracker service + Analytics service (no Scene Controller). Used by |
ReID backends: The
demo-reidanddemo-alltargets default to VDMS (REID_BACKEND=vdms); setREID_BACKEND=qdrantto switch. For raw Compose, add exactly one ofsample_data/compose/docker-compose.vdms-override.ymlorsample_data/compose/docker-compose.qdrant-override.yml. Both overrides provide the same logicalreidservice, shared hostreid.scenescape.intel.com, port55555, TLS settings, and certificates. See Selecting the ReID Vector Database Backend.
Profiles can be specified on the command line with --profile:
docker compose --profile controller up -d
Multiple profiles can be combined:
docker compose --profile controller --profile mapping up -d
Alternatively, profiles can be set via the COMPOSE_PROFILES environment variable:
export COMPOSE_PROFILES=controller
docker compose up -d
For multiple profiles, use a comma-separated list:
export COMPOSE_PROFILES=controller,mapping
docker compose up -d
For more details, see the Docker Compose profiles documentation and the COMPOSE_PROFILES environment variable reference.
Note: The
--profileflags used withdocker compose downmust match those used when starting the services. Otherwise, containers started under a specific profile will remain running.
Stopping the System#
To stop the containers, use the following command in the project directory (see Docker Compose Profiles for details on choosing profiles):
docker compose --profile controller down --remove-orphans
Starting the System#
To start after the first time, use the following command in the project directory:
docker compose --profile controller up -d
Summary#
Scenescape was downloaded, built and deployed onto a fresh Ubuntu system. Using the web user interface, Scenescape provides two scenes by default that can be explored running from stored video data.
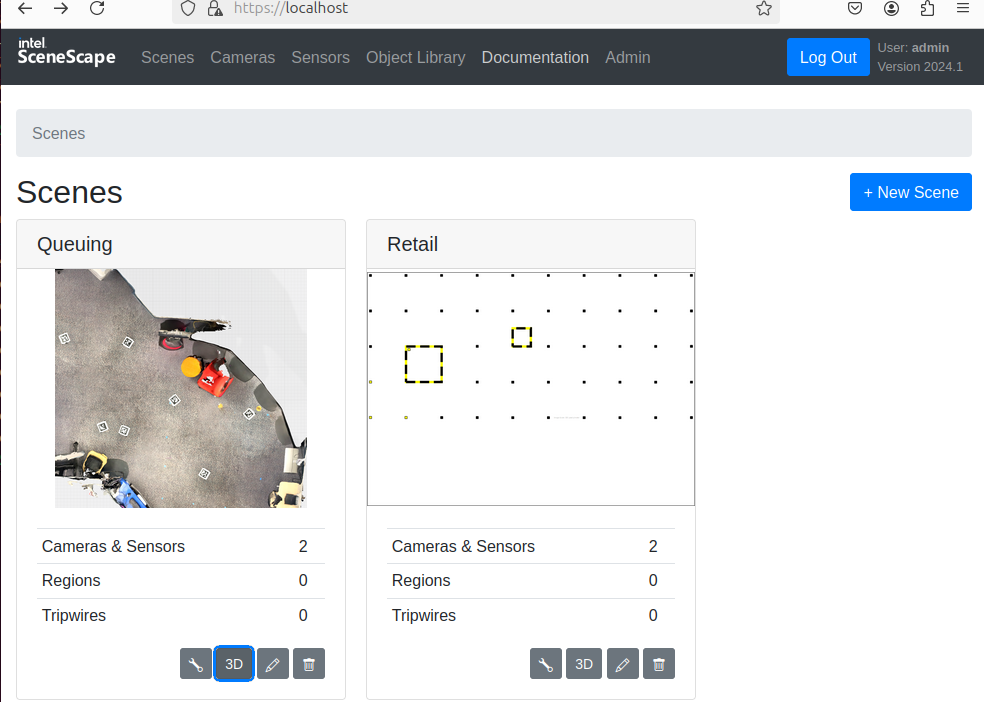
Note: The “Documentation” menu option allows you to view Scenescape HTML version of the documentation in the browser.
Next Steps#
Check Deploy Scenescape for step-by-step instructions on how to deploy Scenescape using prebuilt Docker images.
Explore other topics#
How to Define Object Properties: Step-by-step guide for configuring the properties of an object class.
How to enable reidentification: Step-by-step guide to enable reidentification.
Viewing Re-identification Metrics: Guide for exposing and querying ReID match-latency, camera-count, and tracked-object-count metrics via OpenTelemetry.
How to Enable Observability (Experimental): Guide for enabling OpenTelemetry-based metrics and distributed traces for the Scene Controller and Tracker Service.
Geti AI model integration: Step-by-step guide for integrating a Geti trained AI model with Scenescape.
Running License Plate Recognition with 3D Object Detection: Step-by-step guide for running license plate recognition with 3D object detection.
How to Configure DL Streamer Video Pipeline: Step-by-step guide for configuring DL Streamer video pipeline.
Model configuration file format: Model configuration file overview.
How to Manage Files in Volumes: Step-by-step guide for managing files in Docker and Kubernetes volumes.
Additional Resources#
How to upgrade Scenescape: Step-by-step guide for upgrading from an older version of Scenescape.
How Scenescape converts Pixel-Based Bounding Boxes to Normalized Image Space
Hardening Guide for Custom TLS: Optimizing security posture for a Scenescape installation.