Deploy with Trusted Compute#
This guide shows you how to:
Set up the agent with Trusted Compute using the automated setup script for hardware-isolated deployment.
Install and configure Trusted Compute on your host system.
Access the agent’s features to explore its functionality with enhanced security.
Configure settings to suit specific requirements.
Intel Trusted Compute runs workloads inside hardware-isolated VMs, protecting inference workloads and model data from untrusted co-tenants on the same host.
Prerequisites#
Before you begin, ensure the following:
System requirements: Verify that your system meets the minimum requirements.
Minimum RAM: 32GB RAM is required for Trusted Compute deployments.
Docker platform: Install Docker platform. For installation instructions, see Get Docker.
Message Queuing Telemetry Transport (MQTT) Broker: Ensure access to an MQTT broker for traffic data streaming, or use the included broker.
Docker commands and terminal usage: You are familiar with Docker commands and using the terminal. If you are new to Docker, see Docker Documentation for an introduction.
Hugging Face token: Set your token using
export HUGGINGFACE_TOKEN="<your-huggingface-token>"Registry configuration: To pull pre-built images from a specific registry, set the
REGISTRYandTAGparameters. The recommended default setting is below.export REGISTRY="intel" export TAG="latest"
Additional Prerequisites for GPU Deployment:
Intel CPU with VT-x and VT-d, integrated GPU, and IOMMU enabled in BIOS/UEFI
Linux kernel with IOMMU, VFIO, and DRM/i915 or xe driver support
Note: When GPU passthrough is enabled, the iGPU is exclusively bound to the Trusted Compute VM and is unavailable to the host or other workloads.
1. Install Trusted Compute#
Follow the Trusted Compute baremetal installation guide to install Trusted Compute version 1.5.3 or later on your host system. Complete the following sections:
Prerequisites
Download the Trusted Compute Package
Docker Option
2. Setup and Prepare for Deployment#
Intel recommends using the automated setup script that handles environment configuration, dependencies setup, secrets generation, building, and deployment of the Smart Traffic Intersection Agent.
1. Clone the Suite#
Go to the target directory of your choice and clone the suite.
If you want to clone a specific release branch, replace main with the desired tag.
To learn more on partial cloning, check the Repository Cloning guide.
git clone --filter=blob:none --sparse --branch main https://github.com/open-edge-platform/edge-ai-suites.git
cd edge-ai-suites
git sparse-checkout set metro-ai-suite
cd metro-ai-suite/smart-traffic-intersection-agent/
2. Set the required environment variables#
export VLM_MODEL_NAME=<supported_model_name> # eg. OpenVINO/Phi-3.5-vision-instruct-int8-ov, OpenVINO/InternVL2-1B-int4-ov
The application has been validated with following models:
Model |
|
|---|---|
Microsoft Phi-3.5 Vision (pre-converted) |
|
Microsoft Phi-3.5 Vision (raw, auto-converted) |
|
Qwen2-VL 2B (pre-converted) |
|
Qwen2-VL 7B (pre-converted) |
|
InternVL2 1B (pre-converted) |
|
Note: Both pre-converted OpenVINO models (under the
OpenVINO/namespace on Hugging Face) and raw Hugging Face VLM models (for example,microsoft/Phi-3.5-vision-instruct) are supported. Raw models are automatically downloaded and converted to OpenVINO format during setup.
IMPORTANT: See this disclaimer before using any AI Model.
3. Configure Network Settings (Optional)#
By default, Trusted Compute uses the subnet 172.20.0.0/16 for isolated container networking. If this subnet conflicts with your existing networks, you can customize it before deployment.
Requirements:
Subnet format must be exactly
172.X.0.0/16where X is between 18-31 (RFC 1918 private IP range)The subnet must not conflict with existing Docker networks on your system
DNS relay service will be automatically configured at
172.X.0.200
Example:
# Optional: Customize the subnet if needed (default is 172.20.0.0/16)
export TC_SUBNET=172.25.0.0/16  # DNS relay will be at 172.25.0.200
3. Deploy the Application#
Choose one of the following paths based on whether you need GPU acceleration.
Option A: CPU Deployment#
Deploy the Smart Traffic Intersection Agent with Trusted Compute enabled on CPU:
# Deploy with Trusted Compute enabled
export ENABLE_TC=true
source ./setup.sh --setup
This single command will:
Set required environment variables with default values
Set up dependencies required for Smart Traffic Intersection Agent
Generate the required TLS certificates and authentication files
Download demo video files for testing
Build Docker images
Start services in the Smart Traffic Intersection Agent’s application stack with Trusted Compute enabled
Option B: GPU Deployment#
Step 1: Bind GPU to vfio-pci#
Note: Binding the GPU stops the display manager and disables the graphical display on the host. Run this step over SSH. The display is restored after running the
unbindcommand.
Use the intel-igpu-vfio-bind.sh script from the tools/ directory of the Trusted Compute package installed in Step 1 to bind the Intel iGPU to the vfio-pci driver.
sudo ./tools/intel-igpu-vfio-bind.sh bind
Verify the GPU is bound correctly:
lspci -nnk -d 8086: | grep -A 3 "VGA\|Display"
The output should show Kernel driver in use: vfio-pci for your Intel GPU.
Step 2: Deploy with GPU Enabled#
# Deploy with Trusted Compute and GPU enabled
export ENABLE_TC=true
export VLM_TARGET_DEVICE=GPU
source ./setup.sh --setup
Run Alternative Setup Options#
For a more granular control, run these commands:
#  Set environment variables without building image or starting any containers
source setup.sh --setenv

# Build service images only (without starting containers)
source setup.sh --build

# Start services without building the image
source setup.sh --run

# Stop services
source setup.sh --stop

# Restart services. The variable `service_type` can be set to `agent`, `deps`, and `all`. Run with --help to get details of each type.
source setup.sh --restart [service_type]

# Clean up containers. Run with --help to get details of the option.
source setup.sh --clean [option]
4. Accessing the Services#
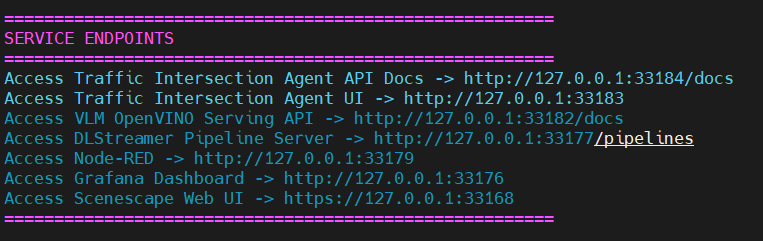
After the setup process completes, the URLs for all services are displayed on the terminal. You can get the URL for Traffic Intersection Agent UI and Traffic Intersection Agent API Docs from the response, and access it in a web browser.
The following is a sample response that you might get at script completion, which displays the URLs for accessing the relevant services:
Advanced Configuration and Operations#
For advanced configuration options and operational tasks, refer to the following sections in the Get Started guide:
Running Multiple Instances: Set up multiple STIA instances for testing or development purposes
Advanced Environment Configuration: Customize environment variables and configuration settings
Upgrading: Update to newer versions of STIA
Troubleshooting: Common issues and solutions
5. Clean Up the Deployment#
Follow the steps below in order to cleanly remove the deployment.
Step 1. Stop and Remove the Containers:
To stop and remove the Smart Traffic Intersection Agent containers:
source ./setup.sh --clean
Step 2. Revert GPU Binding (if deployed with GPU):
On each host where the GPU was bound, unbind it from vfio-pci:
sudo ./tools/intel-igpu-vfio-bind.sh unbind
This will restore the display manager and graphical display on the host.
Step 3. Uninstall Trusted Compute (optional):
To uninstall Trusted Compute from the host, refer to the Trusted Compute documentation.
Other Deployment Options#
For Kubernetes-based deployments with Trusted Compute:
Deploy with Helm and Trusted Compute: Use Helm to deploy the application with Trusted Compute to a Kubernetes cluster for scalable and production-ready deployments with hardware isolation.
Learn More#
System Requirements: Hardware and software requirements
Trusted Compute Documentation: Complete guide to Intel Trusted Compute
Troubleshooting: Common issues and solutions