Preliminary System Configuration#
Before running RVC for the first time, ensure proper configuration has occurred:
Camera
Integration: These demonstrations support all Intel® RealSense™ D4xx cameras, though were designed with the D415.
Universal Robots
Communication: The robot must be properly configured to interface with the Intel® platform.
Calibration Procedure: Extract the robot’s calibration parameters from the physical robot to ensure accurate operation.
Home Pose: Verify and set the robot’s default home pose according to its real-world configuration.
Camera#
The RVC demonstrations assume use of the Intel® RealSense™ D415 camera. If you plan on exploring these exercises with a different model (e.g., D435, D455), the below modifications are required.
Integration#
A .xacro file is an XML-based macro language that lets one define reusable components and parameters. With xacro, one can construct shorter and more readable XML files by using macros that expand to larger XML expressions. This is used to avoid repetition, improve readability, and make robot models configurable (e.g., by passing arguments).
In the case of the Intel® RealSense™ D4xx cameras, the .xacro file for each device are stored in the realsense2_description package. Each exemplary use case requires one to extend these files and provide the cameras origin within the physical world. Below is an example of an .xacro extension for the D455f to be used in the Dynamic Use Case. Note that the origin is placing the camera within the world frame at a specific location while referencing the Intel-provided xacro file found in the realsense2_description package.
<robot name="d455_camera" xmlns:xacro="http://ros.org/wiki/xacro">
    <xacro:arg name="use_nominal_extrinsics" default="false"/>
    <xacro:arg name="name" default="cameraipc0"/>
    <xacro:include filename="$(find realsense2_description)/urdf/_d455.urdf.xacro" />
    <link name="world" />
    <xacro:sensor_d455 parent="world" name="$(arg name)"  use_nominal_extrinsics="$(arg use_nominal_extrinsics)" >
        <origin xyz="0.36 0.66 0.755" rpy="-3.141592654 1.570796327 -1.570796327"/>
    </xacro:sensor_d455>
</robot>
The important part is the origin:
<origin xyz="0.36 0.66 0.755" rpy="-3.141592654 1.570796327 -1.570796327"/>
The xyz triplet is expressed in meters, and the rpy is in radians, both express respectively
the cartesian coordinates of the base of the camera in reference to the world frame_id, which should
coincide with the center of the base of the robot, if not modified. These numbers are important because
if not accurate, the robot will not go to the proper location when picking the objects, as the detection
is in reference system of the camera, and the system has to transform it to robot reference system,
and these numbers give the relation between the two systems.
Each demonstration utilizes these files, if you have selected a camera other than the D415, you will need to create an .xacro extension and store it in the correct location. Again, if doing so please note that the camera location within the physical world must match the original configuration or you will need to retrain the neural network processing the streams.
Use Case |
Package |
Location |
File Name |
|---|---|---|---|
Static |
rvc_static_motion_controller_use_case |
|
d415cameraipc.xacro |
Dynamic |
rvc_static_motion_controller_use_case arm |
|
d415cameraipc.xacro |
Note: Every component has an option to change the default namespace:
namespace:=<namespace>which by default is “ipc”. When specified, the components will only see other components if they have same namespaces and the associated .xacro files must be named as seen in the above table (e.g.d415camera<namespace>.xacro).
Universal Robots Configuration#
The real robot or the simulator must be configured to accept connection from RVC and configure the RVC system for real time capabilities.
Set up Universal Robots UR5e Robot#
This section briefly discusses the steps to set up the Universal Robots UR5e robot.
Note: For more details, refer to the Universal Robots repositories README to configure the robot.
Set up Private Local Network#
One of the key considerations with Universal Robots is that the network connection between the controlling AI running RVC and the robot must be a direct Ethernet connection.
Install external_control.urcap#
Configure the URCaps for the robot and the Robotiq 2F-85 URCap. For details, refer to Connect to External Control via URCap.
After installing external_control.urcap, the screen, shown in the following figure, will be displayed.

Note: Replace the IP in the figure with your Intel target private network IP connected to the robot.
Note: Before starting the demonstration, make sure that the Speed slider, shown in the figure, is set around 70%. Even if the speed is set above 70%, the robot will operate; however, higher speeds might damage the bolts that connect the base of the robot to the table. Do the same for the Rviz2 speed slider as well.
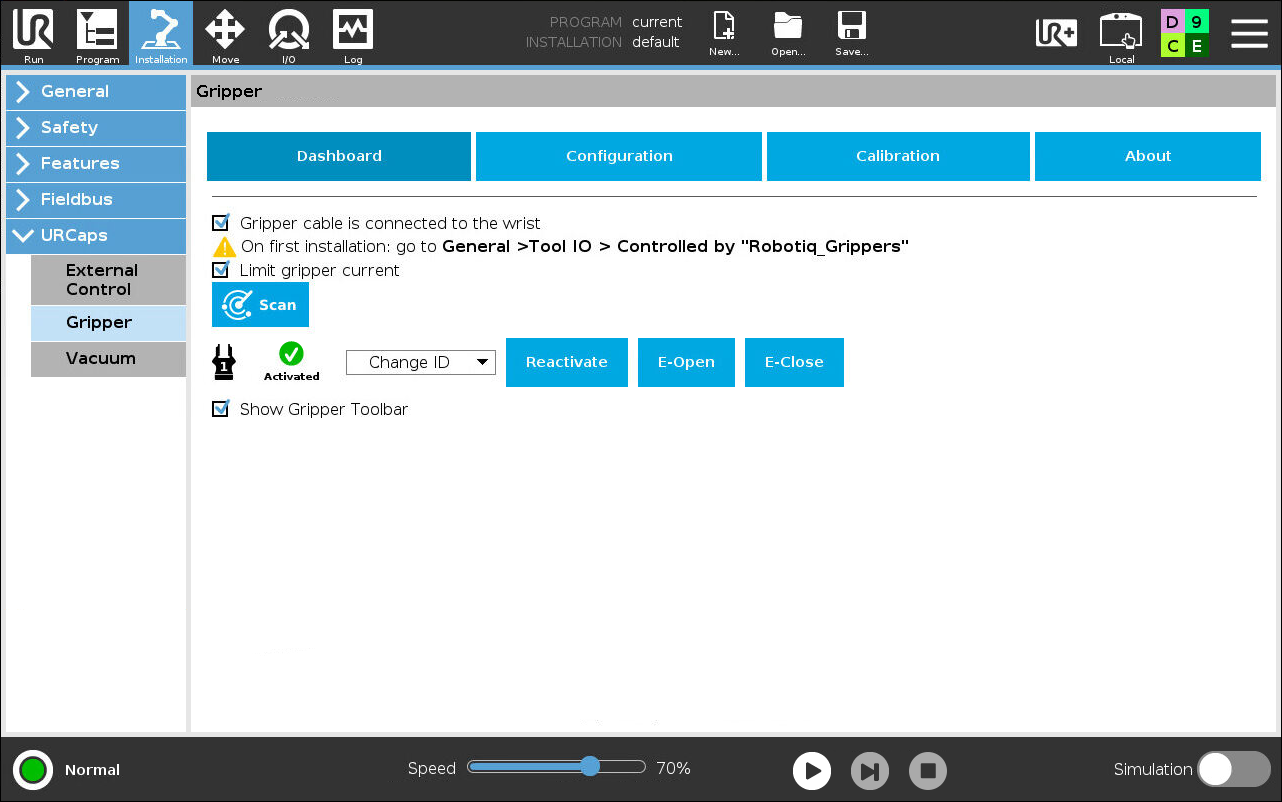
Install Gripper URCaps#
The URCaps are available on the Robotiq Support website.
To download the latest Gripper URCaps, click 2F-85 and 2F-140 Grippers. From there, click Universal Robots. Then, click Software and choose the Gripper URCap package to download.
Install these URCaps on the UR5e robot teach pendant using a USB drive.
Restart the robot. Select Program Robot on the Welcome screen. Go to the Installation tab. Select Gripper listed under URCaps.
Overwrite Model-specific Kinematics Parameters (Calibration)#
There might be slight differences (variance) in the physical attributes of various robots. To address this issue, the robot is calibrated at the factory and the variance in these parameters is saved on the robot controller file system. Extract the kinematics parameters specific to your robot and overwrite the distributed parameters file. This avoids the robot accumulating errors in inverse kinematics computation due to parameter variance.
For information on the Universal Robots robot calibration, refer to README.md.
Note: If the calibration parameters do not match with that of the real robot, the motion controller logs will show the following message:
[ros2_control_node-1] [INFO] [1665059043.476735447] [URPositionHardwareInterface]: Calibration checksum: 'calib_12788084448423163542'.
[ros2_control_node-1] [ERROR] [1665059044.504667587] [URPositionHardwareInterface]: The calibration parameters of the connected robot don't match the ones from the given kinematics config file. Be aware that this can lead to critical inaccuracies of tcp positions. Use the ur_calibration tool to extract the correct calibration from the robot and pass that into the description. See [https://github.com/UniversalRobots/Universal_Robots_ROS_Driver#extract-calibration-information] for details.
Calibration Example#
Execute:
ros2 launch ur_calibration calibration_correction.launch.py robot_ip:=<robot_ip> target_filename:=./thisur5e_kinematics.yaml
Make sure to overwrite the result file at:
<urdriverinstallpath>/Universal_Robots_ROS2_Description/config/ur5e/thisur5e_kinematics.yaml
For example, in this demonstration, the result file is in:
<urdescriptioninstallpath>/ur_description/config/ur5e/default_kinematics.yaml
If everything is correct, you will see an informational message instead of the error message.
[ros2_control_node-1] [INFO] [1665059758.619735683] [URPositionHardwareInterface]: Calibration checksum: 'calib_10395257169742499224'.
[ros2_control_node-1] [INFO] [1665059759.696690136] [URPositionHardwareInterface]: Calibration checked successfully.
Notice the different checksums.
Create Program#
To use the new URCaps, enabling the communication with the Intel® architecture RVC controller, create a new program on the teaching pendant and insert the External Control program node in the program tree.
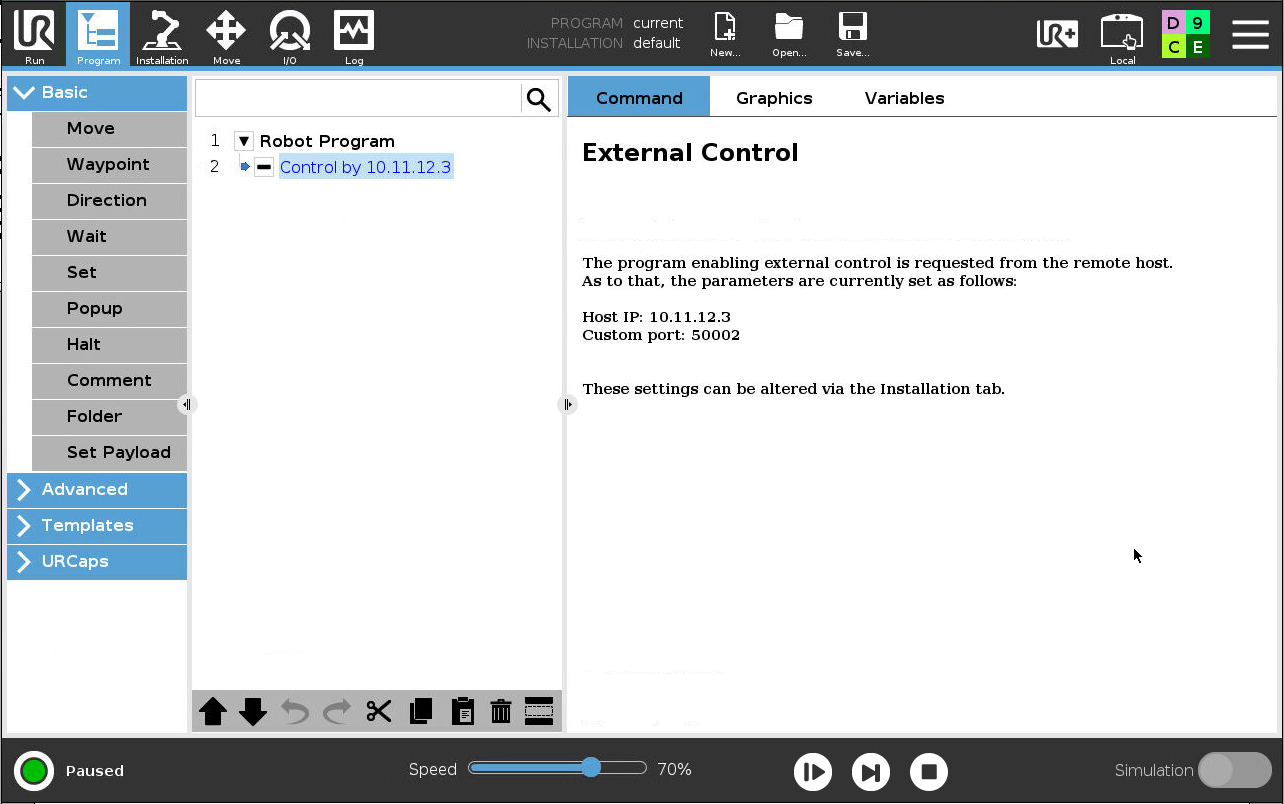
Note: Make sure that you have replaced Host IP with your IA RVC controller private network IP connected to the robot.
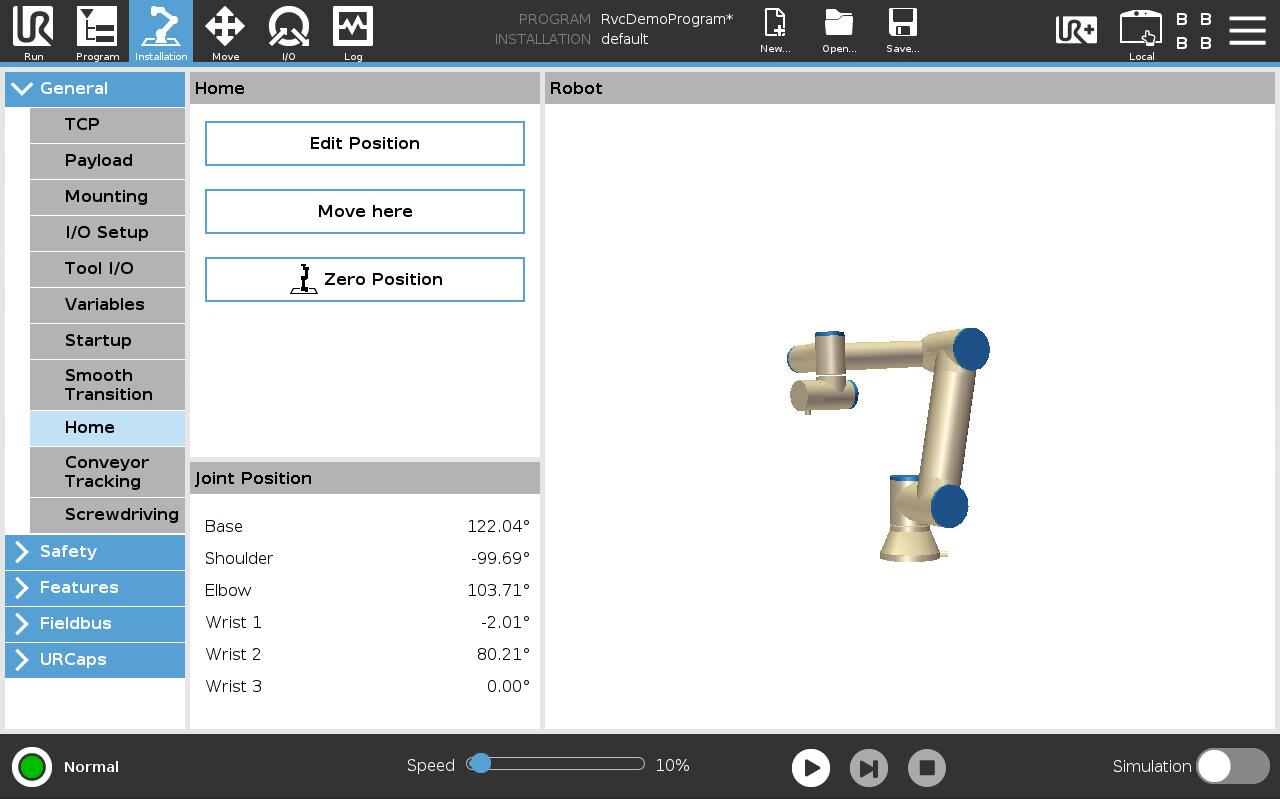
Robot Home Pose#
We strongly recommend positioning the physical robot, as seen below, prior to executing any of the provided use cases. This ensures that the robot begins from a well-defined and safe reference configuration, allowing the calibration parameters and motion sequences to align precisely with the expectations of the RVC framework. Always verify that the robot is correctly homed before initiating any automated behavior.
Joint |
Degrees |
|---|---|
Base |
122° |
Shoulder |
-100° |
Elbow |
104° |
Wrist 1 |
0° |
Wrist 2 |
80° |
Wrist 3 |
0° |