Imitation Learning - ACT#
Imitation learning is a machine learning approach where a model is trained to mimic expert behavior by observing and replicating demonstrations, enabling it to perform tasks similarly to the expert. ACT is an action chunking policy with Transformers, an architecture designed for sequence modeling. It is trained as a conditional VAE (CVAE) to capture the variability in human data. It significantly outperforms previous imitation learning algorithms on a range of simulated and real-world fine manipulation tasks.
We have built an imitation learning pipeline for ACT, which can be used to train and evaluate the ACT model on different tasks both in simulation and real robot environment. In this sample pipeline, we provided source code optimized by OpenVINO™ to accelerate the process.
In this tutorial, we will introduce how to setup ACT pipeline.
Source Code#
The source code of this component can be found here: ACT-Sample
Prerequisites#
Ensure you have completed the setup steps in Get Started.
Installation#
ALOHA real robot environment setup (Optional)#
Follow the stationary ALOHA guide to build real robot platform.
Virtual environment setup#
Create a Python 3.10 virtual environment with the following command:
sudo apt install python3-venv
python3 -m venv act
Activate the virtual environment with the following command:
source act/bin/activate
Install OpenVINO™#
Install the OpenVINO™ with the following command:
pip install openvino==2025.2.0
Dependencies setup#
Install the dependencies with the following command:
pip install torch==2.7.1 torchvision==0.22.1 pyquaternion==0.9.9 pyyaml==6.0 rospkg==1.5.0 pexpect==4.8.0 mujoco==3.2.6 dm_control==1.0.26 matplotlib==3.10.0 einops==0.6.0 packaging==23.0 h5py==3.12.1 ipython==8.12.0 opencv-python==4.10.0.84 transformers==4.37.0 accelerate==0.23.0 huggingface-hub==0.24.7
Note: Usually, pip tries to download a pre-compiled wheel package so you don’t have to build anything in this step. Maintainers may have not uploaded pre-compiled wheels for versions newer than the LTS version yet.
Because of this, pip may fall back to building from source, which triggers the need for compilers and tools like Bazel. Additional build tools may be required to build some of the dependencies from source. If you encounter errors during installation, either switch to a different python version or check the error messages for missing tools or libraries and install them accordingly.
Install ACT package#
The Embodied Intelligence SDK provides optimized source code for OpenVINO™. To get the source code from /opt/act-ov/ with the following command:
sudo apt install act-ov
sudo chown -R $USER /opt/act-ov/
After installing the act-ov package, follow the README.md file in /opt/act-ov/ to set up the complete source code environment.
Install DETR#
Install the DETR with the following command:
cd <act_SOURCE_CODE_PATH>/detr
pip install -e .
Run pipeline#
Inference#
You can download our pre-trained weights from this link: Download Link. The command of training is the same as above, but you need to set the argument
--ckpt_dirto the path of the pre-trained weights.Convert the model checkpoint to OpenVINO IR.
ov_convert.pyis a script provided to convert the PyTorch model to OpenVINO IR. You can find the script in theact-ovdirectory, and see the usage with the following command:cd <act_SOURCE_CODE_PATH> python3 ov_convert.py -h
For example, you can convert the model with the following command:
python3 ov_convert.py --ckpt_path <your_ckpt_path> --height 480 --weight 640 --camera_num 4 --chunk_size 100
Attention: Please make sure the arguments
--chunk_size,--kl_weight,--hidden_dim,--dim_feedforward,--camera_numare the same as the training arguments.The pipeline supports configurations with up to four cameras. You can modify the
constants.pyfile in the source directory to define the number of cameras. Below are examples of configurations for four cameras and one camera:# In <act_SOURCE_CODE_PATH>/constants.py SIM_TASK_CONFIGS = { 'sim_insertion_scripted': { 'dataset_dir': DATA_DIR + '/sim_insertion_scripted', 'num_episodes': 50, 'episode_len': 400, 'camera_names': ['top', 'angle', 'left_wrist', 'right_wrist'] }, }
Below is a camera viewer showcasing four different camera perspectives, the left one is the
anglecamera, and the right one is thetopcamera. The middle two are theleft and right wristcameras, respectively.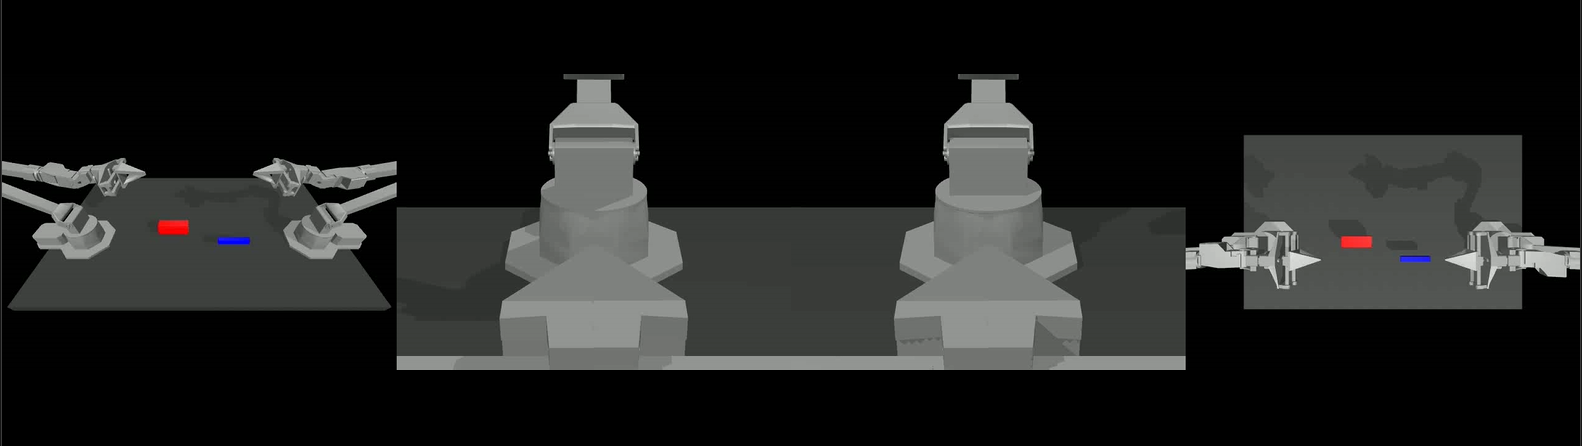
Evaluate the policy with the following command:
python3 imitate_episodes.py --task_name sim_insertion_scripted --ckpt_dir <ckpt dir> --policy_class ACT --kl_weight 10 --chunk_size 100 --hidden_dim 512 --batch_size 8 --dim_feedforward 3200 --num_epochs 2000 --lr 1e-5 --seed 0 --device GPU --eval
Note:
--evalis used to evaluate the policy.--deviceis used to set the device to CPU or GPU.--temporal_aggcan be used to enable the temporal aggregation algorithm.--onscreen_rendercan be used to enable onscreen rendering (requires python3-tk debian package install).MUJOCO_GL=eglenvironment variable can be set to enable EGL rendering, which provides better performance in simulation scenarios.
If the script throws an
unrecognized arguments --deviceerror, then the updated ACT package has not been installed correctly. Ensure to runpip install -e .in the correct directory.When the
--onscreen_renderparameter is enabled, the successful inference result appears as follows: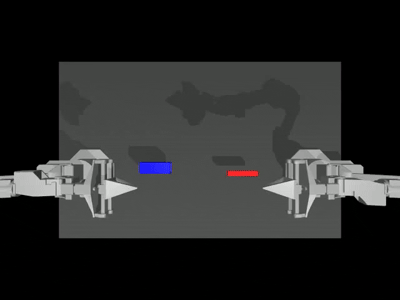
Training (Optional)#
Attention: Please refer to the ALOHA paper for instructions on setting up a machine with the training environment.
Generate 50 episodes with the following command:
# Bimanual Insertion task
python3 record_sim_episodes.py --task_name sim_insertion_scripted --dataset_dir <data save dir> --num_episodes 50
Visualize the episode with the following command:
python3 visualize_episodes.py --dataset_dir <data save dir> --episode_idx 0
Train ACT with the following command:
# Bimanual Insertion task
python3 imitate_episodes.py --task_name sim_insertion_scripted --ckpt_dir <ckpt dir> --policy_class ACT --kl_weight 10 --chunk_size 100 --hidden_dim 512 --batch_size 8 --dim_feedforward 3200 --num_epochs 2000  --lr 1e-5 --seed 0