Step-by-step Setup#
If you want to manually setup Robotics AI Suite on your system, this step-by-step guide will configure and install the necessary content on your system. If you prefer to perform the steps automatically, use the Express Setup guide.
1. Install Canonical Ubuntu OS#
Intel recommends a fresh installation of the Ubuntu distribution of the Linux OS for your target system.
The manual installation only supports Install Canonical Ubuntu 24.04 LTS (Noble Numbat) Desktop on the supported platform. See System Requirements for the supported configuration.
2. Install and Configure ROS 2#
Follow the ROS 2 Runtime guide to install ROS 2 Jazzy and configure the environment.
3. Set up Robotics AI Suite, oneAPI, and Graphics APT Repositories#
This section explains the procedure to configure the APT package manager to use the hosted APT repositories.
Open a terminal prompt which will be used to execute the remaining steps.
Download the GPG APT key for the Robotics AI Suite to the system keyring:
sudo -E wget -O- https://amrdocs.intel.com/repos/gpg-keys/GPG-PUB-KEY-INTEL-AMR.gpg | sudo tee /usr/share/keyrings/amr-archive-keyring.gpg > /dev/null
Add the signed entry to the Robotics AI Suite APT sources and configure the APT client to use them:
echo "deb [signed-by=/usr/share/keyrings/amr-archive-keyring.gpg] https://amrdocs.intel.com/repos/$(source /etc/os-release && echo $VERSION_CODENAME) amr main" | sudo tee /etc/apt/sources.list.d/amr.list > /dev/null
echo "deb-src [signed-by=/usr/share/keyrings/amr-archive-keyring.gpg] https://amrdocs.intel.com/repos/$(source /etc/os-release && echo $VERSION_CODENAME) amr main" | sudo tee -a /etc/apt/sources.list.d/amr.list > /dev/null
Configure the Robotics AI Suite APT repository to have higher priority over other repositories:
echo -e "Package: *\nPin: origin amrdocs.intel.com\nPin-Priority: 1001" | sudo tee /etc/apt/preferences.d/amr
Configure the APT repository for the Intel® oneAPI Base Toolkit:
wget -O- https://apt.repos.intel.com/intel-gpg-keys/GPG-PUB-KEY-INTEL-SW-PRODUCTS.PUB | gpg --dearmor | sudo tee /usr/share/keyrings/oneapi-archive-keyring.gpg > /dev/null
echo "deb [signed-by=/usr/share/keyrings/oneapi-archive-keyring.gpg] https://apt.repos.intel.com/oneapi all main" | sudo tee /etc/apt/sources.list.d/oneAPI.list > /dev/null
echo -e "Package: intel-oneapi-runtime-*\nPin: version 2025.3.*\nPin-Priority: 1001\n" | sudo tee /etc/apt/preferences.d/oneapi > /dev/null
echo -e "Package: intel-oneapi-compiler-*\nPin: version 2025.3.*\nPin-Priority: 1001\n" | sudo tee -a /etc/apt/preferences.d/oneapi > /dev/null
echo -e "Package: intel-oneapi-mkl-*\nPin: version 2025.3.*\nPin-Priority: 1001" | sudo tee -a /etc/apt/preferences.d/oneapi > /dev/null
For the latest Intel graphics support, add the
kobukPPA. For Ubuntu 22,kisakis used:sudo -E add-apt-repository -y ppa:kobuk-team/intel-graphics
sudo -E add-apt-repository -y ppa:kisak/kisak-mesa
4. Install OpenVINO™ Packages#
The following steps will add the OpenVINO™ APT repository to your package management.
Install the OpenVINO™ GPG key:
wget -O- https://apt.repos.intel.com/intel-gpg-keys/GPG-PUB-KEY-INTEL-SW-PRODUCTS.PUB | gpg --dearmor | sudo tee /usr/share/keyrings/openvino-archive-keyring.gpg > /dev/null
Add the APT package sources for OpenVINO™ 2025:
echo "deb [signed-by=/usr/share/keyrings/openvino-archive-keyring.gpg] https://apt.repos.intel.com/openvino/2025 ubuntu24 main" | sudo tee /etc/apt/sources.list.d/intel-openvino-2025.list
echo "deb [signed-by=/usr/share/keyrings/openvino-archive-keyring.gpg] https://apt.repos.intel.com/openvino/2025 ubuntu22 main" | sudo tee /etc/apt/sources.list.d/intel-openvino-2025.list
Run the following commands to create the file
/etc/apt/preferences.d/intel-openvino.This will pin the OpenVINO™ version to 2025.3.0. Earlier versions of OpenVINO™ might not support inferencing on the NPU of Intel® Core™ Ultra processors.
echo -e "\nPackage: openvino-libraries-dev\nPin: version 2025.3.0*\nPin-Priority: 1001" | sudo tee /etc/apt/preferences.d/intel-openvino
echo -e "\nPackage: openvino\nPin: version 2025.3.0*\nPin-Priority: 1001" | sudo tee -a /etc/apt/preferences.d/intel-openvino
echo -e "\nPackage: ros-jazzy-openvino-wrapper-lib\nPin: version 2025.3.0*\nPin-Priority: 1002" | sudo tee -a /etc/apt/preferences.d/intel-openvino
echo -e "\nPackage: ros-jazzy-openvino-node\nPin: version 2025.3.0*\nPin-Priority: 1002" | sudo tee -a /etc/apt/preferences.d/intel-openvino
echo -e "\nPackage: openvino-libraries-dev\nPin: version 2025.3.0*\nPin-Priority: 1001" | sudo tee /etc/apt/preferences.d/intel-openvino
echo -e "\nPackage: openvino\nPin: version 2025.3.0*\nPin-Priority: 1001" | sudo tee -a /etc/apt/preferences.d/intel-openvino
echo -e "\nPackage: ros-humble-openvino-wrapper-lib\nPin: version 2025.3.0*\nPin-Priority: 1002" | sudo tee -a /etc/apt/preferences.d/intel-openvino
echo -e "\nPackage: ros-humble-openvino-node\nPin: version 2025.3.0*\nPin-Priority: 1002" | sudo tee -a /etc/apt/preferences.d/intel-openvino
If you decide to use a different OpenVINO™ version, ensure that all four packages (
openvino-libraries-dev,openvino,ros-jazzy-openvino-wrapper-lib, andros-jazzy-openvino-node) are pinned to the same OpenVINO™ version.
4.1 Install the OpenVINO™ Runtime and the ROS 2 OpenVINO™ Toolkit#
The following steps will install the OpenVINO™ packages:
Ensure all APT repositories are updated:
sudo apt update
Install the Intel® Graphics Compute Runtime:
sudo apt install -y libze1 libze-intel-gpu1
Install
debconf-utilities:sudo apt install debconf-utils
Clear any previous installation configurations:
sudo apt purge ros-jazzy-openvino-node
sudo apt autoremove -y
echo PURGE | sudo debconf-communicate ros-jazzy-openvino-node
sudo apt purge ros-humble-openvino-node
sudo apt autoremove -y
echo PURGE | sudo debconf-communicate ros-humble-openvino-node
Install the OpenVINO™ Runtime:
sudo apt install openvino
Install the ROS 2 OpenVINO™ Node:
sudo -E apt install ros-jazzy-openvino-node
sudo -E apt install ros-humble-openvino-node
During the installation of the “openvino-node” package, you will be prompted to decide whether to install the OpenVINO™ IR formatted models. Answer
yes.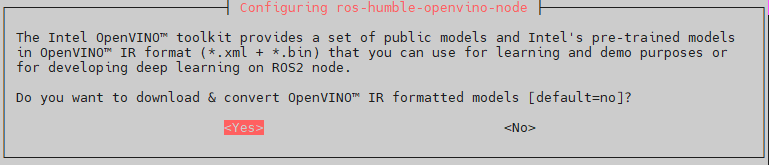
4.2 OpenVINO™ Re-Installation and Troubleshooting#
If you need to reinstall OpenVINO™ or clean your system after a failed installation, run the following commands:
sudo apt purge ros-jazzy-openvino-node
sudo apt autoremove -y
echo PURGE | sudo debconf-communicate ros-jazzy-openvino-node
sudo apt install ros-jazzy-openvino-node
sudo apt purge ros-humble-openvino-node
sudo apt autoremove -y
echo PURGE | sudo debconf-communicate ros-humble-openvino-node
sudo -E apt install ros-humble-openvino-node
5. Install RealSense Camera SDK#
RealSense SDK is a cross-platform library for RealSense depth cameras. The SDK allows depth and color streaming, and provides intrinsic and extrinsic calibration information. The library also offers synthetic streams (pointcloud, depth aligned to color and vise-versa), and a built-in support for record and playback of streaming sessions.
RealSense SDK includes support for ROS and ROS 2, allowing you access to commonly used robotic functionality with ease.
Register the server’s public key:
sudo mkdir -p /etc/apt/keyrings
curl -sSf https://librealsense.realsenseai.com/Debian/librealsenseai.asc | gpg --dearmor | sudo tee /etc/apt/keyrings/librealsenseai.gpg > /dev/null
Add RealSense to the list of repositories:
echo "deb [signed-by=/etc/apt/keyrings/librealsenseai.gpg] https://librealsense.realsenseai.com/Debian/apt-repo `lsb_release -cs` main" | sudo tee /etc/apt/sources.list.d/librealsense.list
Update your APT repository caches after setting up the repository:
sudo apt update
Install the RealSense drivers and libraries:
sudo apt-get install -y --allow-downgrades ros-jazzy-librealsense2
sudo apt install librealsense2-dkms
sudo apt install librealsense2
sudo apt-get install -y --allow-downgrades ros-humble-librealsense2
sudo apt install librealsense2-dkms
sudo apt install librealsense2
6. Install Robotics AI Suite Deb packages#
This section details steps to install Robotics AI Suite Deb packages.
Before using the Robotics AI Suite APT repositories, update the APT packages list:
sudo apt update
The APT package manager will download the latest list of packages available for all configured repositories.

Follow the instructions to install Gazebo:
sudo apt-get update
sudo apt-get install curl lsb-release gnupg

sudo -E curl https://packages.osrfoundation.org/gazebo.gpg --output /usr/share/keyrings/pkgs-osrf-archive-keyring.gpg
echo "deb [arch=$(dpkg --print-architecture) signed-by=/usr/share/keyrings/pkgs-osrf-archive-keyring.gpg] https://packages.osrfoundation.org/gazebo/ubuntu-stable $(lsb_release -cs) main" | sudo tee /etc/apt/sources.list.d/gazebo-stable.list > /dev/null
sudo apt-get update
sudo apt-get install gz-harmonic
sudo apt-get update
sudo apt-get install curl lsb-release gnupg

sudo -E add-apt-repository ppa:openrobotics/gazebo11-gz-cli
sudo -E curl https://packages.osrfoundation.org/gazebo.gpg --output /usr/share/keyrings/pkgs-osrf-archive-keyring.gpg
echo "deb [arch=$(dpkg --print-architecture) signed-by=/usr/share/keyrings/pkgs-osrf-archive-keyring.gpg] https://packages.osrfoundation.org/gazebo/ubuntu-stable $(lsb_release -cs) main" | sudo tee /etc/apt/sources.list.d/gazebo-stable.list > /dev/null
sudo apt-get update
Choose the Autonomous Mobile Robot Deb package to install.
ros-jazzy-robotics-sdk The standard version of the Autonomous Mobile Robot. This package includes almost everything except for a handful of tutorials and bag files.
ros-jazzy-robotics-sdk-complete The complete version of the Autonomous Mobile Robot. It also includes those items excluded from the standard version. Please note that the complete SDK downloads approximately 20GB of additional files.
ros-humble-robotics-sdk The standard version of the Autonomous Mobile Robot. This package includes almost everything except for a handful of tutorials and bag files.
ros-humble-robotics-sdk-complete The complete version of the Autonomous Mobile Robot. It also includes those items excluded from the standard version. Please note that the complete SDK downloads approximately 20GB of additional files.
Install the Robotics AI Suite Deb package
Install command example:
sudo apt install ros-jazzy-robotics-sdk
Intel oneAPI requires GCC >= 12:
sudo apt install gcc-12 g++-12
sudo update-alternatives --install /usr/bin/gcc gcc /usr/bin/gcc-12 60 --slave /usr/bin/g++ g++ /usr/bin/g++-12
sudo apt install ros-humble-robotics-sdk
Your installation time will vary based on network speed and chosen packages.
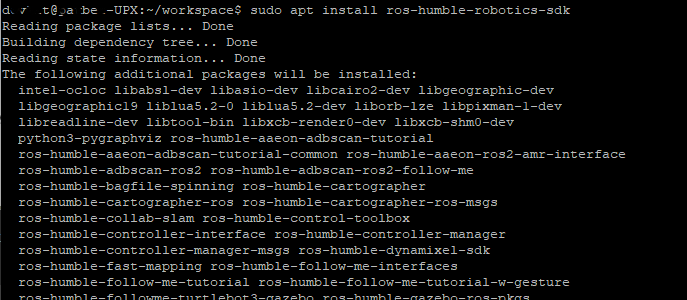
Install one of the following packages based upon your processor type:
Intel SSE-only CPU instruction accelerated package for Collaborative SLAM (installed by default):
# Required for Intel® Atom® processor-based systems
sudo apt-get install ros-jazzy-collab-slam-sse
# Required for Intel® Atom® processor-based systems
sudo apt-get install ros-humble-collab-slam-sse
Intel AVX2 CPU instruction accelerated package for Collaborative SLAM:
# Works only on Intel® Core™ processor-based systems
sudo apt-get install ros-jazzy-collab-slam-avx2
# Works only on Intel® Core™ processor-based systems
sudo apt-get install ros-humble-collab-slam-avx2
Intel GPU Level-Zero accelerated package for Collaborative SLAM:
# Works only on Intel® Core™ processors with Intel® Xe Integrated Graphics or Intel® UHD Graphics
sudo apt-get install ros-jazzy-collab-slam-lze
# Works only on Intel® Core™ processors with Intel® Xe Integrated Graphics or Intel® UHD Graphics
sudo apt-get install ros-humble-collab-slam-lze
During the installation of the above packages, you will see a dialogue asking you for the GPU generation of your system:
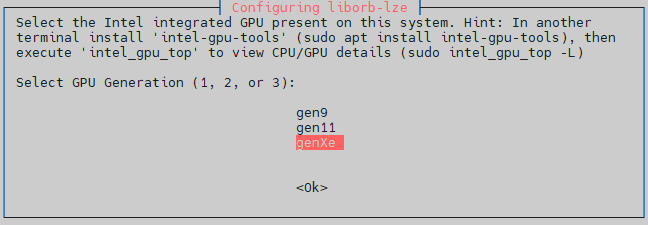
In this dialogue, select the GPU Generation according to the following table depending on your processor type. If you are unsure, select
genXe.GPU Generation
Processors
genXeIntel® Core™ Ultra Processors
11-13th Generation Intel® Core™ Processors
Intel® Processor N-series (products formerly Alder Lake-N)gen11Products formerly Ice Lake
gen9Products formerly Skylake
7. Install the Intel® NPU Driver on Intel® Core™ Ultra Processors#
If you want to run OpenVINO™ inferencing applications on the NPU device of Intel® Core™ Ultra processors, you need to install the Intel® NPU driver. If your system does not have an Intel® Core™ Ultra Processor, you should skip this step.
General information on the Intel® NPU driver can be found on the Linux NPU Driver website. The driver consists of the following packages:
intel-driver-compiler-npu: Intel® driver compiler for NPU hardware; the driver compiler enables compilation of OpenVINO™ IR models using the Level Zero Graph Extension API.intel-fw-npu: Intel® firmware package for NPU hardware.intel-level-zero-npu: Intel® Level Zero driver for NPU hardware; this library implements the Level Zero API to interact with the NPU hardware.
Note: The installation instructions on the Linux NPU Driver website download the
*.debfiles for these components, and install the packages from the downloaded files. Installation through this method will not include automatic updating throughapt-get.
To install the Intel® NPU driver, complete the following steps:
Install the NPU packages:
sudo apt-get install intel-level-zero-npu intel-driver-compiler-npu
Add your user account to the
rendergroup:sudo usermod -a -G render $USER
After this step, log-out (or reboot) and log-in again. Verify that your account belongs to the
rendergroup now:groups $USER
Set the render group for
acceldevice:sudo chown root:render /dev/accel/accel0 sudo chmod g+rw /dev/accel/accel0
This step must be repeated each time when the module is reloaded or after every reboot. To avoid the manual setup of the group for the
acceldevice, you can configure the followingudevrules:sudo bash -c "echo 'SUBSYSTEM==\"accel\", KERNEL==\"accel*\", GROUP=\"render\", MODE=\"0660\"' > /etc/udev/rules.d/10-intel-vpu.rules" sudo udevadm control --reload-rules sudo udevadm trigger --subsystem-match=accel
Now, you can check that the device has been set up with appropriate access rights. Verify that you can see the
/dev/accel/accel0device and that the device belongs to therendergroup:ls -lah /dev/accel/accel0 crw-rw---- 1 root render 261, 0 Jul 1 13:10 /dev/accel/accel0
8. Reboot to load latest Linux kernel and firmware#
sudo reboot
9. Next steps#
Setup is complete! For next steps, explore the Tutorials for ready-to-use applications and examples.
Conditional Setup#
Guide |
Condition |
Description |
|---|---|---|
You are running Ubuntu 22.04 and need to use Intel® GPU hardware. |
Install a newer Linux kernel, firmware, and GPU drivers to enable Intel® silicon on Ubuntu 22.04. |
|
Your workload requires deterministic, low-latency real-time performance. |
Install and boot a real-time Linux kernel for deterministic, low-latency performance. |
|
You are using cameras connected to the GMSL ports. |
Configure ACPI tables and install drivers to use cameras connected to the GMSL ports. |
Installation Troubleshooting#
Support Forum#
If you encounter difficulties, visit the Support Forum for assistance.
APT Package Manager#
If the APT package manager is unable to connect to the repositories, follow these APT troubleshooting tips:
Make sure that the system has network connectivity.
Make sure that port 80 is not blocked by a firewall.
Configure an APT proxy (if network traffic routes through a proxy server).
To configure an APT proxy, add the following lines to a file at
/etc/apt/apt.conf.d/proxy.conf(replace the placeholder as per your specific user and proxy server)::Acquire:http:Proxy "http://user:password@proxy.server:port/"; Acquire:https:Proxy "http://user:password@proxy.server:port/";
To ensure proper proxy settings for other tools required during the package installation add the the required proxy settings to
/etc/environment:http_proxy=http://user:password@proxy.server:port https_proxy=http://user:password@proxy.server:port no_proxy="localhost,127.0.0.1,127.0.0.0/8"
After setting the proxy values in
/etc/apt/apt.conf.d/proxy.confand/etc/environmentyou will have to reboot the device, so these settings become effective.