AAEON CEXD-INTRBL Development Kit#
Product Link#
Product link: AAEON CEXD-INTRBL
Overview#
This guide describes how to set up the AAEON CEXD-INTRBL Development Kit hardware and confirm that it powers on and boots correctly.
The kit is powered by the Intel® Core™ Ultra X7 358H (Panther Lake) processor. It consists of a compute module that hosts the processor, memory, and boot components in a 100 × 87 mm footprint, paired with a carrier card that breaks out the I/O, MIPI CSI, GMSL, and SerDes connectivity.
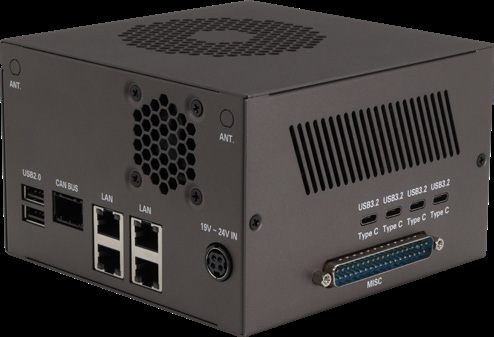
Note: This development kit is intended for research and development purposes only.
What you’ll need#
A monitor with an HDMI or DisplayPort input.
A USB keyboard and mouse.
The bundled DC power adapter (19–24 V).
Overall Flow#
Unbox and inspect the kit.
Connect the display, keyboard, and mouse.
Power on the kit.
Verify the BIOS and confirm the kit boots.
Steps#
Step 1: Unbox and inspect#
Set the kit on an anti-static surface and confirm the box contains all of the following items:
1× Chassis with the compute module and carrier card
1× DC power adapter
1× GPIO MISC connector
2× FAKRA 4-in-1 cables (for GMSL cameras)
1× COM port connector
Inspect the kit to make sure no components are missing, bent, or cracked.
Warning: The kit can be damaged if it is not placed on an anti-static surface. If any item is missing or the kit is damaged, contact Intel before proceeding.
Step 2: Connect peripherals#
Connect your monitor to the HDMI or DisplayPort output, and plug a keyboard and mouse into the USB ports.
Step 3: Power on#
Plug the supplied DC power adapter into the 19–24 V DIN power connector and press the power button.
Only use the DC power adapter supplied with the kit. Powering the board from another source can damage it.
Step 4: Verify the BIOS#
Press
Delas the system boots to enter the BIOS setup screen.Check the time, date, and configuration settings.
Save and exit.
The system reboots. The kit ships with an M.2 NVMe SSD already installed and is ready for you to install an operating system.
Next Steps#
BIOS Configuration — enable the IPU, NPU, and MIPI cameras, and tune fan behavior.
For product details, see the manufacturer website.