ADBSCAN Follow-me#
ADBSCAN (Adaptive DBSCAN) is an Intel® algorithm for adaptive object detection and localization from 2D LiDAR, 3D LiDAR, and RealSense depth-camera point clouds. It automatically determines clustering parameters from sensor range and point density, reducing manual tuning for perception workloads.
The Follow-me application uses ADBSCAN to locate a target person and publish robot velocity commands. This guide combines the supported optimization workflow with one Gazebo simulation and one Clearpath Jackal deployment scenario.
Source Code#
Intel-Optimized ADBSCAN#
In this version of ADBSCAN, the algorithm has been optimized for Intel® SOC by replacing linear neighbor point search with an optimized oneAPI PCL library (offloaded to GPU), as well as refactoring the clustering algorithm. This tutorial describes how to run this Intel-optimized ADBSCAN algorithm and compare the execution time with the unoptimized version.
ADBSCAN Optimization Setup#
The Intel-optimized and unoptimized versions of the algorithm are distributed
as ros-jazzy-adbscan-oneapi and ros-jazzy-adbscan-ros2, respectively.
We demonstrate the gain in latency for a ROS 2 bag file with point cloud data
from a RealSense camera. The amount of gain is prominent when the input
is dense or the number of input points is large. In case of a 2D LIDAR,
the point cloud is comparatively sparse and hence, not showed here.
ADBSCAN Optimization Prerequisites#
Complete the Getting Started guide before continuing.
Install and run the ROS 2 bag file Deb package#
Install the following package with ROS 2 bag files in order to publish point cloud data from LIDAR and RealSense camera:
sudo apt install ros-jazzy-bagfile-laser-pointcloud
sudo apt install ros-humble-bagfile-laser-pointcloud
Run the following commands in a terminal:
source /opt/ros/jazzy/setup.bash
ros2 bag play --loop /opt/ros/jazzy/share/bagfiles/laser-pointcloud
source /opt/ros/humble/setup.bash
ros2 bag play --loop /opt/ros/humble/share/bagfiles/laser-pointcloud
This command will launch the ROS 2 bag file and publish the recorded point cloud data to respective topics. You will view the following screen output:

ros2 topic list command will show a list of the published topics which
include /scan (point cloud from 2D LIDAR) and /camera/depth/color/points
(point cloud from RealSense camera).
Install and run optimized Deb package#
Install ros-jazzy-adbscan-oneapi Deb package from Intel® Autonomous Mobile
Robot APT repository:
sudo apt update
sudo apt install ros-jazzy-adbscan-oneapi
sudo apt update
sudo apt install ros-humble-adbscan-oneapi
Run the following command in a terminal:
source /opt/ros/jazzy/setup.bash
ros2 run adbscan_ros2 adbscan_sub --ros-args --params-file /opt/ros/jazzy/share/adbscan_ros2/config/adbscan_sub_RS.yaml
source /opt/ros/humble/setup.bash
ros2 run adbscan_ros2 adbscan_sub --ros-args --params-file /opt/ros/humble/share/adbscan_ros2/config/adbscan_sub_RS.yaml
This will print tables with the benchmarking data as showed below:
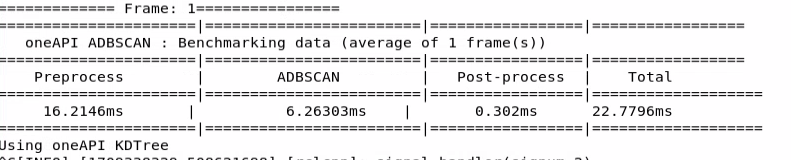
The table shows a breakdown between pre-processing, ADBSCAN execution and post-processing time. The caption at the bottom of the table will print which PCL library is being used.
Install and run standard (unoptimized) Deb package#
Install ros-jazzy-adbscan-ros2 Deb package from Intel® Autonomous Mobile
Robot APT repository
sudo apt update
sudo apt install ros-jazzy-adbscan-ros2
sudo apt update
sudo apt install ros-humble-adbscan-ros2
Run the following command in a terminal
source /opt/ros/jazzy/setup.bash
ros2 run adbscan_ros2 adbscan_sub --ros-args --params-file /opt/ros/jazzy/share/adbscan_ros2/config/adbscan_sub_RS.yaml
source /opt/ros/humble/setup.bash
ros2 run adbscan_ros2 adbscan_sub --ros-args --params-file /opt/ros/humble/share/adbscan_ros2/config/adbscan_sub_RS.yaml
This will print a similar table with the benchmarking data.

You will see that the ADBSCAN execution time is much smaller for the optimized version compared to the standard one. The pre-processing and post-processing time should be more or less of the same range in both versions, since the input bag file is identical. The amount of gain in execution time will depend on the system configuration, the size of the point cloud data in the input frames etc.
Re-configurable parameters#
The optimized ADBSCAN has a user-defined parameter called oneapi_library to
choose from a set of PCL libraries: oneapi_kdtree, oneapi_octree,
pcl_kdtree. The default value is oneapi_kdtree.
Moreover, one can run both optimized and unoptimized packages with a parameter
called benchmark_number_of_frames. It will take an integer (greater or equal
to 1) as input and the benchmarking table will produce the average execution
time of benchmark_number_of_frames frames, instead of a single frame
(default value).
For example, you can use the following command to run the optimized ADBSCAN
with oneapi_octree library and display the benchmarking data for
an average of 5 frames:
ros2 run adbscan_ros2 adbscan_sub --ros-args --params-file /opt/ros/jazzy/share/adbscan_ros2/config/adbscan_sub_RS.yaml -p benchmark_number_of_frames:=5 -p oneapi_library:=oneapi_octree
ros2 run adbscan_ros2 adbscan_sub --ros-args --params-file /opt/ros/humble/share/adbscan_ros2/config/adbscan_sub_RS.yaml -p benchmark_number_of_frames:=5 -p oneapi_library:=oneapi_octree
A complete list of the reconfigurable parameters is given below:
Lidar_typeType of the point cloud sensor. For RealSense camera and LIDAR inputs, the default value is set to
RSand2D, respectively.Lidar_topicName of the topic publishing point cloud data.
VerboseIf this flag is set to
True, the locations of the detected target objects will be printed as the screen log.subsample_ratioThis is the downsampling rate of the original point cloud data. Default value = 15 (i.e., every 15-th data in the original point cloud is sampled and passed to the core ADBSCAN algorithm).
x_filter_backPoint cloud data with x-coordinate
x_filter_backare filtered out (positive x direction lies in front of the robot).y_filter_left,y_filter_rightPoint cloud data with y-coordinate
y_filter_leftandy-coordinate<y_filter_rightare filtered out (positivey-directionis to the left of robot and vice versa)z_filterPoint cloud data with z-coordinate <
z_filterwill be filtered out. This option will be ignored in case of 2D Lidar.Z_based_ground_removalFiltering in the z-direction will be applied only if this value is non-zero. This option will be ignored in case of 2D Lidar.
base,coeff_1,coeff_2,scale_factorThese are the coefficients used to calculate the adaptive parameters of the ADBSCAN algorithm. These values are pre-computed and recommended to keep unchanged.
oneapi_libraryAvailable options are:
oneapi_kdtree,oneapi_octree,pcl_kdtree.oneapi_kdtreeandoneapi_octreeallow the algorithm to use optimized oneAPI™ KdTree or octree library and offload the neighbor point search method to GPU.pcl_kdtreeoption uses the standard PCL KdTree library, not optimized for Intel® SOC.benchmark_number_of_framesAny integer greater or equal to 1. This is the number of frames over which the average execution time is executed and printed in the benchmarking table.
ADBSCAN Optimization Troubleshooting#
Failed to install Deb package: Please make sure to run
sudo apt updatebefore installing the necessary Deb packages.You can stop the demo anytime by pressing
ctrl-C.The screen log will show
number of points after subsamplingandnumber of points after filtering. If these values are zero, please make sure to adjust the following parameters to make sure these values are greater than zero.Decrease
subsample_ratio.Increase the absolute values of
x_filter_back,y_filter_right,y_filter_left.Please see the description of these parameters in the table and adjust according to your environment.
IA-optimized ADBSCAN offloads the neighbor search to GPUs when using
oneapi_kdtreeandoneapi_octreelibrary.Please make sure that your system is equipped with working gpu, if using these libraries. You can use
lspcicommand in a Linux terminal to view GPU info.ros-jazzy-adbscan-ros2andros-jazzy-adbscan-oneapiare mutually exclusive Deb packages.Please refrain from installing them simultaneously like this
apt install ros-jazzy-adbscan-ros2 ros-jazzy-adbscan-oneapi. Always install the packages sequentially, as showed in this document.You may experience lower performance if the Linux kernel schedules the
adbscan_ros2process to an efficient-core (E-core). To achieve better performance, you can utilize thetasksetcommand to set the process’s CPU affinity. For example, you can directadbscan_ros2to run on CPU core 0 which is a performance-core (P-core).source /opt/ros/jazzy/setup.bash taskset -c 0 ros2 run adbscan_ros2 adbscan_sub --ros-args --params-file /opt/ros/jazzy/share/adbscan_ros2/config/adbscan_sub_RS.yaml
source /opt/ros/humble/setup.bash
taskset -c 0 ros2 run adbscan_ros2 adbscan_sub --ros-args --params-file /opt/ros/humble/share/adbscan_ros2/config/adbscan_sub_RS.yaml
Simulate Follow-me in Gazebo#
This demo of the Follow-me algorithm shows an Autonomous Mobile Robot application
for following a target person where the movement of the robot can be controlled
by the person’s location and hand gestures. The entire pipeline diagram can be
found in this guide.
This demo contains only the ADBSCAN and Gesture recognition modules in the
input-processing application stack. No text-to-speech synthesis module is
present in the output-processing application stack. This tutorial describes how
to launch the demo in Gazebo simulator.
Simulation Setup#
Simulation Prerequisites#
Complete the Getting Started guide before continuing.
Install the Simulation Deb Package#
Install ros-jazzy-followme-turtlebot3-gazebo Deb package from Intel®
Autonomous Mobile Robot APT repository. This is the wrapper package which will
launch all of the dependencies in the backend.
sudo apt update
sudo apt install ros-jazzy-followme-turtlebot3-gazebo
sudo apt update
sudo apt install ros-humble-followme-turtlebot3-gazebo
Activate Python Virtual Environment#
sudo apt install python3-venv
python3 -m venv venv_followme
cd venv_followme
source bin/activate
Install Python Modules#
This application uses Mediapipe Hands Framework for hand gesture recognition. Install the following modules as a prerequisite for the framework:
pip3 install --upgrade pip
pip3 install pyyaml
pip3 install -r /opt/ros/jazzy/share/followme_turtlebot3_gazebo/scripts/requirements_jazzy.txt
pip3 install --upgrade pip
pip3 install pyyaml
pip3 install -r /opt/ros/humble/share/followme_turtlebot3_gazebo/scripts/requirements_humble.txt
Run Demo with 2D Lidar#
Run the following script to launch Gazebo simulator and ROS 2 rviz2.
sudo chmod +x /opt/ros/jazzy/share/followme_turtlebot3_gazebo/scripts/demo_lidar.sh
/opt/ros/jazzy/share/followme_turtlebot3_gazebo/scripts/demo_lidar.sh
sudo chmod +x /opt/ros/humble/share/followme_turtlebot3_gazebo/scripts/demo_lidar.sh
/opt/ros/humble/share/followme_turtlebot3_gazebo/scripts/demo_lidar.sh
You will see two panels side-by-side: Gazebo GUI on the left and ROS 2 rviz
display on the right.
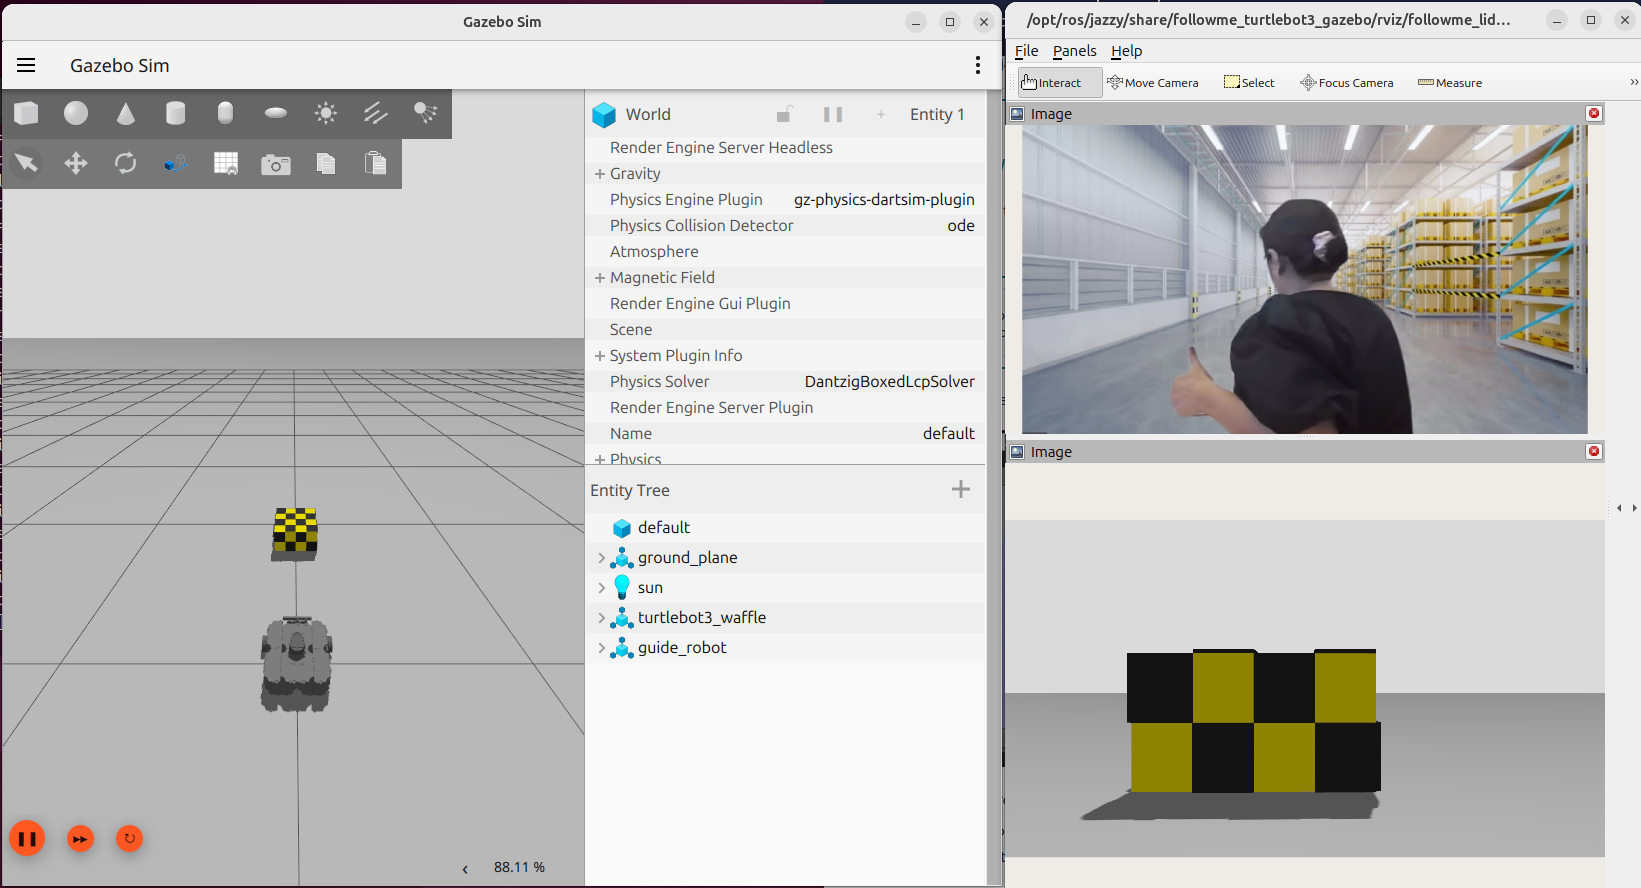
The green square robot is a guide robot (namely, the target), which will follow a pre-defined trajectory.
The gray circular robot is a TurtleBot3 robot, which will follow the guide robot. TurtleBot3 robot is equipped with a 2D Lidar and a RealSense Depth Camera. In this demo, the 2D Lidar is used as the input topic.
Both of the following conditions need to be fulfilled to start the TurtleBot3 robot:
The target (guide robot) will be within the tracking radius of the TurtleBot3 robot. Radius is a reconfigurable parameter in:
/opt/ros/jazzy/share/adbscan_ros2_follow_me/config/adbscan_sub_2D.yaml.In ROS 2 Humble, the file is located at the similar directory path.
The gesture (visualized in the
/imagetopic in ROS 2 rviz2) of the target isthumbs up.
The stop condition for the TurtleBot3 robot is fulfilled when either one of the following conditions are true:
The target (guide robot) moves to a distance of more than the tracking radius of the TurtleBot3 robot. Radius is a reconfigurable parameter in:
/opt/ros/jazzy/share/adbscan_ros2_follow_me/config/adbscan_sub_2D.yaml.In ROS 2 Humble, the file is located at the similar directory path.
The gesture (visualized in the
/imagetopic in ROS 2 rviz2) of the target isthumbs down.
Run Demo with RealSense Camera#
Run the following script to launch Gazebo simulator and ROS 2 rviz2.
sudo chmod +x /opt/ros/jazzy/share/followme_turtlebot3_gazebo/scripts/demo_RS.sh
/opt/ros/jazzy/share/followme_turtlebot3_gazebo/scripts/demo_RS.sh
sudo chmod +x /opt/ros/humble/share/followme_turtlebot3_gazebo/scripts/demo_RS.sh
/opt/ros/humble/share/followme_turtlebot3_gazebo/scripts/demo_RS.sh
In this demo, RealSense camera of the TurtleBot3 robot is selected as
the input point cloud sensor. After running all of the above commands,
you will observe similar behavior of the TurtleBot3 robot and guide robot in the
Gazebo GUI as in Run Demo with 2D Lidar.
There are reconfigurable parameters in
/opt/ros/humble/share/adbscan_ros2_follow_me/config/ directory for both LIDAR
(adbscan_sub_2D.yaml) and RealSense camera (adbscan_sub_RS.yaml).
The user can modify parameters depending on the respective robot, sensor configuration and environments (if required) before running the tutorial. Find a brief description of the parameters in the following list:
Lidar_typeType of the point cloud sensor. For RealSense camera and LIDAR inputs, the default value is set to
RSand2D, respectively.Lidar_topicName of the topic publishing point cloud data.
VerboseIf this flag is set to
True, the locations of the detected target objects will be printed as the screen log.subsample_ratioThis is the downsampling rate of the original point cloud data. Default value = 15 (i.e. every 15-th data in the original point cloud is sampled and passed to the core ADBSCAN algorithm).
x_filter_backPoint cloud data with x-coordinate >
x_filter_backare filtered out (positive x direction lies in front of the robot).y_filter_left,y_filter_rightPoint cloud data with y-coordinate >
y_filter_leftand y-coordinate <y_filter_rightare filtered out (positive y-direction is to the left of robot and vice versa).z_filterPoint cloud data with z-coordinate <
z_filterwill be filtered out. This option will be ignored in case of 2D Lidar.Z_based_ground_removalFiltering in the z-direction will be applied only if this value is non-zero. This option will be ignored in case of 2D Lidar.
base,coeff_1,coeff_2,scale_factorThese are the coefficients used to calculate adaptive parameters of the ADBSCAN algorithm. These values are pre-computed and recommended to keep unchanged.
init_tgt_locThis value describes the initial target location. The person needs to be at a distance of
init_tgt_locin front of the robot to initiate the motor.max_distThis is the maximum distance that the robot can follow. If the person moves at a distance >
max_dist, the robot will stop following.min_distThis value describes the safe distance the robot will always maintain with the target person. If the person moves closer than
min_dist, the robot stops following.max_linearMaximum linear velocity of the robot.
max_angularMaximum angular velocity of the robot.
max_frame_blockedThe robot will keep following the target for
max_frame_blockednumber of frames in the event of a temporary occlusion.tracking_radiusThe robot will keep following the target as long as the current target location = previous location +/-
tracking_radius
Simulation Troubleshooting#
Failed to install Deb package: Please make sure to run
sudo apt updatebefore installing the necessary Deb packages.You can stop the demo anytime by pressing
ctrl-C. If theGazebosimulator freezes or does not stop, please use the following command in a terminal:sudo killall -9 gazebo gzserver gzclient
Deploy Follow-me on a Clearpath Jackal#
This tutorial provides instructions for running the ADBSCAN-based Follow-me
algorithm from Autonomous Mobile Robot using RealSense camera input when
using a Clearpath Robotics Jackal robot.
The RealSense camera publishes to /camera/depth/color/points topic.
The adbscan_sub_node subscribes to the corresponding topic,
detects the obstacle array, computes the robot’s velocity and publishes to the
/cmd_vel topic of type geometry_msg/msg/Twist.
This twist message consists of the updated angular and linear velocity of the
robot to follow the target, which can be subsequently subscribed
by a robot-driver.
Deployment Setup#
Deployment Prerequisites#
Complete the Getting Started guide before continuing.
Install the Deployment Deb Package#
Install the ros-jazzy-follow-me-tutorial Deb package from the Autonomous
Mobile Robot APT repository.
sudo apt update
sudo apt install ros-jazzy-follow-me-tutorial
sudo apt update
sudo apt install ros-humble-follow-me-tutorial
Run Demo#
To launch the Follow-me application tutorial on the Jackal robot, use the following ROS 2 launch file.
source /opt/ros/jazzy/setup.bash
ros2 launch tutorial_follow_me jackal_followme_launch.py
source /opt/ros/humble/setup.bash
ros2 launch tutorial_follow_me jackal_followme_launch.py
After starting the script, the robot should begin searching for trackable objects in its initial detection radius (defaulting to around 0.5m), and then following acquired targets as they move from the initial target location.
There are reconfigurable parameters in
/opt/ros/jazzy/share/tutorial_follow_me/params/followme_adbscan_RS_params.yaml.
You can modify the parameters depending on the respective robot, sensor
configuration and environments (if required) before running the tutorial.
Find a brief description of the parameters in the following list.
Lidar_typeType of the point cloud sensor. For RealSense camera and LIDAR inputs, the default value is set to
RSand2D, respectively.Lidar_topicName of the topic publishing point cloud data.
VerboseIf this flag is set to
True, the locations of the detected target objects will be printed as the screen log.subsample_ratioThis is the downsampling rate of the original point cloud data. Default value = 15 (i.e. every 15-th data in the original point cloud is sampled and passed to the core BSCAN algorithm).
x_filter_backPoint cloud data with x-coordinate >
x_filter_backare filtered out (positive x direction lies in front of the robot).y_filter_left,y_filter_rightPoint cloud data with y-coordinate >
y_filter_leftand y-coordinate <y_filter_rightare filtered out (positive y-direction is to the left of robot and vice versa).z_filterPoint cloud data with z-coordinate <
z_filterwill be filtered out. This option will be ignored in case of 2D Lidar.Z_based_ground_removalFiltering in the z-direction will be applied only if this value is non-zero. This option will be ignored in case of 2D Lidar.
base,coeff_1,coeff_2,scale_factorThese are the coefficients used to calculate adaptive parameters of the ADBSCAN algorithm. These values are pre-computed and recommended to keep unchanged.
init_tgt_locThis value describes the initial target location. The person needs to be at a distance of
init_tgt_locin front of the robot to initiate the motor.max_distThis is the maximum distance that the robot can follow. If the person moves at a distance >
max_dist, the robot will stop following.min_distThis value describes the safe distance the robot will always maintain with the target person. If the person moves closer than
min_dist, the robot stops following.max_linearMaximum linear velocity of the robot.
max_angularMaximum angular velocity of the robot.
max_frame_blockedThe robot will keep following the target for
max_frame_blockednumber of frames in the event of a temporary occlusion.tracking_radiusThe robot will keep following the target as long as the current target location = previous location +/-
tracking_radius
Deployment Troubleshooting#
Failed to install Deb package: Please make sure to run
sudo apt updatebefore installing the necessary Deb packages.You may stop the demo anytime by pressing
ctrl-C.If the robot rotates more than intended at each step, try reducing the parameter
max_angularin the parameter file.If the motor controller board does not start, restart the robot.
For general robot issues, refer to the troubleshooting guide.