Real-time Linux#
This guide explains how to install and verify Intel’s real-time Linux kernel
(PREEMPT_RT) from the ECI package repository. It walks through setting up the
repository, installing the eci-customizations meta-package and the
linux-intel-rt kernel, and confirming the real-time kernel is active after
reboot. It also covers benchmarking system determinism with the Cyclictest
workload and interpreting its latency results.
Setup ECI Package Repository#
Open a terminal prompt which will be used to execute the remaining steps.
Download the ECI APT key to the system keyring:
sudo -E wget -O- https://eci.intel.com/repos/gpg-keys/GPG-PUB-KEY-INTEL-ECI.gpg | sudo tee /usr/share/keyrings/eci-archive-keyring.gpg > /dev/null
Add the signed entry to APT sources and configure the APT client to use the ECI APT repository:
echo "deb [signed-by=/usr/share/keyrings/eci-archive-keyring.gpg] https://eci.intel.com/repos/$(source /etc/os-release && echo $VERSION_CODENAME) isar main" | sudo tee /etc/apt/sources.list.d/eci.list
echo "deb-src [signed-by=/usr/share/keyrings/eci-archive-keyring.gpg] https://eci.intel.com/repos/$(source /etc/os-release && echo $VERSION_CODENAME) isar main" | sudo tee -a /etc/apt/sources.list.d/eci.list
Configure the ECI APT repository to have higher priority over other repositories and pin the version of the
libflannpackages:sudo bash -c 'echo -e "Package: *\nPin: origin eci.intel.com\nPin-Priority: 1000" > /etc/apt/preferences.d/isar' sudo bash -c 'echo -e "\nPackage: libflann*\nPin: version 1.19.*\nPin-Priority: -1\n\nPackage: flann*\nPin: version 1.19.*\nPin-Priority: -1" >> /etc/apt/preferences.d/isar'
Update the packages list:
sudo apt update
Install Real-time Linux Kernel#
The ECI package repository provides Deb packages named
customizations-*which add a GRUB menu entry for the real-time kernel and prepare the system to be deterministic. Install these packages using theeci-customizationsmeta-package:sudo apt install -y eci-customizations
The ECI package repository provides a firmware package which backports updates from upstream to bring better hardware support to the OS distribution. Install this package:
sudo apt-get reinstall '(firmware-linux-nonfree|linux-firmware$)'
Next, install the real-time Linux kernel.
Linux Intel LTS PREEMPT_RT kernel is Intel’s Long-Term-Support Linux kernel with PREEMPT_RT patches, which is closely tied to the OS distribution.
sudo apt install -y linux-intel-rt
Note
The ECI package repository also provides a Linux kernel newer than the LTS version, which supports the latest silicon ahead of the OS distribution. This Linux kernel is postfixed with
-experimentalin the package name. Install this Linux kernel for the latest silicon support.sudo apt install -y linux-intel-rt-experimental
Attention
Please review the Canonical Intellectual property rights policy regarding Ubuntu*. Note that any redistribution of modified versions of Ubuntu must be approved, certified, or provided by Canonical if you are going to associate it with the Trademarks. Otherwise you must remove and replace the Trademarks and will need to recompile the source code to create your own binaries.
Reboot the system.
sudo reboot
Verify the Real-time Linux kernel#
Reboot the target system, if not already done. When the system boots to the GRUB menu, there should be a menu entry for ECI at the top of the GRUB menu list. Select this menu entry, or wait five seconds for this menu entry to automatically boot.
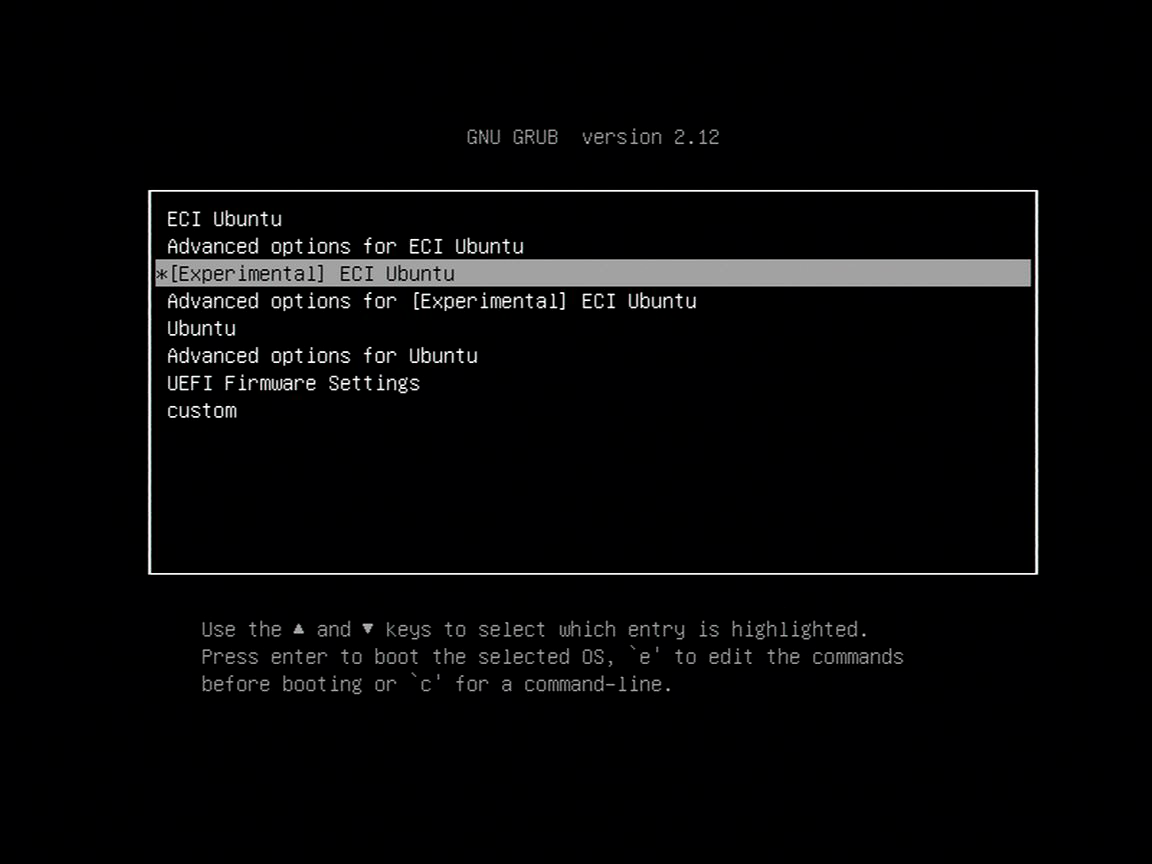
Let the system boot normally.
Note
If the system does not boot, then secure boot may be enabled in the BIOS. You may either disable secure boot in the BIOS, or sign the Linux kernel.
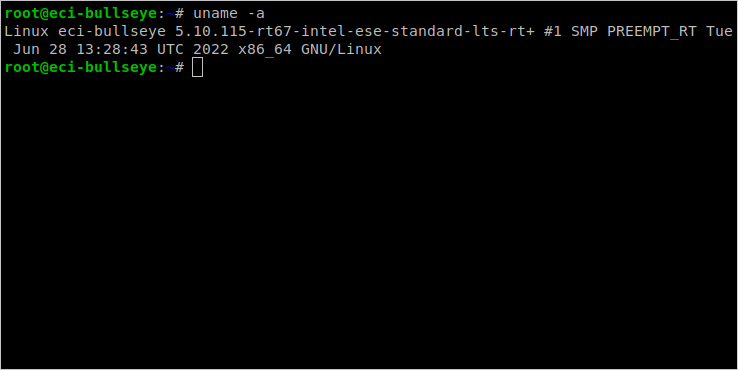
Login to the system and verify that the Linux* Intel LTS PREEMPT_RT kernel is active by running the command
uname -a. The output of this command should contain the following based on which kernel was installed:Linux Intel LTS PREEMPT_RT kernel:
...-intel-ese-standard-lts-rt+ #1 SMP PREEMPT_RT ...
Verify Benchmark Performance#
After installing and verifying the real-time Linux kernel, it’s a good idea to benchmark the system to establish confidence that the system is properly configured. This section will guide you through some basic benchmarks you can use to evaluate your system.
Cyclictest Workload#
Benchmark |
Units |
Source |
|---|---|---|
Cyclictest |
microseconds |
Cyclictest is most commonly used for benchmarking real-time (RT) systems. It is one of the most frequently used tools for evaluating the relative performance of an RT. Cyclictest accurately and repeatedly measures the difference between a thread’s intended wake-up time and the time at which it actually wakes up to provide statistics about the system’s latency. It can measure latency in real-time systems caused by the hardware, the firmware, and the operating system.
Install Cyclictest Workload#
Perform the following command to install this component:
sudo apt install rt-tests-scripts
Execute Cyclictest Workload#
An example script that runs the cyclictest benchmark and the README is available
at /opt/benchmarking/rt-tests. The script performs the following runtime
optimizations before executing the benchmark:
Assigns benchmark thread affinity to last isolated core (typically core 3)
Assigns non-benchmark thread affinity to core 0
Changes the priority of benchmark thread to 95 (using:
chrt -f 95)Disables kernel machine check interrupt
Increases thread runtime utilization to infinity
To start the benchmark, run the following command:
sudo /opt/benchmarking/rt-tests/start-cyclic.py
Default parameters are used unless otherwise specified. Run the script with
--help to list the modifiable arguments.
Interpret Cyclictest Results#
Short |
Explanation |
|---|---|
T |
Thread: Thread index and thread ID |
P |
Priority: RT thread priority |
I |
Interval: Intended wake up period for the latency measuring threads |
C |
Count: Number of times the latency was measured that is, iteration count |
Min |
Minimum: Minimum latency that was measured |
Act |
Actual: Latency measured during the latest completed iteration |
Avg |
Average: Average latency that was measured |
Max |
Maximum: Maximum latency that was measured |
On a non-realtime system, the result might be similar to the following:
T: 0 ( 3431) P:99 I:1000 C: 100000 Min:      5 Act:   10 Avg:   14 Max:   39242
T: 1 ( 3432) P:98 I:1500 C:  66934 Min:      4 Act:   10 Avg:   17 Max:   39661
The right-most column contains the most important result, that is, the worst-case latency of 39.242 ms / 39242 us (Max value).
On a realtime-enabled system, the result might be similar to the following:
T: 0 ( 3407) P:99 I:1000 C: 100000 Min:      7 Act:   10 Avg:   10 Max:      18
T: 1 ( 3408) P:98 I:1500 C:  67043 Min:      7 Act:    8 Avg:   10 Max:      22
This result indicates an apparent short-term worst-case latency of 18 us. According to this, it is important to pay attention to the Max values as these are indicators of outliers. Even if the system has decent Avg (average) values, a single outlier as indicated by Max is enough to break or disturb a real-time system.
Build a Custom Real-time Kernel#
Use this procedure when the packaged real-time kernel needs a custom configuration. Building and installing a custom kernel is an advanced task; keep a known working kernel available in GRUB before installing the new packages.
Prepare the Build Environment#
Install the build dependencies:
sudo apt-get install git fakeroot build-essential ncurses-dev xz-utils \
    libssl-dev bc flex libelf-dev bison debhelper
Download the Kernel Source#
Download the source package for the installed kernel series. Use the experimental package when building for the latest silicon support:
sudo apt-get source linux-intel-rt-experimental
cd linux-intel-rt-experimental*
For the Intel LTS kernel, use the following instead:
sudo apt-get source linux-intel-rt
cd linux-intel-rt*
Configure the Kernel#
Start from the configuration installed with the matching real-time kernel. The
configuration is available under /boot/; copy the matching config-*-intel-*
file into the source directory before making changes.
The real-time configuration enables settings such as CONFIG_PREEMPT_RT, CPU
isolation, RCU callback offloading, tickless scheduling, and the performance CPU
frequency governor. Update the default configuration, then make any required
changes interactively:
make olddefconfig
make menuconfig
kernel config fragment overrides (.cfg) |
Comments |
|---|---|
|
Reduce task scheduling-clock overhead and disable CPU governor Linux OS features |
|
Linux OS power-management runtime features |
|
Enable more accurate task and CPU time accounting |
|
Enable more preemptive task scheduling policies and CPU temporal-isolation |
Changing kernel options can produce a non-functional kernel. Leave an option at its default value unless its effect and dependency are understood.
Build and Install#
Build Debian packages from the configured source tree:
cp build-full/ltsintelrelease .
make ARCH=x86 bindeb-pkg
Install the generated packages and regenerate the GRUB configuration:
sudo dpkg -i ../*.deb
sudo update-grub
If package installation fails because the running kernel is being replaced, boot a different installed kernel from GRUB and rerun the installation command. Do not force installation of a kernel package that is actively in use.
Reboot and verify the active kernel:
sudo reboot
uname -mrs
Build cpupower from Kernel Source#
cpupower manages and monitors CPU frequency, governor, C-state, P-state, and
Turbo Boost settings. To build it from the same kernel source tree, first
install its dependencies:
sudo apt install -y make build-essential libpci-dev libcap-dev gettext libncurses-dev
Then build and install the tool:
cd tools/power/cpupower
make
sudo make install