Intel® RealSense™ Camera with ROS 2 Sample Application#
This tutorial tells you how to:
Launch ROS nodes for a camera.
List ROS topics.
Confirm that Intel® RealSense™ camera topics are publishing data.
Retrieve data from the Intel® RealSense™ camera (data coming at FPS).
Visualize an image from the Intel® RealSense™ camera displayed in rviz2.
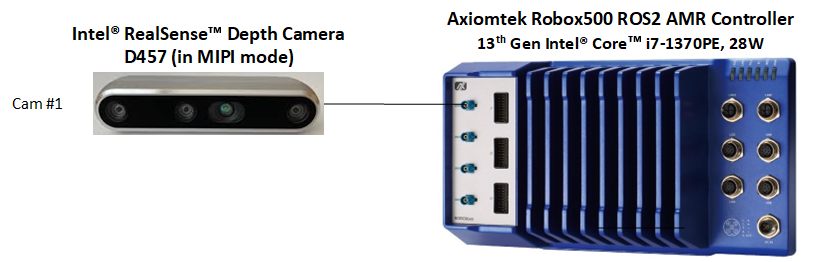
This Intel® RealSense™ with ROS 2 Sample Application can be run using two different types of Intel® RealSense™ cameras. The next section explains how to run this sample application using an Intel® RealSense™ camera connected through USB (for example, Intel® RealSense™ camera D435i). The subsequent section focuses on an Intel® RealSense™ Depth Camera D457 in MIPI mode, which is connected to an Axiomtek Robox500 ROS 2 AMR Controller.
Using Intel® RealSense™ camera connected through USB#
Connect an Intel® RealSense™ camera (for example, Intel® RealSense™ D435i) to the host, through USB.
Install the
librealsense2andrealsense2tools:sudo apt-get install -y ros-humble-librealsense2-tools
Download and install the Intel® RealSense™ camera with ROS 2 sample application:
sudo apt-get install -y ros-humble-realsense2-tutorial-demo
Set up the ROS 2 environment:
source /opt/ros/humble/setup.bash
Run the Intel® RealSense™ camera with ROS 2 sample application:
ros2 launch realsense2_tutorial realsense2_tutorial.launch.py
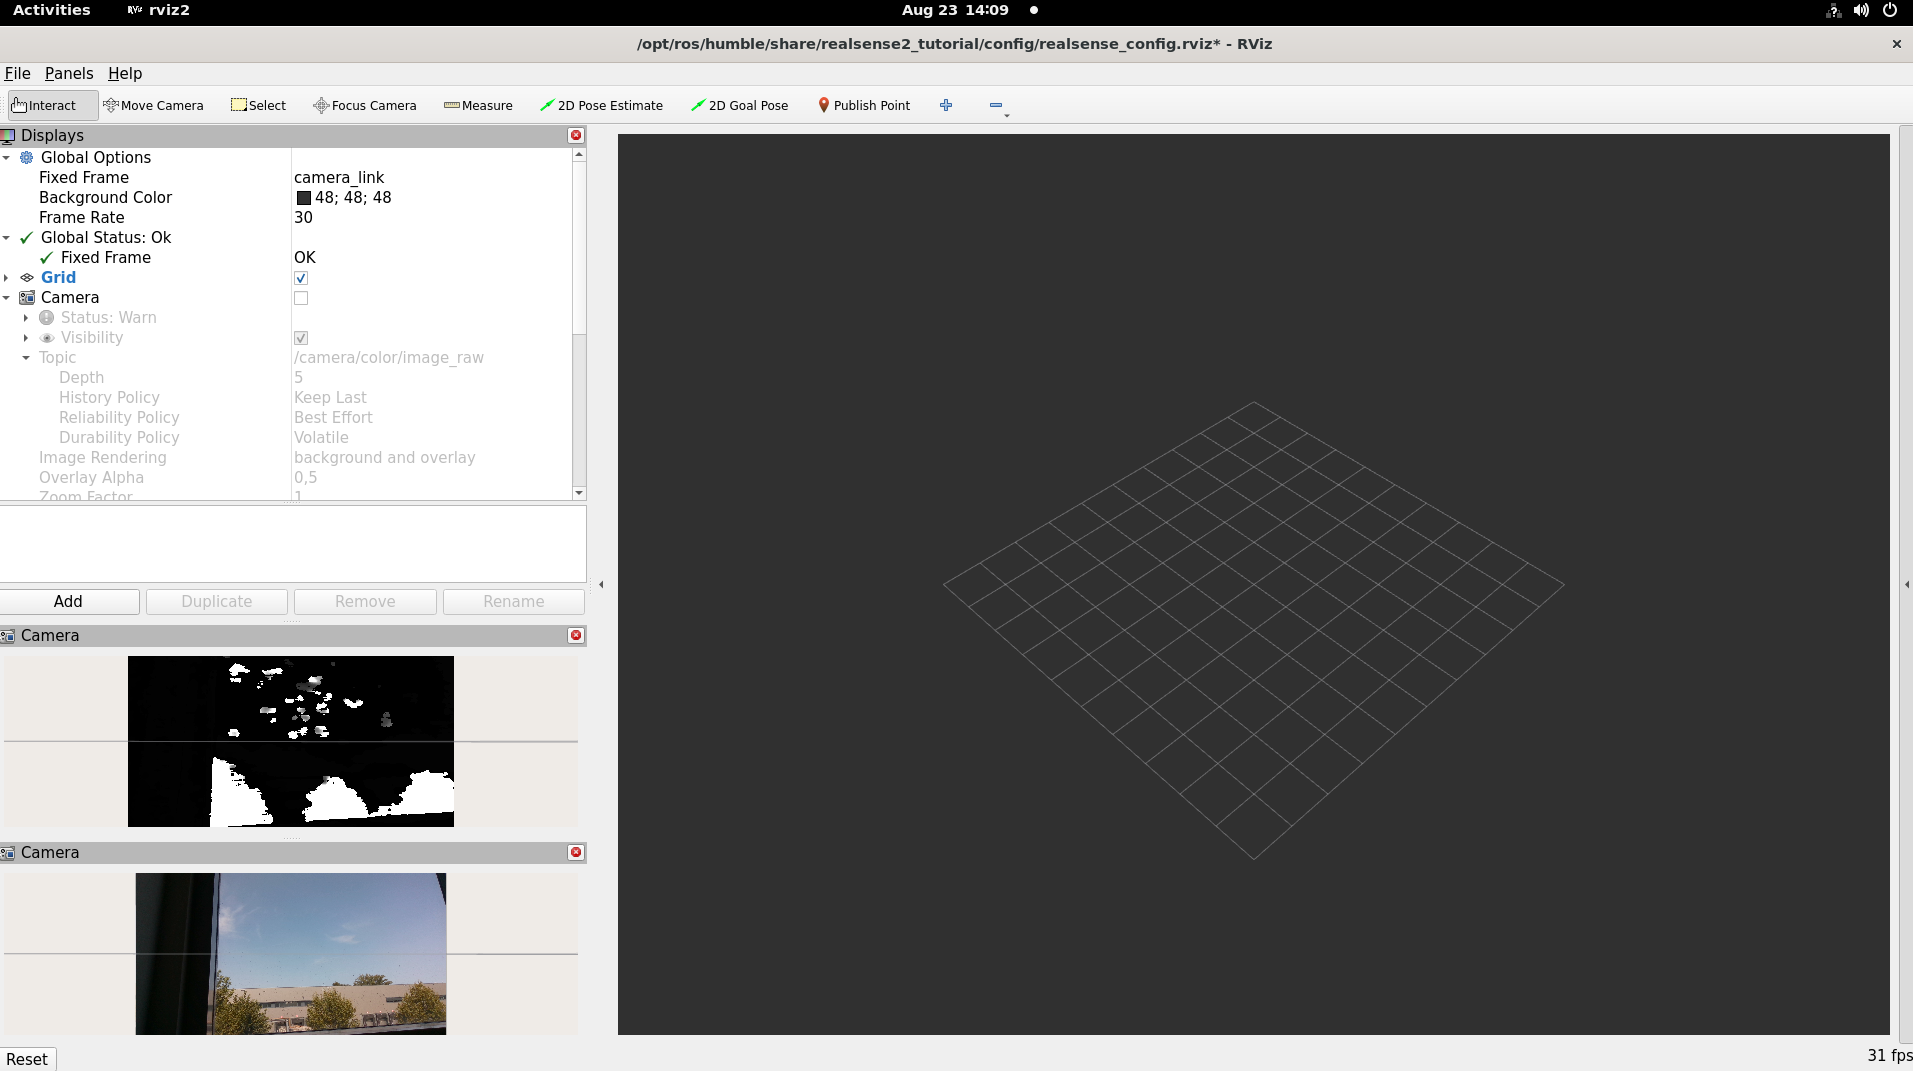
Expected output: The image from the Intel® RealSense™ camera is displayed in rviz2, on the bottom left side.
To close this, do the following:
Type
Ctrl-cin the terminal where the tutorial was run.
Using Intel® RealSense™ Depth Camera D457 on an Axiomtek Robox500 ROS 2 AMR Controller#
The following steps are required to set up the Axiomtek Robox500 ROS 2 AMR Controller to support the Intel® RealSense™ Depth Camera D457.
Axiomtek Robox500 ROS 2 AMR Controller Setup#
Connect an Intel® RealSense™ Depth Camera D457 to the Axiomtek Robox500 ROS 2 AMR Controller as shown in the below picture. Now, power-on the target.
Note
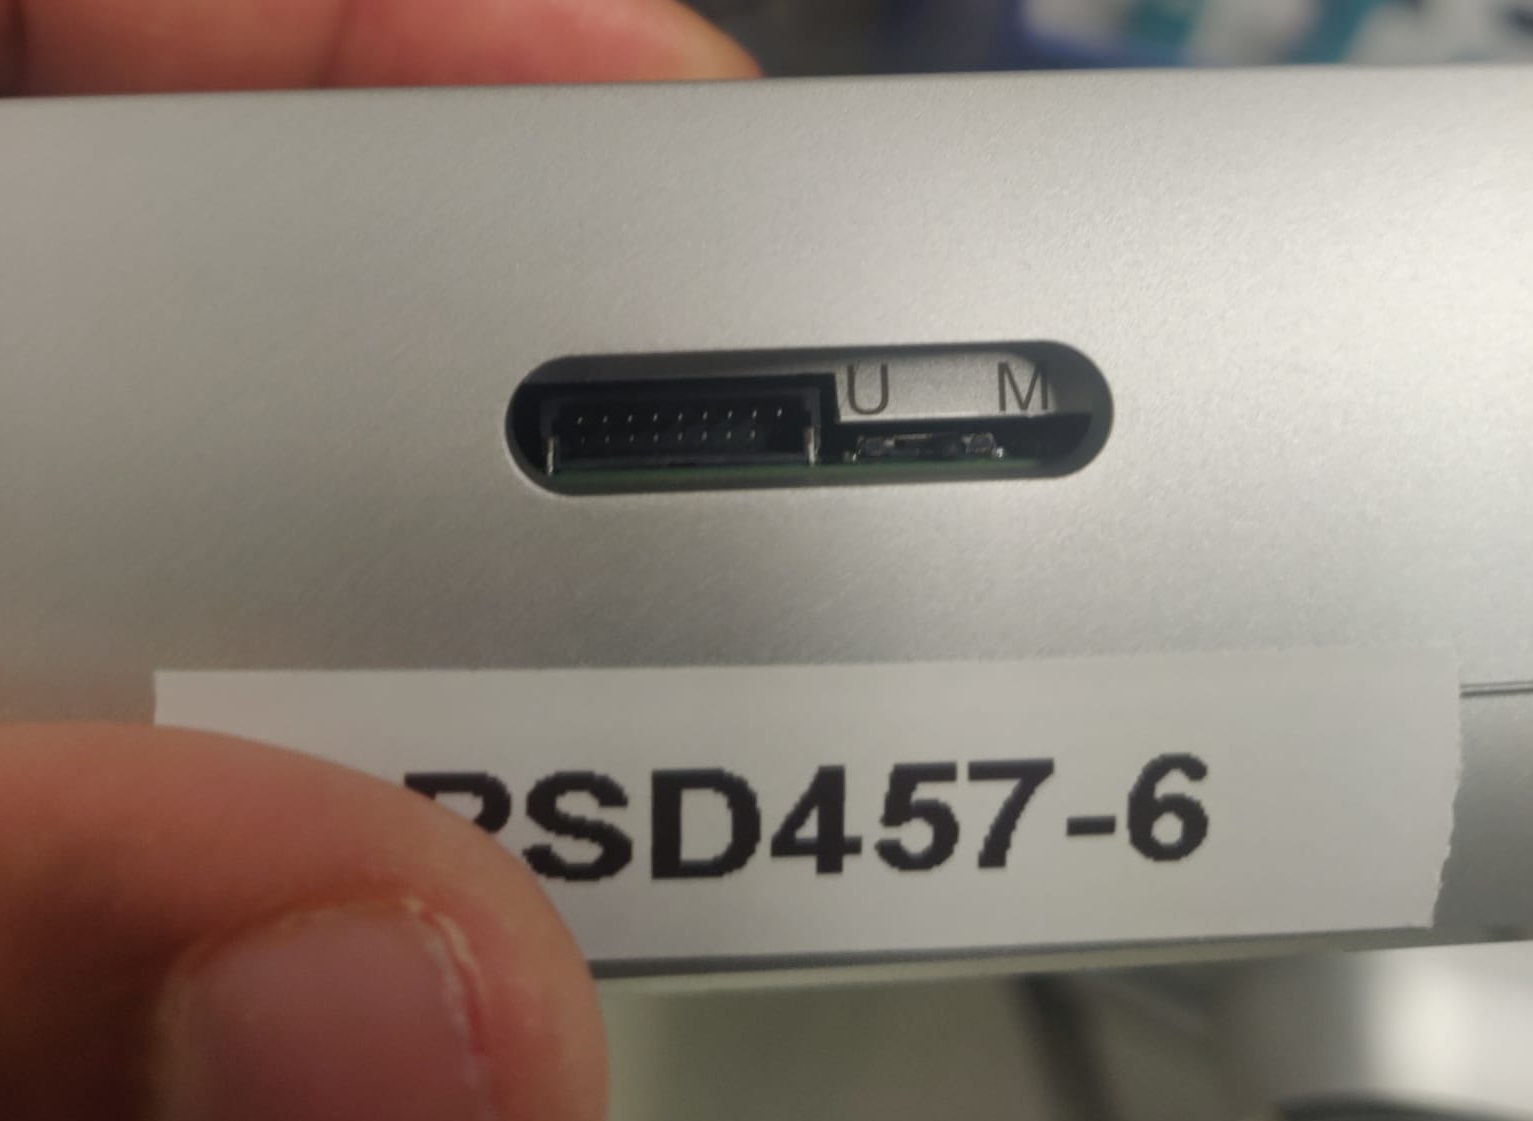
Select the “MIPI” mode of the Intel® RealSense™ Depth Camera D457 by moving the select switch on the camera to “M”, as shown in the below picture.
BIOS settings#
Go to the BIOS menu by pressing “Del” or “Esc” button when the board is powered on. The following BIOS settings should be set to enable Intel® RealSense™ Depth Camera D457 support on an Axiomtek Robox500 ROS 2 AMR Controller.
Intel Advanced Menu -> Power & Performance -> CPU-Power Management Control -> C States -> < Disable > (Note: If enabled, fps drops)
Intel Advanced Menu -> System Agent (SA) Configuration -> MIPI Camera Configuration -> < Enable > (Note: Enable all four cameras in this menu)
Camera BIOS settings.
BIOS setting |
Camera 1 |
Camera 2 |
Camera 3 |
Camera 4 |
|---|---|---|---|---|
MIPI Port |
0 |
1 |
2 |
3 |
Lane user |
x2 |
x2 |
x2 |
x2 |
Port speed |
2 |
2 |
2 |
2 |
I2C Channel |
I2C5 |
I2C5 |
I2C5 |
I2C5 |
Device0 I2C Address |
12 |
14 |
16 |
18 |
Device1 I2C Address |
42 |
44 |
62 |
64 |
Device2 I2C Address |
48 |
4a |
68 |
6c |
Install librealsense2 and realsense2 tools#
sudo apt install -y ros-humble-librealsense2-tools
Install intel-ipu6 (intel-ipu6-dkms) driver#
Create a
/etc/modprobe.d/blacklist-ipu6.conffile and add the lines of the listing below. This will prevent the loading of the existing defaultintel_ipu6_isyskernel module.# kernel builtin ipu6 driver and realsense D4XX driver clash with intel-ipu6-dkms installation. blacklist intel_ipu6_isys blacklist intel_ipu6_psys blacklist intel_ipu6
Reboot the target.
Install the
intel-ipu6-dkms:sudo apt install -y intel-ipu6-dkms
Run the following command for
dkmsto force-install theintel-ipu6driver:dkms install --force ipu6-drivers/20230621+iotgipu6-0eci8
Check the
dkmsstatus by using the following command:$ dkms status ipu6-drivers/20230621+iotgipu6-0eci8, 5.15.0-1048-intel-iotg, x86_64: installed
If the
dkmsstatus is not “installed”, then rerun the command from step number 4.modprobethe installedintel-ipu6driver:sudo modprobe intel-ipu6-isys
Note
The
modprobecommand must be run after every system reboot. This is because theintel-ipu6-isyskernel module is not loaded by OS at boot. It must be loaded manually using the above command.After installation, check the status of the loaded
intel-ipu6-isyskernel module. The kernel module loaded must be/lib/modules/5.15.0-1048-intel-iotg/updates/dkms/intel-ipu6-isys.koas shown below:$ modinfo intel-ipu6-isys | head -3 filename: /lib/modules/5.15.0-1048-intel-iotg/updates/dkms/intel-ipu6-isys.ko description: Intel ipu input system driver license: GPL
Add the user to the video and render group#
# Add the $USER to the video group
sudo usermod -a -G video $USER

# Add the $USER to the render group
sudo usermod -a -G render $USER
Install and run the Intel® RealSense™ camera with ROS 2 sample application#
Download and install the Intel® RealSense™ camera with ROS 2 sample application:
sudo apt-get install -y ros-humble-realsense2-tutorial-demo
Set up the ROS 2 environment:
source /opt/ros/humble/setup.bash
Run the following command to bind the Intel® RealSense™ Depth camera D457 with
intel-ipu6driver with metadata enabled:rs_ipu6_d457_bind.sh
Run the Intel® RealSense™ camera with ROS 2 sample application:
ros2 launch realsense2_tutorial realsense2_tutorial.launch.py use_sub_camera:=false
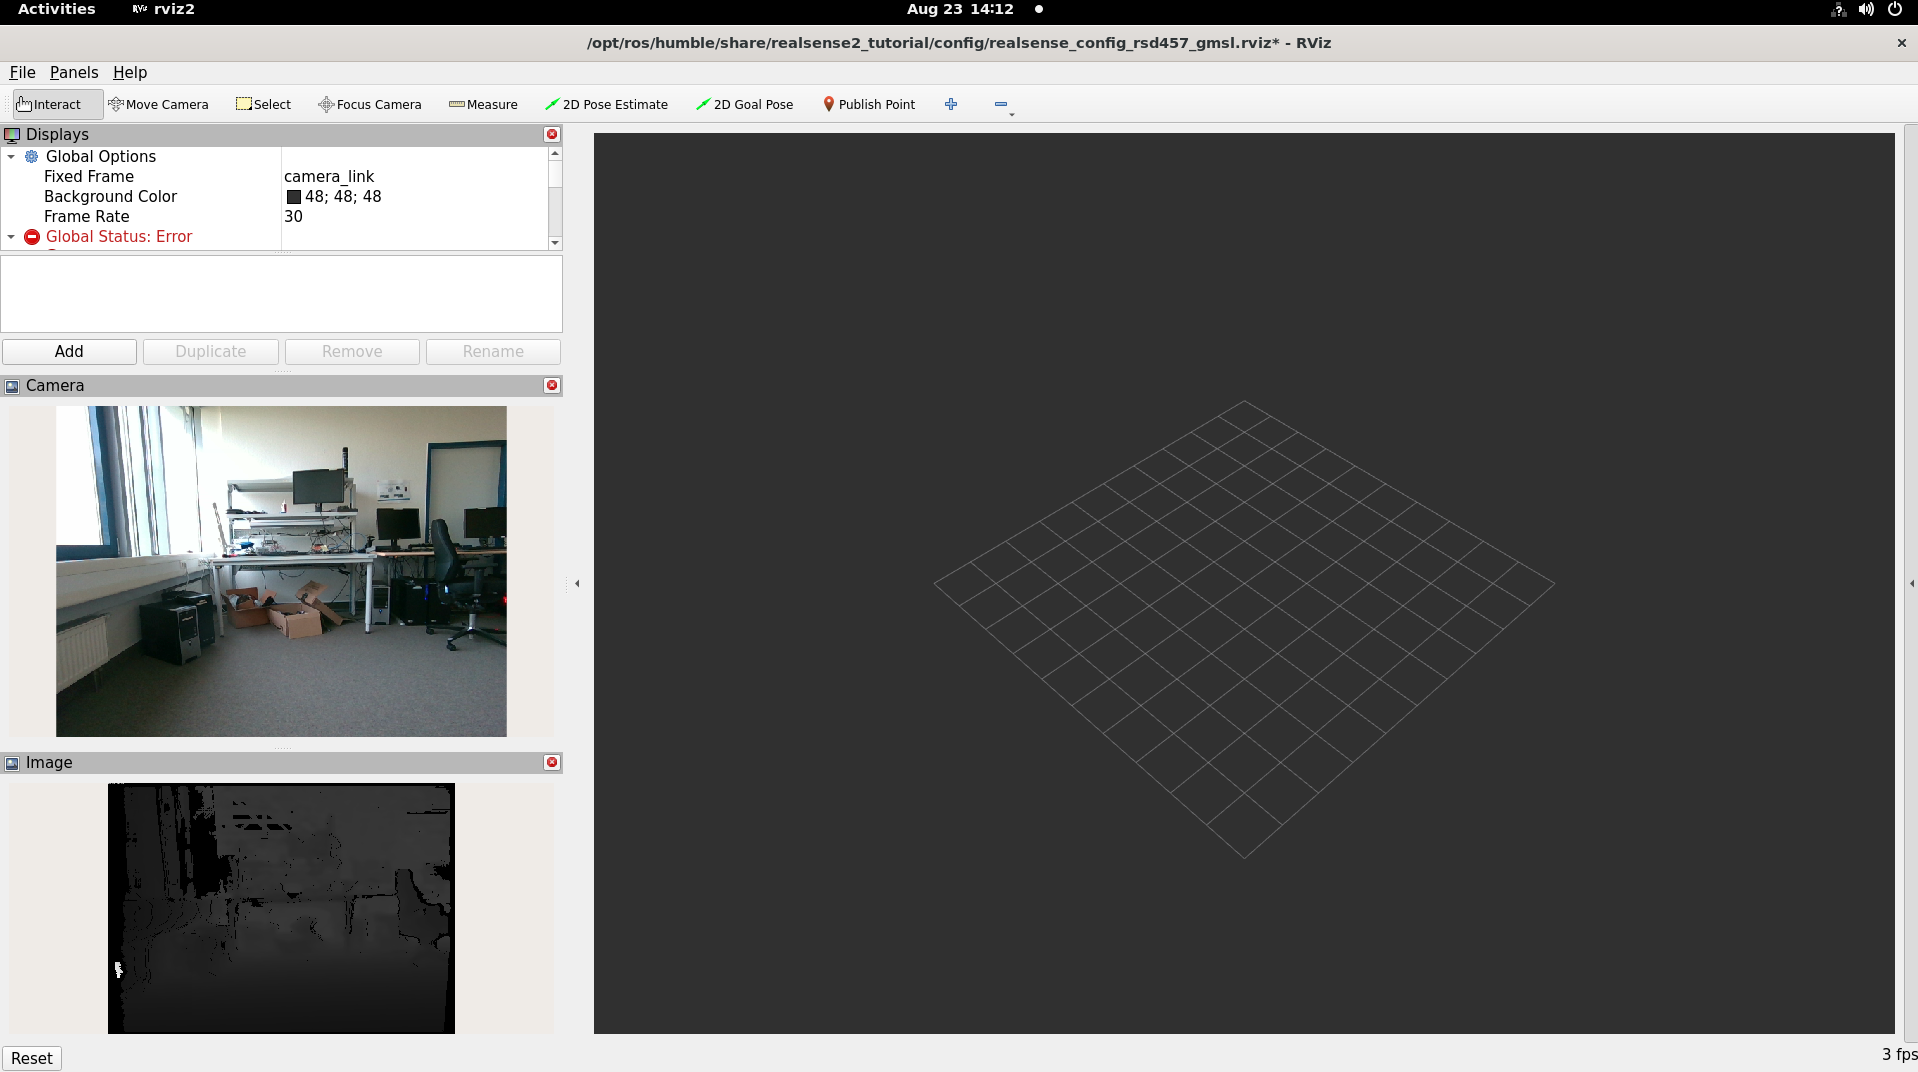
Expected output: The image from the Intel® RealSense™ camera is displayed in rviz2, on the bottom left side.
To close this, do the following:
Type
Ctrl-cin the terminal where the tutorial was run.