Run Loitering Detection with Nx Witness#
This page brings up Loitering Detection and VAP, registers VAP with Nx Witness, and runs Loitering Detection on an Nx Witness camera. When you finish, the Desktop Client shows the detection boxes and the loitering zone on the camera’s live video, and a bookmark for each loitering event.
Prerequisites#
Nx Witness set up and checked, as in Set Up Nx Witness.
An analytics host with Ubuntu 24.04 or 26.04, Docker and Docker Compose.
The
metro-ai-suiterepository cloned on the analytics host:git clone --filter=blob:none --branch release-2026.3.0 https://github.com/open-edge-platform/metro-ai-suite.git cd metro-ai-suite
Part 1: Bring up Loitering Detection#
1.1 Install the application#
Install Loitering Detection as described in its Get Started Guide. In short:
cd metro-vision-ai-app-recipe
./install.sh loitering-detection
Do not run sample_start.sh. It starts pipelines on the bundled sample videos; VAP starts the
pipelines on your Nx Witness cameras instead.
1.2 Set the loitering threshold#
In metro-vision-ai-app-recipe/.env, set how many seconds a person must stay in the zone to
count as loitering:
LOITERING_THRESHOLD_SEC=5.0
The mqtt-table-flattener sidecar uses this value to decide when to publish a loitering row,
and so when VAP adds a bookmark. Use the same value for VAP in
Part 2.
1.3 Check the MQTT broker#
The application includes an Eclipse Mosquitto MQTT broker. VAP subscribes to it from outside
the application’s Docker network, so the broker must publish port 1883 on the host. In
docker-compose.yml, check the port, and that the DL Streamer Pipeline Server publishes to
the broker through the host:
broker:
  image: docker.io/library/eclipse-mosquitto:2.0.22
  ports:
    - "1883:1883"

dlstreamer-pipeline-server:
  environment:
    - MQTT_HOST=${HOST_IP} # the broker runs on the same host
    - MQTT_PORT=1883
This is the default configuration. The broker allows anonymous access, which VAP and the pipeline server need to subscribe and publish without credentials.
1.4 Start the application#
docker compose up -d
docker compose ps
Check that dlstreamer-pipeline-server, broker and mqtt-table-flattener are running.
Part 2: Configure VAP#
2.1 Open the VAP directory#
cd ../vms-adapter-plugin
cp .env.example .env
2.2 Configure the environment#
Edit .env. The values below are the ones this integration needs; leave the rest as they
are. Variables of other VMS and apps, such as AIB_* and LVC_*, are not used.
# PostgreSQL
PG_PASSWORD=<choose-a-password>

# Nx Witness
NX_HOST=<NX_HOST_IP>
NX_USERNAME=<nx-admin-user>
NX_PASSWORD=<nx-admin-password>
NX_TLS_VERIFY=false

# Loitering Detection (DL Streamer Pipeline Server)
DLS_VISION_HOST=host.docker.internal
DLS_VISION_PORT=443
DLS_VISION_TLS_VERIFY=false
DLS_PIPELINE_GPU=loiter_detect_roi_gpu
# Same value as LOITERING_THRESHOLD_SEC in the recipe .env (Part 1.2).
LOITERING_THRESHOLD_SEC=5.0

# Loitering Detection MQTT broker, as VAP reaches it
MQTT_HOST=host.docker.internal
MQTT_PORT=1883
Set at least one of
DLS_PIPELINE_CPU,DLS_PIPELINE_GPUandDLS_PIPELINE_NPU. The pipelines must exist in Loitering Detection, and the host must support the device; see the application’s GPU and NPU setup documentation. Only the devices you set can be chosen when you start a pipeline.host.docker.internalworks when Loitering Detection runs on the same host as VAP; otherwise, use its address.NX_TLS_VERIFYandDLS_VISION_TLS_VERIFYarefalsefor self-signed certificates. To verify certificates, see TLS and Certificate Configuration.
2.3 Generate config/config.yaml#
Generate the VAP configuration for Nx Witness and Loitering Detection:
./setup.sh --vms nx --apps ld
setup.sh builds config/config.yaml from the configuration fragments below, and warns about
their variables that are not set in .env. The values come from .env at startup, so you do
not need to run setup.sh again after editing .env.
Fragment |
Content |
|---|---|
|
The Nx Witness instance |
|
The Loitering Detection app |
To change a setting, edit the fragment and run setup.sh again; do not edit
config/config.yaml, as setup.sh overwrites it. Check these parts.
The Nx Witness instance, in vms_shim/nxwitness/vap-config.yaml:
- name: nx-main
  vendor: nx_witness
  base_url: "https://${NX_HOST}:7001"
  tls_verify: ${NX_TLS_VERIFY:-false}
  tls_ca_bundle: "${NX_CA_BUNDLE:-}"
  auth:
    username: "${NX_USERNAME}"
    password: "${NX_PASSWORD}"
    auth_type: digest
The labels, loitering zone, threshold and events, in
analytics_app_shim/object_detection/vap-config.yaml:
- type: object_detection
  app_id: "dls_vision"
  display_name: "Loitering Detection"
  label_map:
    vehicle: vehicle
    pedestrian: pedestrian
    background: background
  zones:
    region1:
      label: "Loitering Zone"
      bounding_box: [0.0, 0.25, 0.3, 0.7]
  default_zone_polygon: [[0.0, 0.25], [0.3, 0.25], [0.3, 0.7], [0.0, 0.7]]
  loitering_threshold_s: "${LOITERING_THRESHOLD_SEC:-5.0}"
  events_enabled: true
label_mapmaps the model’s detection labels to categories. Nx Witness shows each category as the object typevap.<category>, for examplevap.pedestrian. Labels that are not in the map are shown aspython.detected.object. If your model uses other labels, such aspersonorcar, add them, for exampleperson: person.default_zone_polygonis the zone the pipeline measures loitering in, as fractions of the frame (0 to 1). It is the default value of the Loitering Zone field in Nx Witness, which you can change for each camera.zonesis the box drawn on the video as the object typevap.zone. Keepbounding_boxequal to the rectangle ofdefault_zone_polygon, so the drawn box matches the measured zone.events_enabledadds a bookmark for each loitering event; see Part 6.
Every setting is described in the Reference.
Part 3: Start VAP#
docker compose up -d
docker compose ps
Expect vms-adapter-backend, vms-adapter-ui and vms-adapter-postgres to be up, and the
backend to be healthy. Compose pulls the images; to build them from source instead, run
docker compose build first.
On startup, VAP registers the VAP Analytics Integration with Nx Witness, approves it, and starts reading the camera settings. Check the log:
docker compose logs backend | grep -E "nx_integration_|nx_settings_poll_started"
Expected on the first start:
nx_integration_autoregistered  vms=nx-main analytics_app_id=VAP Analytics Integration status=approved
nx_settings_poll_started       vms=nx-main
On later starts, VAP reuses the integration and logs nx_integration_already_registered and
nx_integration_credentials_restored instead.
To check in Nx Witness, open Main Menu → System Administration → Integrations in the Desktop Client. VAP Analytics Integration is listed.
Part 4: Start a pipeline#
Pipelines are started and stopped from the camera settings in the Desktop Client. VAP reads the settings every 5 seconds.
In the Desktop Client, close any open view of the camera. Detections do not render in a view that was open before the pipeline started.
In the resource tree, right-click the camera, and choose Camera Settings.
Open the Integrations tab, and select VAP Analytics Integration. If it is off, turn it on.
In the Loitering Detection group, set the fields:
Field
Description
Enable Loitering Detection pipeline
Starts or stops the pipeline for this camera.
Device
Inference device. Only the devices with a pipeline in
.envare listed.Loitering Zone
Zone as normalized
[[x,y],...]points, each 0 to 1. Defaults todefault_zone_polygon. VAP scales it to the camera’s resolution when the pipeline starts.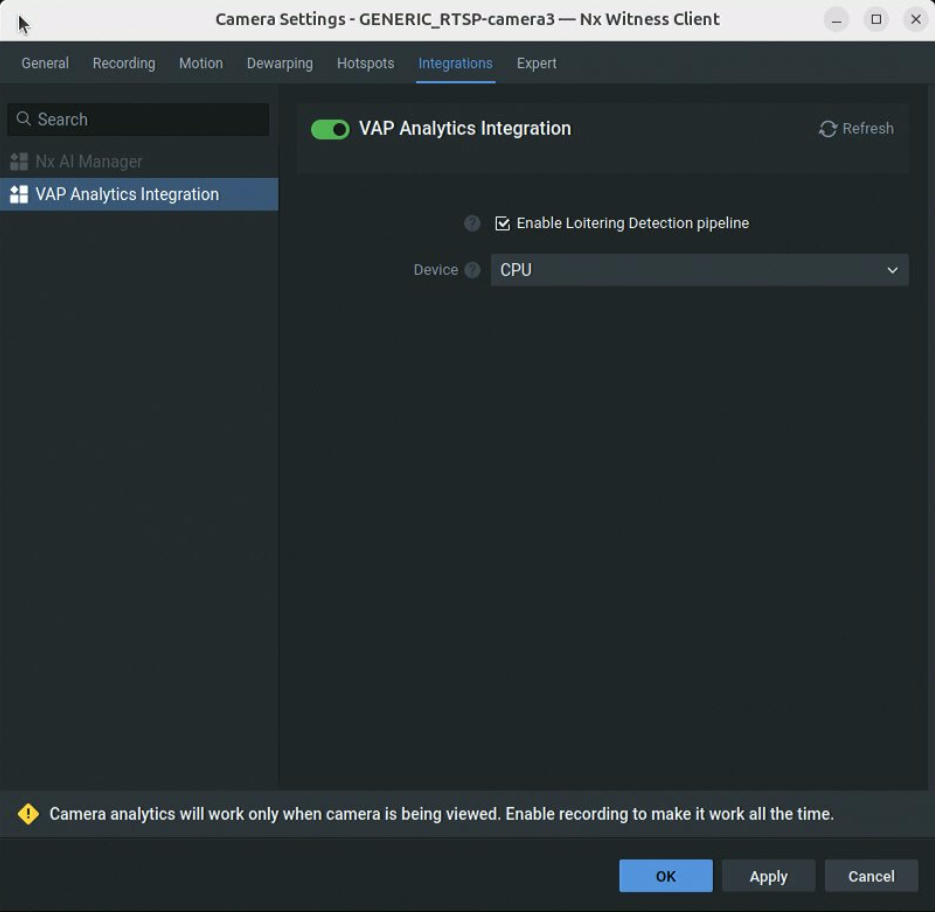
Check Enable Loitering Detection pipeline, and click Apply, then OK.
Within 5 seconds, VAP starts the pipeline. Check the log:
docker compose logs backend | grep -E "od_run_started|nx_pipeline_started"
Expected:
od_run_started       pipeline=user_defined_pipelines/loiter_detect_roi_gpu run_id=<run-id>
nx_pipeline_started  app_id=dls_vision device_id=<device-uuid> run_id=<run-id>
If you change Device or Loitering Zone while the pipeline runs, VAP restarts it with the new values.
Part 5: See the detections#
In the Desktop Client, open the camera.
Open the Object Search panel (Alt+O).
Within a few seconds, boxes appear around detected objects, labelled with their object type, for example
vap.pedestrian. The loitering zone is drawn as avap.zonebox.
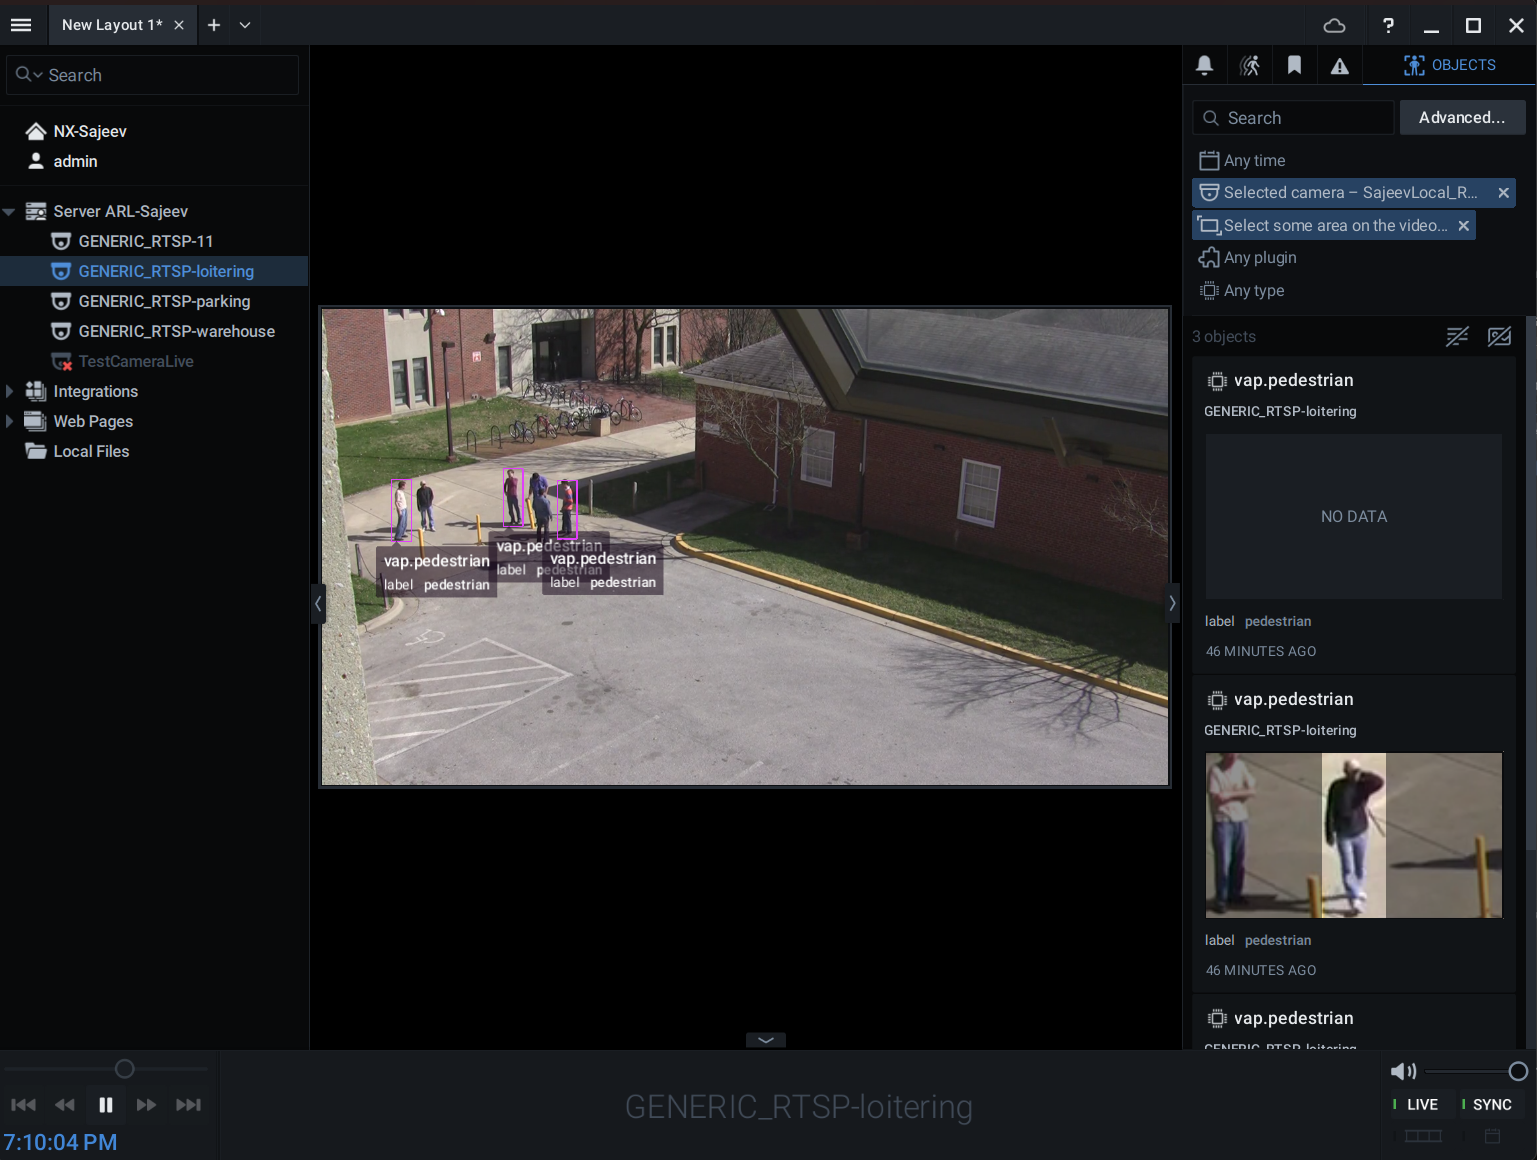
If no boxes appear, see Troubleshooting.
Part 6: Get loitering events as bookmarks#
With events_enabled: true, VAP adds a bookmark to the camera’s timeline for each loitering
event.
        flowchart LR
  P["Loitering Detection app"] -- "loitering row<br/>(one per loiterer, about every second)" --> V["VAP"]
  V -- "bookmark" --> N["Nx Witness<br/>camera timeline"]
The
mqtt-table-flattenersidecar publishes a row for each person who has stayed in the zone longer thanLOITERING_THRESHOLD_SEC. It repeats the row about once a second while the person stays.VAP adds a bookmark for every row. The bookmark name is the event, for example
pedestrian 119 loitering 12.0s in zone vap_zone. It starts when VAP receives the row, and lasts 30 seconds.
To view them, open the camera in the Desktop Client, and open the Bookmarks panel (Ctrl+B).
Check that VAP publishes the events:
docker compose logs -f backend | grep loitering_event_published
# loitering_event_published camera_id=nx:<device-uuid> result=True track_id=12 with_box=True
Note
VAP adds a bookmark for every loitering row, so a person who stays in the zone adds about
one bookmark per second. To turn the bookmarks off, set events_enabled: false in
analytics_app_shim/object_detection/vap-config.yaml, run ./setup.sh --vms nx --apps ld
again, and restart the backend with docker compose restart backend.
Change the loitering threshold#
The threshold is set in two places, which should hold the same value:
Where |
Setting |
What it does |
|---|---|---|
Recipe |
|
Decides when the sidecar publishes a row, and so when a bookmark is added. |
VAP |
|
Sent to the pipeline at run start; turns the on-video dwell text red. |
After changing the recipe value, recreate the sidecar from metro-vision-ai-app-recipe:
docker compose up -d --no-deps --force-recreate mqtt-table-flattener
After changing the VAP value, recreate the backend with
docker compose up -d --force-recreate backend, and restart the pipeline.
Part 7: Start from the VAP dashboard (optional)#
You can also start and stop pipelines from the VAP dashboard instead of the Desktop Client.
Open
https://<vap-host>:3443in a browser.In the Camera Discovery panel, click Discover Cameras, and turn on the camera you want to analyze. Its ID is
nx:<device-uuid>.In the Analytics Engine panel, click Discover Apps, and select Loitering Detection.
Select the Camera and the Device, and click Start Analysis.
To stop, click Stop Analysis on the active run.
The same steps through the API:
curl -k -X POST https://localhost:3443/v1/cameras/discover
curl -k -X POST https://localhost:3443/v1/cameras/enable \
  -H "Content-Type: application/json" \
  -d '{"camera_ids": ["nx:<device-uuid>"], "enabled": true}'
curl -k https://localhost:3443/v1/analytics-apps/dls_vision/runs
curl -k -X DELETE https://localhost:3443/v1/analytics-apps/dls_vision/runs/<run_id>
Part 8: Stop#
To stop the pipeline, uncheck Enable Loitering Detection pipeline in the camera settings,
and click Apply, then OK. VAP stops it within 5 seconds and logs
nx_pipeline_stopped.
To stop VAP, run docker compose down.
Caution
Do not add -v: it deletes the database volume, including the integration credentials
VAP stored. The integration in Nx Witness then becomes stale; see
Troubleshooting.