Get Started#
The Smart Corridor sample application helps developers create intelligent intersection monitoring solutions. It uses AI and sensor fusion to demonstrate accurate traffic detection, congestion management, and real-time alerting.
To get started:
Set up the sample application: Use the Docker Compose tool to quickly deploy the application in your environment.
Run a predefined pipeline: Execute a sample pipeline to see real-time transportation monitoring and object detection in action.
Access the application’s features and user interfaces: Explore the Scenescape Web UI, Grafana dashboard, Node-RED interface, and Deep Learning Streamer Pipeline Server (DL Streamer Pipeline Server) to monitor, analyze, and customize workflows.
Consider enabling security features: Use hardware-based security measures to make your application safer.
Note
The default dataset includes only two intersections,
Smart-Corridor-Intersection-04 and Smart-Corridor-Intersection-05. Intersections 01, 02,
and 03 are not part of this dataset, so their absence does not indicate a deployment problem.
Prerequisites#
Verify that your system meets the minimum requirements.
Install Docker: Installation Guide.
Configure Docker commands to run without
sudo: Post Install.Install Git: Installing Git.
Setup and First Use#
Clone the Suite#
Go to your target directory and clone the suite. To clone a specific release branch, replace
main with the desired tag. To learn more about partial cloning, see the
Repository Cloning guide.
git clone --filter=blob:none --sparse --branch main https://github.com/open-edge-platform/metro-ai-suite.git
cd metro-ai-suite
git sparse-checkout set metro-vision-ai-app-recipe
cd metro-vision-ai-app-recipe/
Multi-Node Deployment (Parent and Child)#
The Smart Corridor application supports multi-machine deployments where one parent machine aggregates scene data from one or more child machines. Each child runs its own set of camera pipelines and sends tracking data to the parent’s scene controller.
Deployment Architecture#
Parent Machine
├── Scenescape Controller (aggregates all scenes)
├── Scenescape Manager (Web UI)
├── DLStreamer (local cameras: camera1–camera4)
├── MQTT Broker (port 1883 TLS, 1882 internal)
└── CA Server (port 8888, serves CA cert to parent)

Child Machine
├── DLStreamer (child cameras: camera401–camera404)
├── MQTT Broker (port 1883 TLS)
└── CA Server (port 8888, serves CA cert to parent)
Important Notes for Multi-Machine Deployments#
Deploy child nodes first: The parent’s
ca-bundle.shfetches Certificate Authority (CA) certificates from child nodes over HTTP on port 8888. Install and start child nodes before installing the parent.Network access: Ensure port 8888 (CA server) and port 1883 are accessible between machines. Port 1883 uses Message Queuing Telemetry Transport (MQTT) secured with Transport Layer Security (TLS).
Scene configuration: After deployment, add the remote child scene in the Scenescape Web UI under the parent scene’s settings. See Step 5 of Deploy a Parent Node.
Time synchronization: Ensure Network Time Protocol (NTP) is synchronized across all machines to avoid delayed or missing tracking behavior in the Smart Corridor scene.
Note
For a single-node deployment (no remote child), skip the following section and go directly to Deploy a Parent Node.
Deploy a Child Node#
If you are deploying multiple child nodes, number each deployment
(REMOTE_CHILD_DEPLOY) starting at 1 in its respective .env file:
Clone and enter the directory (same as Setup and First Use above).
The Smart Corridor deployment must identify which child node it represents. Configure
REMOTE_CHILD_DEPLOYas1,2, or3in the .env file to select the corresponding child scene data and pipeline configuration:REMOTE_CHILD_DEPLOY=1
If
REMOTE_CHILD_DEPLOY=1is set, the installer selectssmart-corridor-child-1-ri.tar.bz2andconfig_child_1.json.If
REMOTE_CHILD_DEPLOY=2is set, the installer selectssmart-corridor-child-2-ri.tar.bz2andconfig_child_2.json, and so on.
Run the install script:
Run the installation script to configure the application and download the required models:
./install.sh smart-corridor
Note
If you need to specify a host IP address, such as when deploying across different network interfaces, replace
<HOST_IP>with your target IP address:./install.sh smart-corridor <HOST_IP>The installer detects the child node deployment and automatically:
Uses child-specific scene data (
Smart-Corridor-Intersection-04.zip)Uses child-specific pipeline configuration (
config_child_${REMOTE_CHILD_DEPLOY}.json)
Start the Application:
Export the administrator password as an environment variable:
export SUPASS=$(cat ./smart-corridor/src/secrets/supass)
Download the container images and start the application microservices with the Docker Compose tool:
docker compose up -d
Repeat the steps in the Deploy a Child Node section for each child node, incrementing the
REMOTE_CHILD_DEPLOYvalue for every additional child node.
Deploy a Parent Node#
On the parent machine, configure the .env file to declare how many remote child nodes exist:
Clone and enter the directory (same as Setup and First Use above).
Configure the .env file with the remote child IP addresses:
For a single-node deployment with no child nodes:
TOTAL_REMOTE_CHILD=0
For a multi-node deployment, specify the total number of remote child nodes and their corresponding host IP addresses:
TOTAL_REMOTE_CHILD=1
REMOTE_IP_1=<IP_ADDRESS_CHILD_NODE_1>
For multiple child nodes:
TOTAL_REMOTE_CHILD=2
REMOTE_IP_1=<IP_ADDRESS_CHILD_NODE_1>
REMOTE_IP_2=<IP_ADDRESS_CHILD_NODE_2>
Run the install script:
Run the installation script to configure the application and download the required models:
./install.sh smart-corridor
Note
If you need to specify a host IP address, such as when deploying across different network interfaces, replace
<HOST_IP>with your target IP address:./install.sh smart-corridor <HOST_IP>The installer detects a parent node deployment (
TOTAL_REMOTE_CHILDdefined in.env) and automatically:Uses parent-specific scene data (
Smart-Corridor.zip)Uses parent-specific pipeline configuration (
config_parent.jsonfor a multi-node deployment orconfig_sn_parent.jsonfor a single-node deployment)Runs
ca-bundle.shto fetch CA certificates from each remote child and build a combined trust bundle for TLS connectivity
Start the Application:
Export the administrator password as an environment variable:
export SUPASS=$(cat ./smart-corridor/src/secrets/supass)
Download the container images and start the application microservices with the Docker Compose tool:
docker compose up -d
Check Status of Microservices
The application starts the following microservices:
To check whether all microservices are running:
docker ps
Expected Services:
Grafana Dashboard
DL Streamer Pipeline Server
MQTT Broker
Node-RED
Scenescape services
Note
The following step is for Multi-Node (Parent and Child) deployments only. For a Single-Node deployment, skip the step and go to Access the Application and Components.
Link the Remote Child Scene to the Smart-Corridor Scene:
The parent’s Scene Controller only receives tracks from a child node after the child scene is linked to the Smart-Corridor scene in the Scenescape UI. Do this once for every remote child node, after both the child and the parent are running.
Before you start, ensure that:
The child node is running and the parent can reach it on port
1883(MQTT TLS) and port8888(CA server).The system time is synchronized between the parent and child nodes (see Troubleshooting).
Collect the following details from the child node:
Detail
Where to Get It
Child scene name
The scene name on the child’s Scenescape UI, for example
Smart-Corridor-Intersection-04. It must be unique across the parent and child nodes.Remote child ID
The UUID of the child scene. Open the child scene in the child’s Scenescape UI (
https://<child_ip>/) and copy the UUID from the browser address bar (https://<child_ip>/<scene-uuid>/).Hostname or IP
The IP address of the child node (the same value as
REMOTE_IP_<n>in the parent’s .env file).MQTT username and password
The
userandpasswordvalues in./smart-corridor/src/secrets/controller.authon the child node.Link the child scene on the parent node:
Open the parent’s Scenescape UI at
https://<parent_ip>/and log in asadmin.Click the Smart-Corridor scene card to open the parent scene.
Select the Children tab below the scene map.
Click + Link Child Scene.
Set Child Type to
remoteand fill in the form:Child Name: The child scene name, for example
Smart-Corridor-Intersection-04.Remote Child ID: The child scene UUID.
Hostname or IP: The IP address of the child node.
MQTT Username and MQTT Password: The child node’s MQTT credentials.
Transform type and values: The position, rotation, and scale that place the child scene on the Smart-Corridor map. Keep the default values if the child scene already shares the parent’s coordinate system. For the default dataset, set Transform type to
Matrixand change the value in row 1, column 4 to170.1594097946251.Retrack objects: Keep it enabled so that the parent tracker re-tracks the child’s detections.
Click Add Child Scene.
Repeat steps 4 to 6 for every remaining remote child node, using that child’s own scene name, UUID, IP address, and credentials.
Expected result: The child scene is listed in the Children tab of the Smart-Corridor scene, and its MQTT status indicator turns green. Vehicles tracked at the child intersection then appear on the Smart-Corridor map.
Note
A scene can have only one parent, so link each child scene to the Smart-Corridor scene only once.
If the status indicator stays red, check that port
1883on the child node is reachable from the parent, the CA certificates were fetched during the parent installation (ca-bundle.sh), and the child MQTT credentials are correct.For details about local and remote child scenes, see the Scenescape guide Create and Manage a Scene Hierarchy.
Access the Application and Components#
Application UI#
Open a browser and go to the following endpoints to access the application. Use <actual_ip>
instead of localhost for external access:
Note
Access the application UI, Grafana UI, Node-RED UI, and DL Streamer Pipeline Server API through the NGINX reverse proxy at
https://localhost, using their documented paths. Access the InfluxDB UI directly athttp://localhost:8086.For passwords stored in files, such as
supassorinfluxdb2-admin-token, refer to the corresponding files in./src/secretsin your deployment.The application uses HTTPS with self-signed certificates, so your browser may display a certificate warning. For the best experience, use Google Chrome and accept the warning.
URL: https://localhost
Log in with credentials:
Username:
adminPassword: Stored in
supass. Check./smart-corridor/src/secrets/supass.
Note
After starting the application, wait approximately 1 minute for the MQTT broker to initialize. Green arrows next to MQTT in the application interface indicate that the broker is ready. The application uses HTTPS with a self-signed certificate, so your browser may display a warning. For the best experience, use Google Chrome.
Grafana UI#
Log in with credentials:
Username:
adminPassword:
admin(You will be prompted to change it the first time you log in.)
InfluxDB UI#
Log in with credentials:
Username:
<your_influx_username>(Check./smart-corridor/src/secrets/influxdb2/influxdb2-admin-username.)Password:
<your_influx_password>(Check./smart-corridor/src/secrets/influxdb2/influxdb2-admin-password.)
Node-RED UI#
Log in with credentials:
Username:
<your_nodered_username>(Check./smart-corridor/src/secrets/nodered/nodered-admin-username.)Password:
<your_nodered_password>(Check./smart-corridor/src/secrets/nodered/nodered-admin-password.)
DL Streamer Pipeline Server#
REST API: https://localhost/api/pipelines/status
Check Pipeline Status:
curl -k https://localhost/api/pipelines/status
Verify the Application#
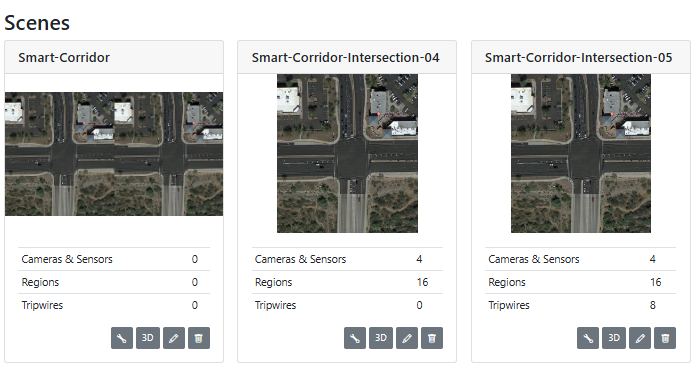
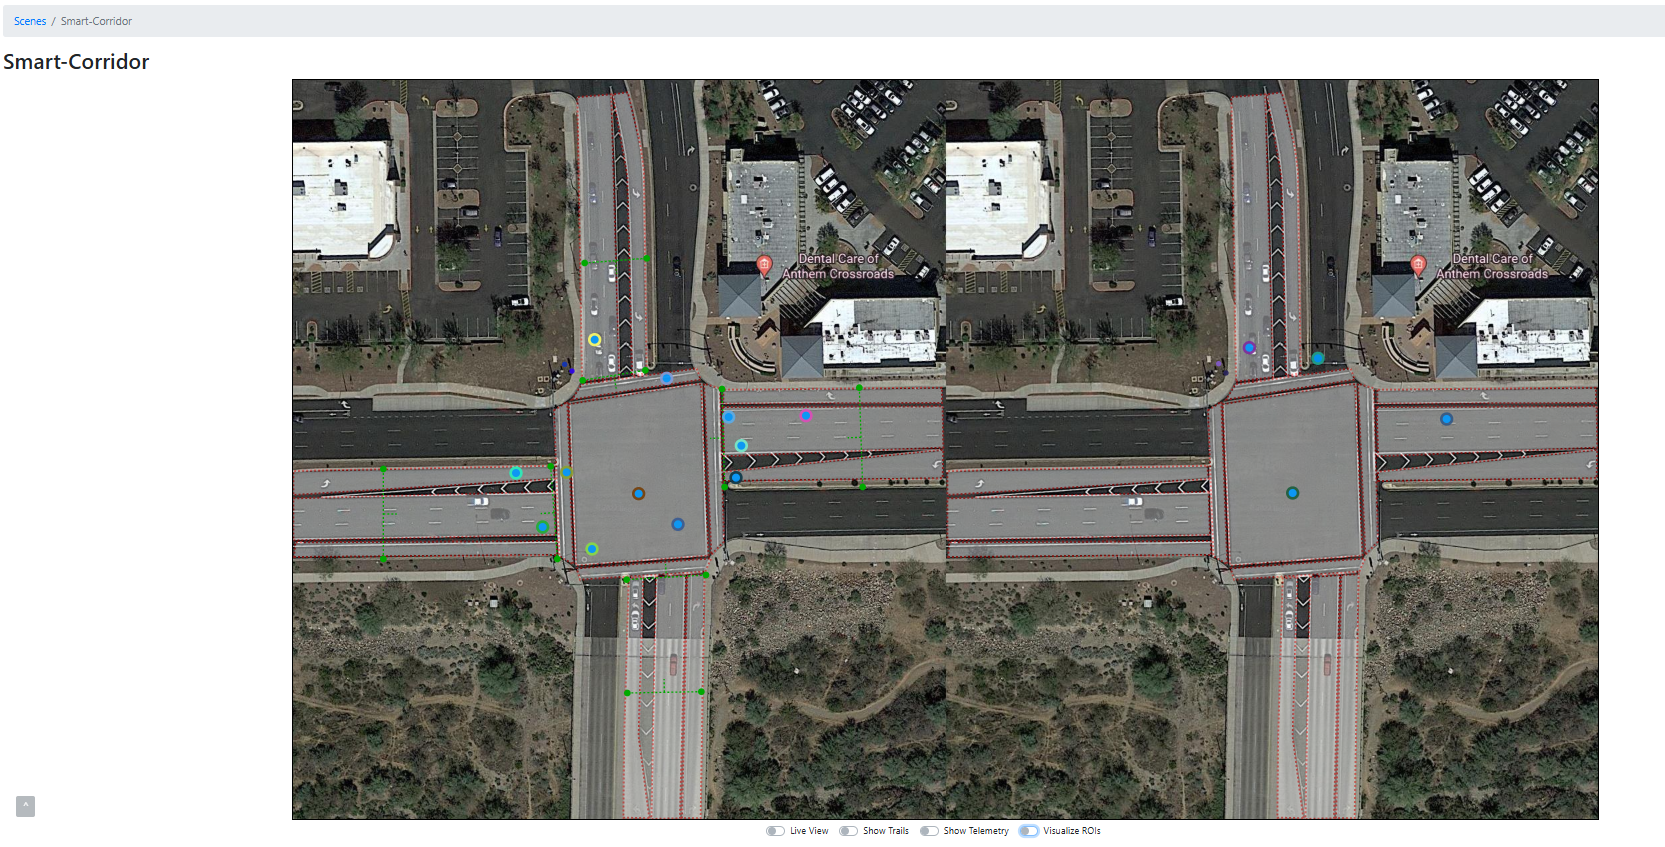
Fused object tracks: In the Scene Management UI, select the Smart-Corridor or Smart-Corridor-Intersection cards to open the scene. The individual intersection scene pages display fused tracks moving on the map and grayed-out frames from each camera. Select “Live View” to display incoming camera frames. Object detections in the camera feeds correspond to the tracks on the map.
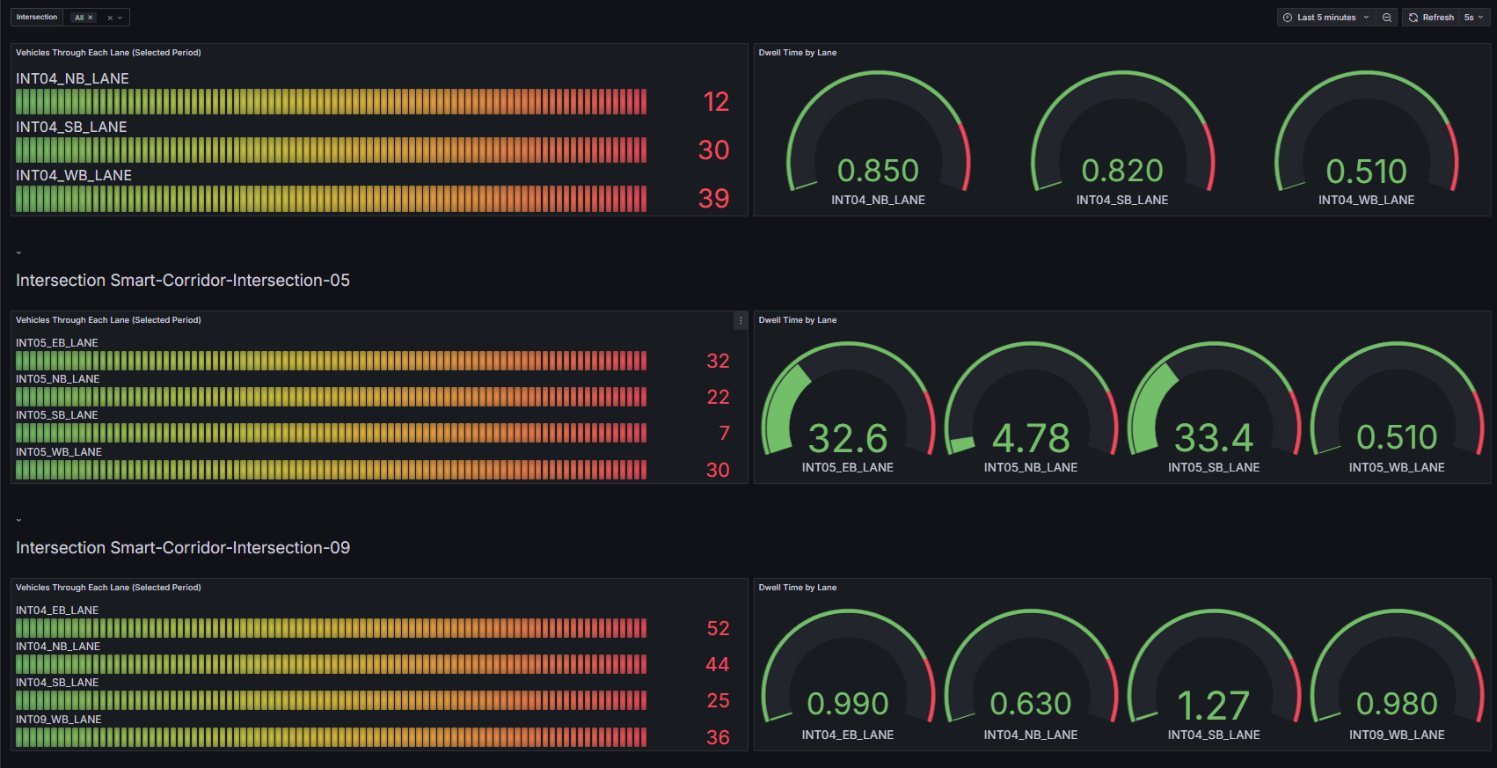
Grafana dashboard: In the Grafana Dashboard UI, view aggregated analytics for different regions of interest. On the Grafana Dashboard home page, select “Dashboards,” then select “Smart Corridor - Generic Data.”
In the same Grafana Dashboard UI, you can go to the
Smart Corridor - Vehicle Eventsdashboard to find Vehicle Events that get captured across intersections. For example, Vehicle Reappearance and Wrong Way.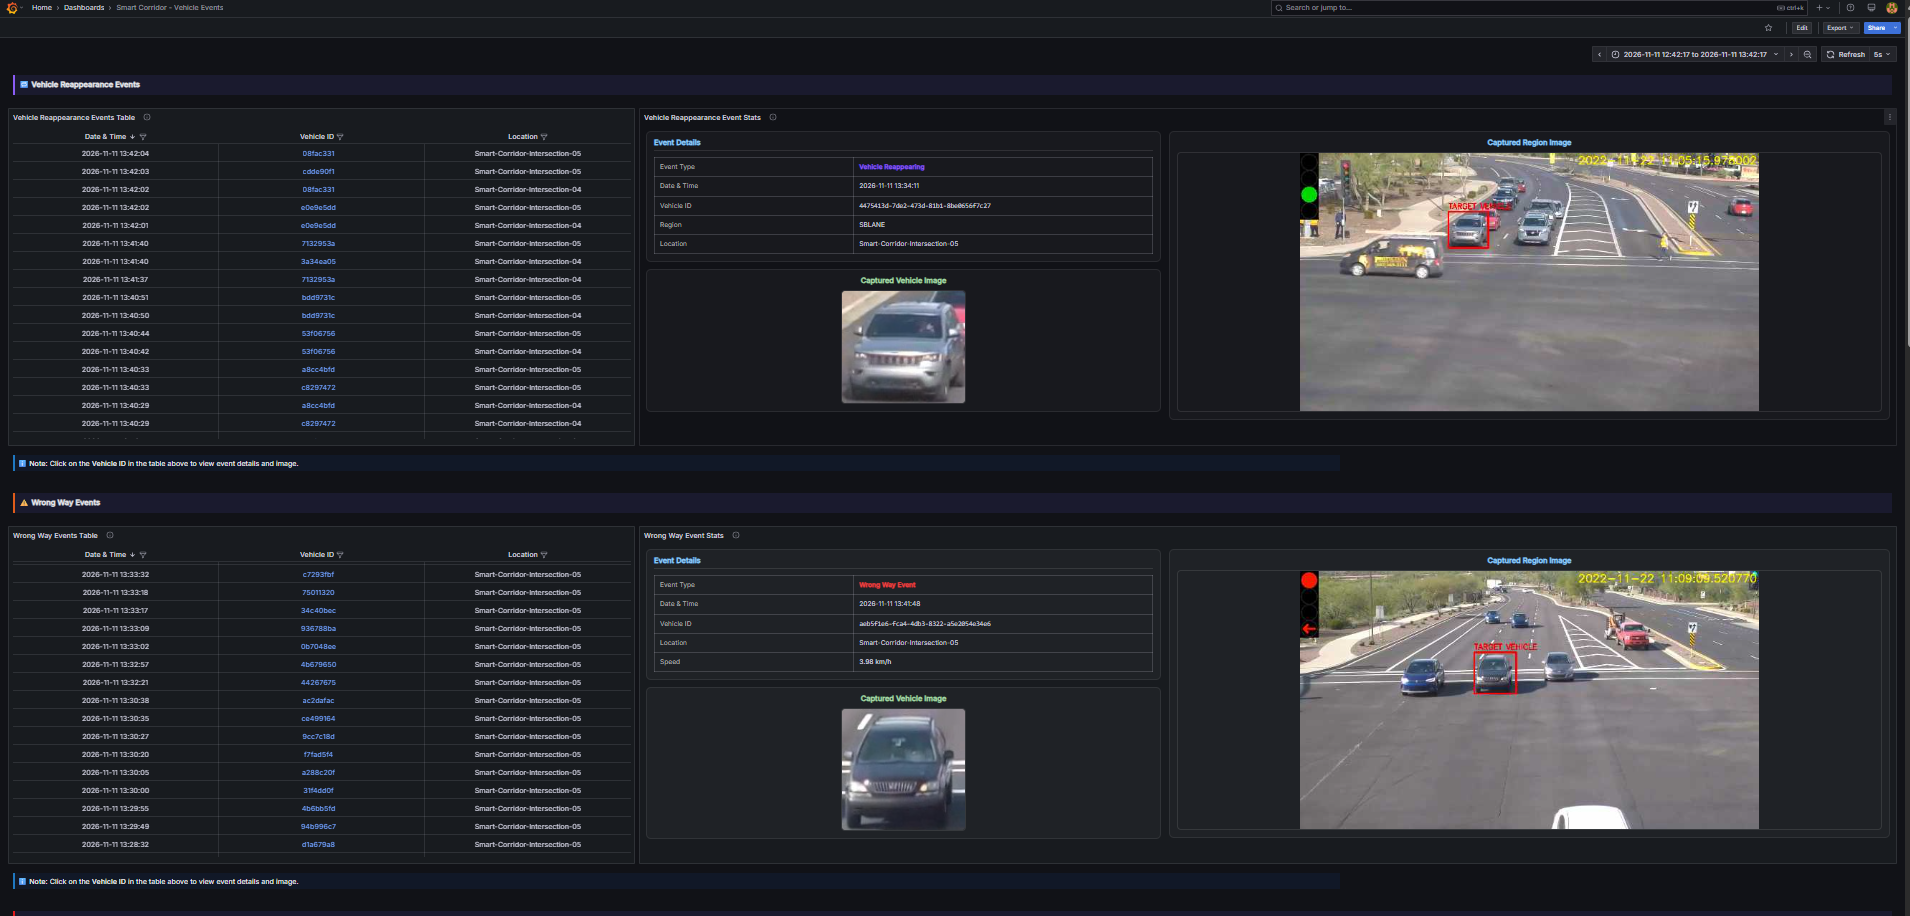
Note
The Wrong Way event is currently configured with inverted logic and only on one intersection to demonstrate the functionality because there is no appropriate dataset available at present.
Stop the Application#
To stop the application microservices, run:
docker compose down
Learn More#
Troubleshooting: Find detailed steps to resolve common issues during deployments.
DL Streamer Pipeline Server: Intel® microservice based on Python programming language for video ingestion and deep learning inference.
Scenescape: Intel® scene-based AI software framework.