Run Live Video Captioning with Nx Witness#
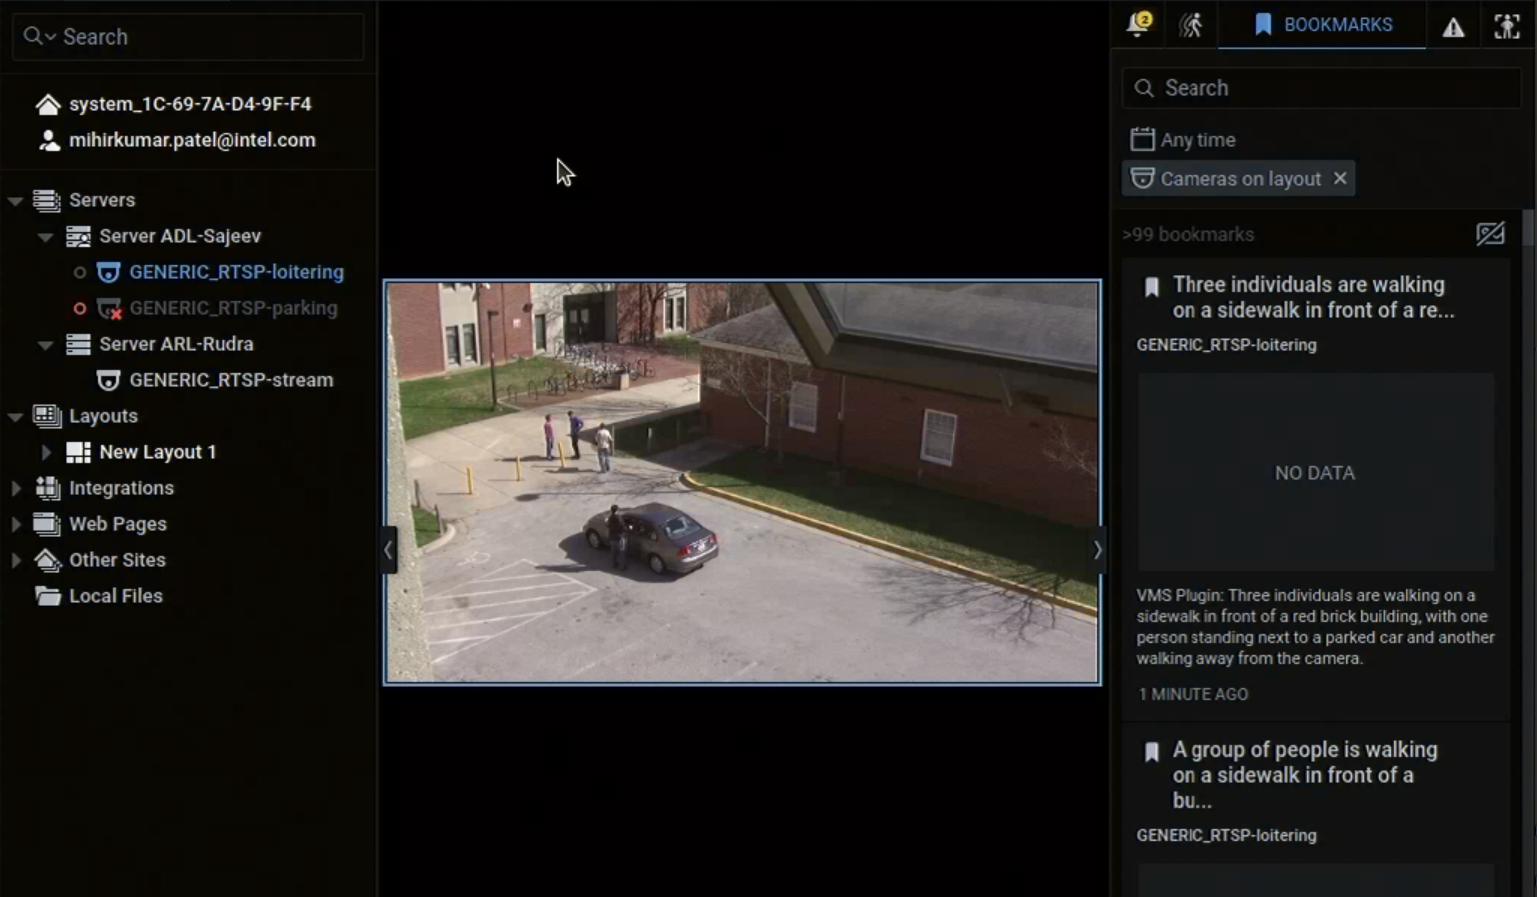
This page brings up Live Video Captioning (LVC) and VAP, and runs a captioning pipeline on an Nx Witness camera. When you finish, each caption the VLM generates appears as a bookmark on the camera’s timeline in the Desktop Client.
Prerequisites#
Nx Witness set up and checked, as in Set Up Nx Witness.
An analytics host with Ubuntu 24.04 or 26.04, Docker and Docker Compose.
The
metro-ai-suiterepository cloned on the analytics host:git clone --filter=blob:none --branch release-2026.3.0 https://github.com/open-edge-platform/metro-ai-suite.git cd metro-ai-suite
Part 1: Bring up Live Video Captioning#
LVC must be running before VAP starts: VAP reads the LVC API schema at startup.
1.1 Install and start LVC#
cd live-video-analysis/live-video-captioning
Follow the LVC
Get Started Guide
to download the models and configure its .env, then start the stack:
docker compose up -d
1.2 Check LVC#
curl http://localhost:4173/health
curl http://localhost:8889/
The first command checks the LVC backend, the second MediaMTX. VAP uses these LVC services:
Service |
Default port |
Purpose |
|---|---|---|
LVC backend |
|
REST API to start and stop captioning runs |
MQTT broker |
|
Captions, read by VAP |
MediaMTX |
|
WebRTC video for the VAP dashboard (optional) |
Part 2: Configure VAP#
2.1 Open the VAP directory#
cd ../../vms-adapter-plugin
cp .env.example .env
2.2 Configure the environment#
Edit .env. The values below are the ones this integration needs; leave the rest as they
are. Variables of other VMS and apps, such as AIB_* and DLS_*, are not used.
# PostgreSQL
PG_PASSWORD=<choose-a-password>

# Nx Witness
NX_HOST=<NX_HOST_IP>
NX_USERNAME=<nx-admin-user>
NX_PASSWORD=<nx-admin-password>
NX_TLS_VERIFY=false

# Live Video Captioning
LVC_HOST=host.docker.internal
LVC_BASE_URL=http://host.docker.internal:4173
MEDIAMTX_URL=http://host.docker.internal:8889

# LVC MQTT broker, as VAP reaches it
MQTT_BROKER_HOST=host.docker.internal
MQTT_BROKER_PORT=1883
host.docker.internal works when LVC runs on the same host as VAP; otherwise, use its
address. For TLS to the MQTT broker, see
TLS and Certificate Configuration.
2.3 Generate config/config.yaml#
Generate the VAP configuration for Nx Witness and Live Video Captioning:
./setup.sh --vms nx --apps lvc
setup.sh builds config/config.yaml from the configuration fragments below, and warns about
their variables that are not set in .env. To change a setting, edit the fragment and run
setup.sh again; do not edit config/config.yaml.
Fragment |
Content |
|---|---|
|
The Nx Witness instance; see Run Loitering Detection |
|
The LVC app and its MQTT broker |
The LVC app, in analytics_app_shim/lvc/vap-config.yaml:
- type: live_captioning
  display_name: "Live Video Captioning"
  base_url: "http://${LVC_HOST:-host.docker.internal}:${LVC_PORT:-4173}"
  mediamtx_url: "http://${MEDIAMTX_HOST:-host.docker.internal}:${MEDIAMTX_PORT:-8889}"
  mqtt_host: "${MQTT_BROKER_HOST:-}"
  mqtt_port: ${MQTT_BROKER_PORT:-1883}
If mqtt_host is empty, VAP does not read the captions, and adds no bookmarks.
Part 3: Start VAP#
docker compose up -d
docker compose ps
Expect vms-adapter-backend, vms-adapter-ui and vms-adapter-postgres to be up, and the
backend to be healthy.
Check that VAP registered with Nx Witness and subscribed to the LVC broker:
docker compose logs backend | grep -E "nx_integration_|lvc_mqtt_subscriber_task_started"
Expect nx_integration_autoregistered (or nx_integration_already_registered on later
starts) and lvc_mqtt_subscriber_task_started.
Check that VAP read the LVC schema:
curl -k https://localhost:3443/v1/analytics-apps/live_captioning/schema | python3 -m json.tool | head -20
A JSON schema with fields such as prompt, model_name and pipeline_name means VAP
reaches LVC.
Part 4: Start a captioning pipeline#
In the Desktop Client, right-click the camera in the resource tree, and choose Camera Settings.
Open the Integrations tab, and select VAP Analytics Integration. If it is off, turn it on.
In the Live Video Captioning group, set the fields:
Field
Description
Enable Live Video Captioning Pipeline
Starts or stops the pipeline for this camera.
Device
Inference device:
CPU,GPUorNPU.Prompt
Prompt sent to the VLM, for example
Describe what you see in one sentence.Leave empty to use the LVC default.Check Enable Live Video Captioning Pipeline, and click Apply, then OK.
Within 5 seconds, VAP starts the pipeline. Check the log:
docker compose logs backend | grep -E "lvc_run_registered|nx_pipeline_started"
Expected:
lvc_run_registered   camera_id=nx:<device-uuid> run_id=<run-id>
nx_pipeline_started  app_id=live_captioning device_id=<device-uuid> run_id=<run-id>
If you change Device or Prompt while the pipeline runs, VAP restarts it with the new values.
Part 5: See the captions#
VAP adds each caption as a bookmark on the camera’s timeline, with the first 500 characters of the caption as its name.
In the Desktop Client, open the camera.
Open the Bookmarks panel (Ctrl+B).
Captions also appear in the VAP dashboard. Open https://<vap-host>:3443, and open the
Live Stream tab: it plays the camera video through MediaMTX, with the latest caption
overlaid.
Part 6: Start from the VAP dashboard (optional)#
Open
https://<vap-host>:3443in a browser.In the Camera Discovery panel, click Discover Cameras, and turn on the camera you want to caption.
In the Analytics Engine panel, click Discover Apps, and select Live Video Captioning.
Select the Camera and the Device, enter a prompt, and click Start Analysis.
The form has more LVC settings; the defaults work for a first run.
To list and stop runs through the API:
curl -k https://localhost:3443/v1/analytics-apps/live_captioning/runs | python3 -m json.tool
curl -k -X DELETE https://localhost:3443/v1/analytics-apps/live_captioning/runs/<run_id>
Part 7: Stop#
To stop the pipeline, uncheck Enable Live Video Captioning Pipeline in the camera
settings, and click Apply, then OK. VAP logs lvc_run_stopped and
nx_pipeline_stopped.
To stop VAP, run docker compose down. Do not add -v; see
Run Loitering Detection, Part 8.
Next step#
Run Both Applications: run Loitering Detection and Live Video Captioning on the same cameras.