Run Loitering Detection with XProtect#
This page brings up Loitering Detection and VAP, connects VAP to AI Bridge, and runs Loitering Detection on an XProtect camera. When you finish, Smart Client shows the detection boxes and the loitering zone on the camera’s live video.
Prerequisites#
XProtect and AI Bridge set up and checked, as in Set Up XProtect and AI Bridge.
An analytics host with Ubuntu 24.04 or 26.04, Docker and Docker Compose.
The
metro-ai-suiterepository cloned on the analytics host:git clone --filter=blob:none --branch release-2026.3.0 https://github.com/open-edge-platform/metro-ai-suite.git cd metro-ai-suite
Part 1: Bring up Loitering Detection#
1.1 Install the application#
Install Loitering Detection as described in its Get Started Guide. In short:
cd metro-vision-ai-app-recipe
./install.sh loitering-detection
Do not run sample_start.sh. It starts pipelines on the bundled sample videos; VAP
starts the pipelines on your XProtect cameras instead.
1.2 Set the loitering threshold#
In metro-vision-ai-app-recipe/.env, set how many seconds a person must stay in the zone
to count as loitering:
LOITERING_THRESHOLD_SEC=5.0
The mqtt-table-flattener sidecar uses this value to decide when to publish a loitering
row, and so when VAP raises an event. Use the same value for VAP in
Part 2.
1.3 Verify the MQTT Port Exposure and Set the MQTT Host for the DL Streamer Pipeline Server#
The Docker Compose stack includes an Eclipse Mosquitto MQTT broker. Confirm that port 1883
is published to the host in docker-compose.yml, and set MQTT_HOST so the DL Streamer Pipeline
Server can publish to it:
broker:
  image: docker.io/library/eclipse-mosquitto:2.0.22
  ports:
    - "1883:1883"

dlstreamer-pipeline-server:
  environment:
    - MQTT_HOST=${HOST_IP} # we set to HOST_IP as broker is running in the same host
    - MQTT_PORT=1883
1.4 Start the application#
docker compose up -d
docker compose ps
Check that dlstreamer-pipeline-server, broker and mqtt-table-flattener are running,
and that the broker publishes port 1883 on the host. VAP connects to the broker from
outside the application’s Docker network.
Part 2: Configure VAP#
2.1 Open the VAP directory#
cd ../vms-adapter-plugin
cp .env.example .env
2.2 Configure the environment#
Edit .env. The values below are the ones this integration needs; leave the rest as they
are.
# PostgreSQL
PG_PASSWORD=<choose-a-password>

# Milestone AI Bridge
AIB_HOST=<aib-host>
AIB_GRAPHQL_PORT=4000
AIB_TLS_VERIFY=false
# This host's name or address, as the XProtect host reaches it for rending VAP url to
# start/stop analytics.
AIB_APP_HOSTNAME=<vap-host>

# Loitering Detection (DL Streamer Pipeline Server)
DLS_VISION_HOST=host.docker.internal
DLS_VISION_PORT=443
DLS_VISION_TLS_VERIFY=false
DLS_PIPELINE_GPU=loiter_detect_roi_gpu
# Same value as LOITERING_THRESHOLD_SEC in the recipe .env (Part 1.2).
LOITERING_THRESHOLD_SEC=5.0

# Loitering Detection MQTT broker, as VAP reaches it
MQTT_HOST=host.docker.internal
MQTT_PORT=1883
Set at least one of DLS_PIPELINE_CPU, DLS_PIPELINE_GPU and DLS_PIPELINE_NPU. The pipeline names you provide much be available in Loitering detection application. If using GPU or NPU pipelines, ensure host supports it. Refer to app’s gpu and npu setup documentation for that. Only the devices you set can be chosen when you start a pipeline. host.docker.internal
works when Loitering Detection runs on the same host as VAP; otherwise use its address.
2.3 Generate config/config.yaml#
Generate the VAP configuration for Milestone and Loitering Detection:
./setup.sh --vms milestone --apps ld
setup.sh builds config/config.yaml from the configuration fragments below, and warns about
their variables that are not set in .env. The values come from .env at startup, so you do
not need to run setup.sh again after editing .env.
Fragment |
Content |
|---|---|
|
The Milestone instance |
|
The Loitering Detection app |
To change a setting, edit the fragment and run setup.sh again; do not edit
config/config.yaml, as setup.sh overwrites it. Check these parts.
The Milestone instance, in vms_shim/milestone/vap-config.yaml:
- name: milestone
  vendor: milestone
  base_url: "http://${AIB_HOST}:${AIB_GRAPHQL_PORT:-4000}"
  vendor_options:
    graphql_url: "http://${AIB_HOST}:${AIB_GRAPHQL_PORT:-4000}/api/bridge/graphql"
    dashboard_url: "https://${AIB_APP_HOSTNAME}:${UI_HTTPS_PORT:-3443}"
    metadata_format: ONVIF_ANALYTICS_FRAME
    event_min_interval_s: 10
dashboard_url is the VAP page Management Client shows for the app, so the XProtect
host must be able to open it.
The loitering zone, threshold and events, in
analytics_app_shim/object_detection/vap-config.yaml:
- type: object_detection
  app_id: "dls_vision"
  display_name: "Loitering Detection"
  zones:
    region1:
      label: "Loitering Zone"
      bounding_box: [0.0, 0.25, 0.3, 0.7]
  default_zone_polygon: [[0.0, 0.25], [0.3, 0.25], [0.3, 0.7], [0.0, 0.7]]
  loitering_threshold_s: "${LOITERING_THRESHOLD_SEC:-5.0}"
  events_enabled: true
default_zone_polygonis the zone the pipeline measures loitering in, as fractions of the frame (0 to 1). Place it where people stand in your camera view. You can change it for each run when you start the pipeline.zonesis the box drawn on the video in Smart Client. Keepbounding_boxequal to the rectangle ofdefault_zone_polygon, so the drawn box matches the measured zone.events_enabledsends loitering events to XProtect; see Loitering Events and Alarms.
Every setting is described in the Reference.
Part 3: Start VAP#
docker compose up -d
docker compose ps
Expect vms-adapter-backend, vms-adapter-ui and vms-adapter-postgres to be up.
On startup VAP connects to AI Bridge and registers Loitering Detection. Check the log:
docker compose logs backend | grep -E "milestone_(connected|iva_registered|autoregister)"
Expected:
milestone_connected            discovered=1 graphql_url=http://<aib-host>:4000/api/bridge/graphql vms_ids=['<vms-id>']
milestone_iva_registered       app_ids=['<app-guid>'] apps=['Loitering Detection'] vms_id=<vms-id>
milestone_autoregister_complete app_ids=['<app-guid>'] vms=milestone vms_ids=['<vms-id>']
You can also ask AI Bridge for the topics VAP registered:
curl -s http://<aib-host>:4000/api/bridge/graphql \
  -H 'Content-Type: application/json' \
  -d '{"query":"{ metadataTopics { appID topicName } eventTopics { appID topicName } }"}'
Expect dls_vision-metadata and dls_vision-events.
Part 4: Turn on the metadata topic in Management Client#
XProtect accepts detection metadata for a camera only after you turn on the app’s metadata topic for that camera.
Important
If you skip this step, AI Bridge accepts VAP’s metadata and discards it without an error, and Smart Client shows no boxes.
In Management Client, go to Recording Servers, expand your recording server, and select the camera.
Open the camera’s Processing server tab.
Under Loitering Detection, tick dls_vision-metadata.
Click Save.
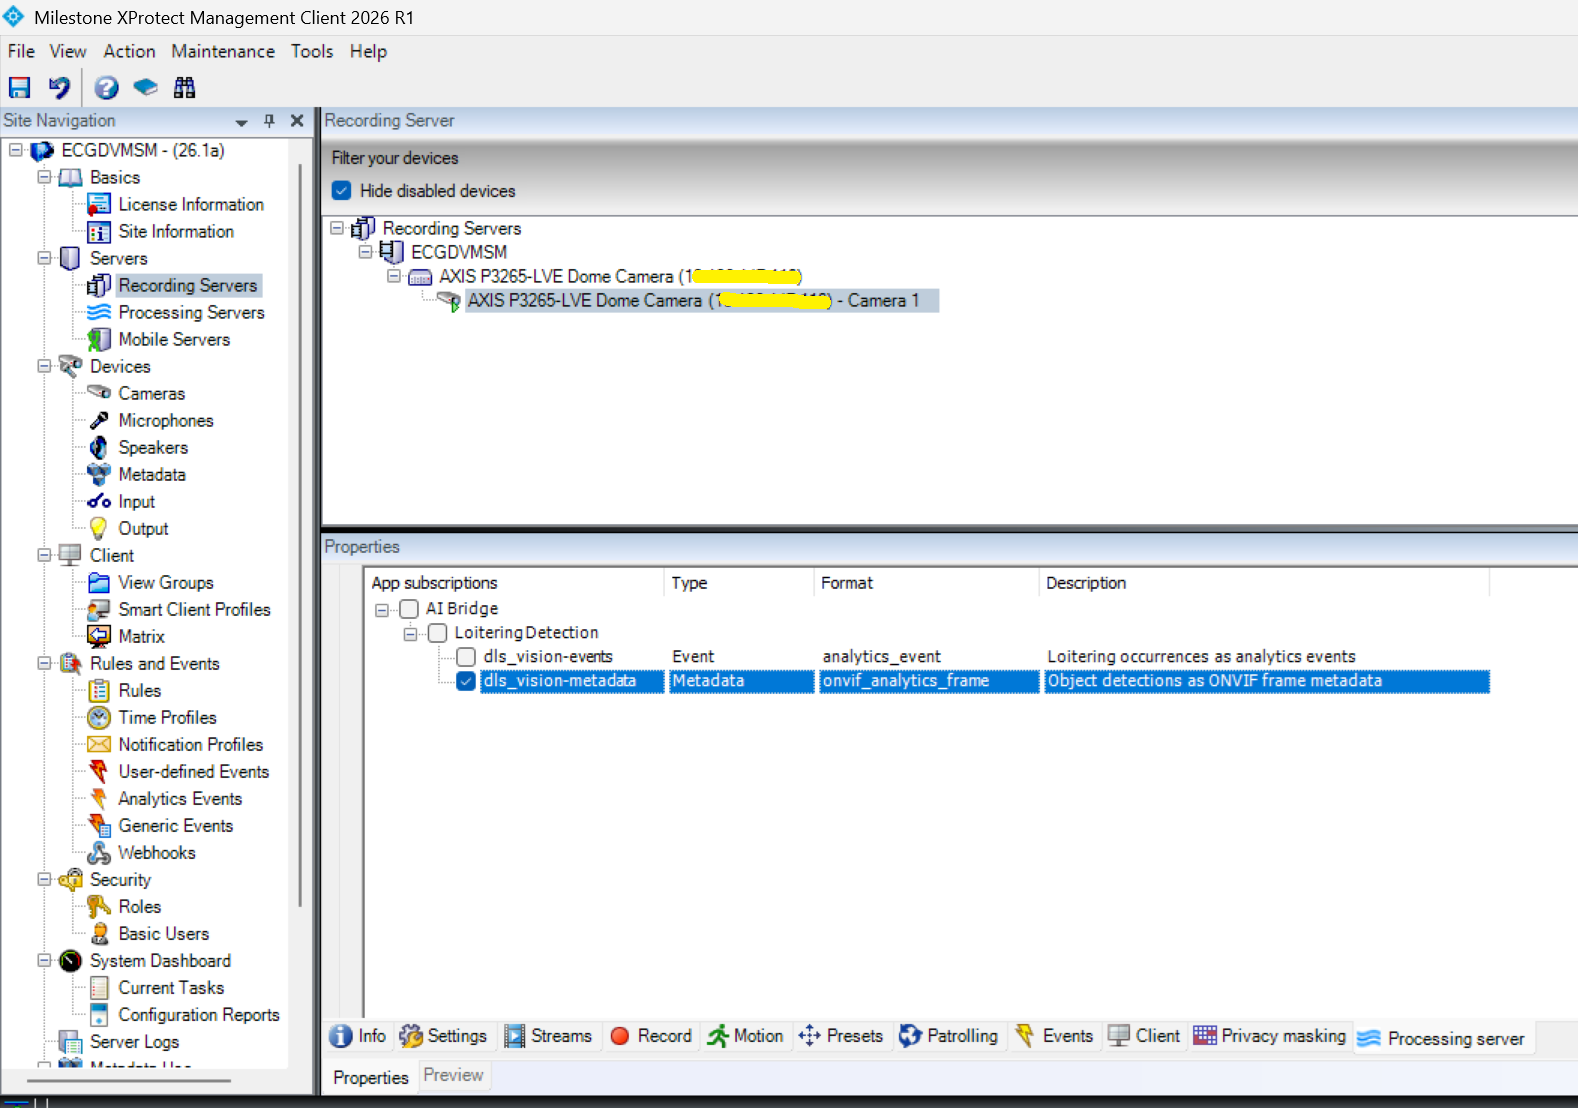
The events topic, dls_vision-events, does not need ticking.
Note
When you select the app or a topic, Management Client also shows VAP’s page for it. start and stop pipelines from the VAP dashboard as shown below.
Part 5: Start a pipeline#
5.1 Start from the camera page#
VAP also has a compact page for one camera, with a zone editor:
https://<vap-host>:3443/<deviceId>/<deviceId>/<streamId>
Pick the device, adjust the zone corners if needed, and click Start. While the pipeline runs, the page shows Running and a Stop button, and the zone is locked.

Each numbered corner of the zone has its own X and Y box, as a fraction of the frame.
+ Point adds a corner, and Reset restores default_zone_polygon.
5.2 Check that the pipeline runs#
docker compose logs backend | grep od_run_started
# od_run_started  pipeline=user_defined_pipelines/object_tracking_gpu run_id=<run-id>
curl -sk https://localhost:3443/v1/analytics-apps/dls_vision/runs
The run list shows the run as RUNNING, with its camera_id, device and zone.
When it starts a run, VAP scales the zone to the camera’s resolution and sends it to the
pipeline, together with the threshold. If the log shows od_zone_resolution_unavailable,
AI Bridge has no resolution for this camera and the pipeline uses its own default zone;
see Use a simulated camera.
Part 6: See the results in Smart Client#
Open Smart Client and show the camera in a live view.
Within a few seconds, boxes appear around detected people, labelled with their class (for example
person), and the loitering zone is drawn as an amber box labelled Loitering Zone.Switch to playback: the boxes are recorded with the video.
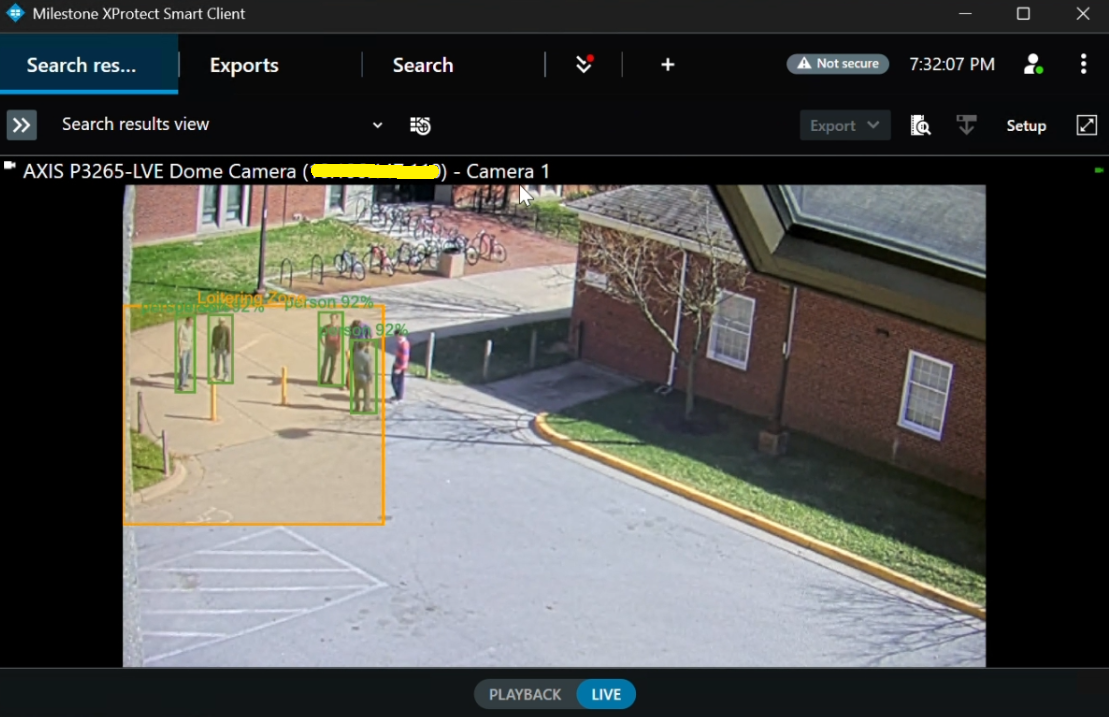
Boxes are colored by class: people blue, vehicles red, zones amber.
You might need to reopen the Smart Client if it was already open for the boxes to render for the first time.
Part 7: Stop the pipeline#
Click Stop on the camera page, or use the API:
Part 8: Stop VAP#
To stop VAP, run docker compose down. Do not add -v: it deletes the database volume
with the discovered cameras.
Next step#
Loitering Events and Alarms: raise an XProtect alarm when someone loiters.