Load the Helm* Charts and Images into the OCI Local Registry#
The Helm* charts that were created earlier for the Tutorial Server and the Tutorial Web UI are only present locally in the file system. They must be bundled and pushed to an OCI registry, so they will be available for deployment to the Edge Node. You must push them to the local OCI registry that is running in the Edge Orchestrator.
Note
The OCI registry running on the Edge Orchestrator is a private registry
that is only accessible from the Edge Orchestrator and the Edge Node.
There are many public registries available, such as Docker* Hub, but for
simplicity, use the local registry. It is available at
https://registry-oci.<CLUSTER_FQDN>. The <CLUSTER_FQDN> is the
Fully Qualified Domain Name of the Edge Orchestrator
without the hostname.
# Change back to where you created the Tutorial Helm charts
cd tutorial-chart
helm package tutorial-server
helm package tutorial-web-ui
This creates two Archive files that you can push to the OCI registry. To get the password for the Registry, follow the instructions in Push Image or Chart to the Registry.
Note
It is not possible to say what the CLUSTER_FQDN is in advance, as every deployment will be different. It is better for the user to set it as a variable (see how to refer to the variable below). Same for USER_NAME, ORG and PROJECT. You should never put a password into a variable. The user should be part of the Edge Manager Group - see Cluster User Groups for more information.
Push the images to the registry:
export CLUSTER_FQDN=<CLUSTER_FQDN>
export ORG=<ORG>
export PROJECT=<PROJECT>
export USER_NAME=<USER_NAME>
helm registry login registry-oci.$CLUSTER_FQDN -u $USER_NAME
# Will prompt for password. Remember to use the CLI Secret from the OCI registry

helm push tutorial-server-0.1.0.tgz oci://registry-oci.$CLUSTER_FQDN/catalog-apps-$ORG-$PROJECT
helm push tutorial-web-ui-0.1.0.tgz oci://registry-oci.$CLUSTER_FQDN/catalog-apps-$ORG-$PROJECT
Load the Container Images into the Local OCI Registry#
Likewise, the Container images created earlier for the Tutorial Server and the Tutorial Web UI are only present in the local computer. You must push them to the same OCI registry, so they will be available for deployment to the Edge Node.
You can use the docker command to push the images to the OCI registry.
First, tag the images so Docker knows which registry to push them
to.
docker tag tutorial-server-image:latest registry-oci.$CLUSTER_FQDN/catalog-apps-$ORG-$PROJECT/tutorial-server-image:0.1.0
docker tag tutorial-web-ui-image:latest registry-oci.$CLUSTER_FQDN/catalog-apps-$ORG-$PROJECT/tutorial-web-ui-image:0.1.0
Note
Here the images have a version number of 0.1.0. This is not
required (it will use latest by default), but it is recommended to give
the images a semantic version number, so you can track the versions of
the images that are deployed. The value used here must match the version in
the values files in the Deployment Package from the previous steps.
Push the images to the OCI registry:
docker login registry-oci.$CLUSTER_FQDN -u $USER_NAME
# Will prompt for password. Remember to use the CLI Secret from the OCI registry

docker push registry-oci.$CLUSTER_FQDN/catalog-apps-$ORG-$PROJECT/tutorial-server-image:0.1.0
docker push registry-oci.$CLUSTER_FQDN/catalog-apps-$ORG-$PROJECT/tutorial-web-ui-image:0.1.0
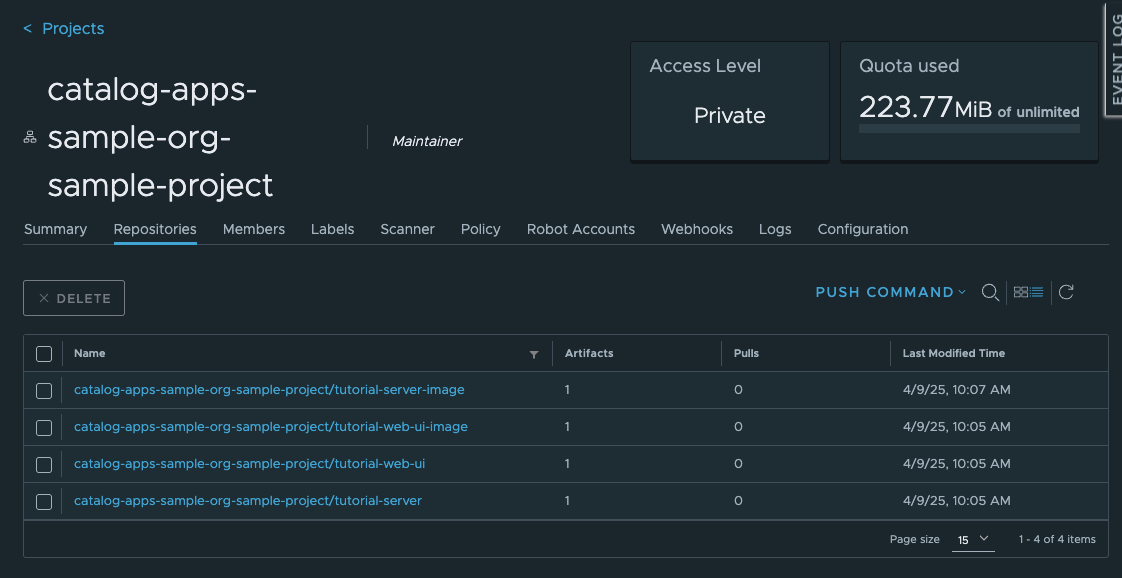
After these pushes, the images and charts can be seen side by side in the OCI registry.