Develop the Tutorial Web UI#
Web UI First Steps#
You will develop a simple Next.js* application that will interact with the Tutorial Server. First, you will develop and test it locally on your computer and then see how to package it in to an edge application later.
Note
It is not essential to test the application on your own computer if you do not have Node.js* environment installed. When you are packaging the code at a later stage in the Dockerfile, you will be able to test it then.
The application is developed in a single HTML file, which is a good way to get started with a Next.js application. Follow the Docs page where you can find more details.
Ensure Node.js application version 18 or later is installed on your computer and install Next.js using npm (part of Node.js).
node --version
npx create-next-app@latest tutorial-web-ui --ts --yes
cd tutorial-web-ui
npm add -s axios
npx next dev --turbopack
This creates all the needed files to run a Client and makes it available on http://localhost:3000. Open your web browser to this address to see the default page.
The default page will not be what you want, so you will modify the code.
Customize the UI#
The default page contains only a link to the Next.js documentation. You will remove this and only add what you need.
First, you remove the app/page.tsx file and create a new file app/page.tsx with the following content:
 1'use client'
 2
 3import {useEffect, useState} from 'react';
 4import axios from 'axios';
 5
 6// Axios Interceptor Instance
 7const AxiosInstance = axios.create({
 8    baseURL: process.env.NODE_ENV === 'development' ? 'http://localhost:8000' : '/api'
 9});
10
11export default function Home() {
12    const [count, setCount] = useState(0);
13    const [greeting, setGreeting] = useState("not yet set");
14    const [error, setError] = useState(null);
15
16    useEffect(() => {
17        AxiosInstance.get('/counter')
18            .then(response => {
19                setCount(response.data.count);
20            })
21            .catch(error => {
22                setError(error.message);
23            });
24    }, []);
25
26    useEffect(() => {
27        AxiosInstance.get('/')
28            .then(response => {
29                setGreeting(response.data.message);
30            })
31            .catch(error => {
32                setError(error.message);
33            });
34    }, []);
35
36    return (
37        <div
38            className="grid grid-rows-[20px_1fr_20px] items-center justify-items-center min-h-screen p-8 pb-20 gap-16 sm:p-20 font-[family-name:var(--font-geist-sans)]">
39            <header className="row-start-1 flex gap-[24px] flex-wrap items-center justify-center">
40                <div className="flex items-center bg-blue-500 text-white text-sm font-bold px-4 py-3" role="alert">
41                    <svg className="fill-current w-4 h-4 mr-2" xmlns="http://www.w3.org/2000/svg" viewBox="0 0 20 20">
42                        <path
43                            d="M12.432 0c1.34 0 2.01.912 2.01 1.957 0 1.305-1.164 2.512-2.679 2.512-1.269 0-2.009-.75-1.974-1.99C9.789 1.436 10.67 0 12.432 0zM8.309 20c-1.058 0-1.833-.652-1.093-3.524l1.214-5.092c.211-.814.246-1.141 0-1.141-.317 0-1.689.562-2.502 1.117l-.528-.88c2.572-2.186 5.531-3.467 6.801-3.467 1.057 0 1.233 1.273.705 3.23l-1.391 5.352c-.246.945-.141 1.271.106 1.271.317 0 1.357-.392 2.379-1.207l.6.814C12.098 19.02 9.365 20 8.309 20z"/>
44                    </svg>
45                    <p>{greeting}</p>
46                </div>
47            </header>
48            <main className="flex flex-col gap-[32px] row-start-2 items-center sm:items-start">
49                <div className="bg-blue-100 border-t border-b border-blue-500 text-blue-700 px-4 py-3" role="alert">
50                    <p className="font-bold">Counter</p>
51                    <p className="text-sm">{count}</p>
52                </div>
53                <div>
54                    <button className="bg-blue-500 hover:bg-blue-700 text-white font-bold py-2 px-4 rounded-full">
55                        <input type="button" value="Increment" onClick={() => {
56                            AxiosInstance.post('/increment')
57                                .then(response => {
58                                    setCount(response.data.count);
59                                })
60                                .catch(error => {
61                                    setError(error.message);
62                                });
63                        }}/>
64                    </button>
65                    <button className="bg-blue-500 hover:bg-blue-700 text-white font-bold py-2 px-4 rounded-full">
66                        <input type="button" value="Decrement" onClick={() => {
67                            AxiosInstance.post('/decrement')
68                                .then(response => {
69                                    setCount(response.data.count);
70                                })
71                                .catch(error => {
72                                    setError(error.message);
73                                });
74                        }}/>
75                    </button>
76                    <button className="bg-blue-500 hover:bg-blue-700 text-white font-bold py-2 px-4 rounded-full">
77                        <input type="button" value="Reinitialize" onClick={() => {
78                            AxiosInstance.post('/reinitialize')
79                                .then(response => {
80                                    setCount(response.data.count);
81                                })
82                                .catch(error => {
83                                    setError(error.message);
84                                });
85                        }}/>
86                    </button>
87                </div>
88            </main>
89            <footer className="row-start-3 flex gap-[24px] flex-wrap items-center justify-center">
90                {error && <p>Error: {error}</p>}
91            </footer>
92        </div>
93    );
94}
While you do not need to understand all the details of the code, it is clear that you are using Axios library to make calls to the Tutorial Server. You are using the useState and useEffect hooks (from React) to manage the state of the local variables.
Tailwind CSS is used by default with Next.js, therefore, it is easy to style the page.
Verify the UI#
To verify the UI, keep the Tutorial Server running in one terminal and start the Next.js application in another with:
npx next dev --turbopack
Open your web browser to http://localhost:3000.
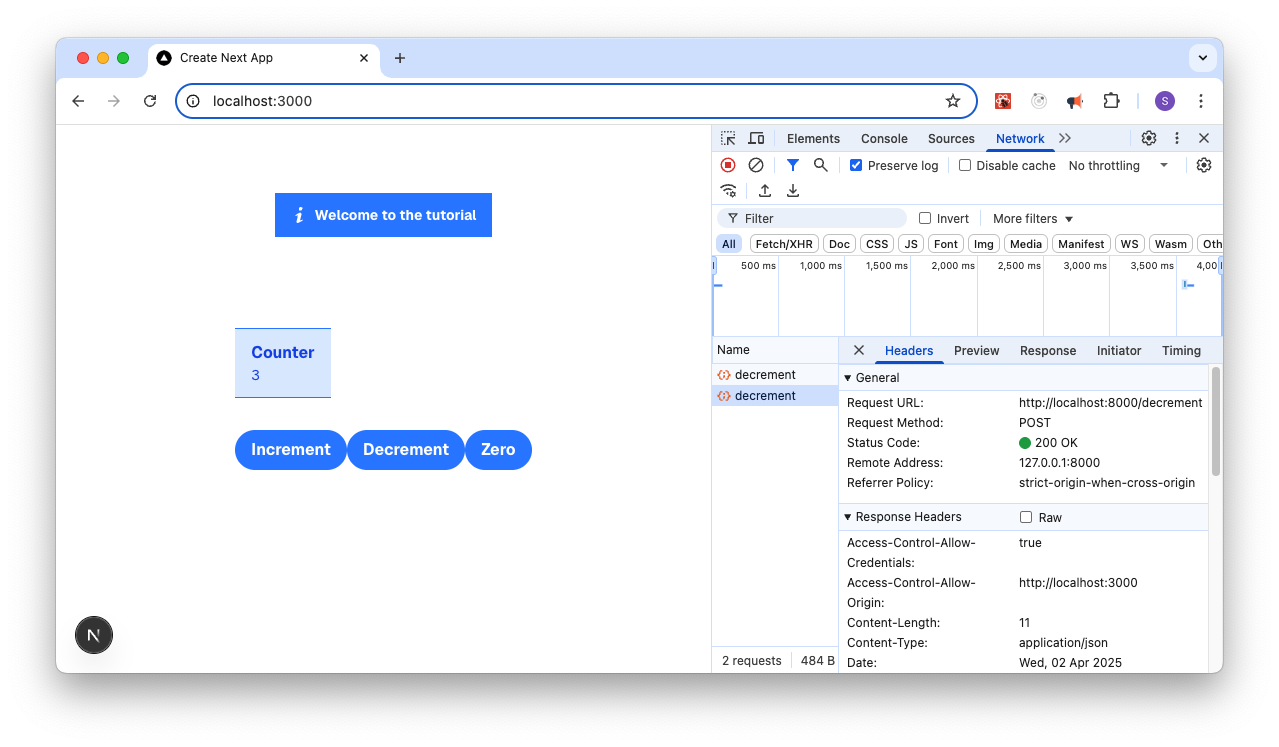
Note
The browser tools are open in the image above, showing the network requests and the console output. This is an essential tool to understand the requests that are going between your browser and the Tutorial Server.
While your browser is still open, run the curl commands from the Tutorial Server page. This allows you to see that requests from the UI are equivalent to those from the command line, and that the UI is updating the counter as expected when the buttons are clicked.
Next Steps#
You can now package the Tutorial Web UI and Tutorial Server into a Container image, so you can deploy them to the edge.