Route API through NGINX* Web Server#
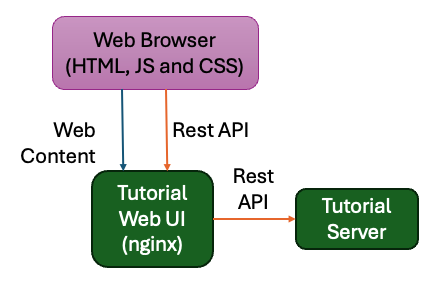
In the Tutorial Web UI, you can make calls using Axios to the Tutorial Server
API at /api. While there are many alternative approaches to
used, it is a common pattern in web applications, where the web server (NGINX*
web server) also acts as a reverse proxy to route traffic to the appropriate
backend service (Tutorial Server).
Override the NGINX Configuration#
To add this reverse proxy functionality, add a new nginx.conf file to the
Tutorial Web UI project. This file overwrites the existing
/etc/nginx.conf.d/default.conf that came with our base image. To do this,
create a ConfigMap in the Helm* chart and mount it to the container.
Create a file configmap.yaml in the tutorial-web-ui/templates folder.
Copy the following into it:
apiVersion: v1
kind: ConfigMap
metadata:
  name: {{ include "tutorial-web-ui.fullname" . }}
  labels:
    {{- include "tutorial-web-ui.labels" . | nindent 4 }}
data:
  default.conf: |
    server {
        listen       8080;
        listen  [::]:8080;
        server_name  localhost;

        #access_log  /var/log/nginx/host.access.log  main;

        location / {
            root   /usr/share/nginx/html;
            index  index.html index.htm;
        }

        # redirect server error pages to the static page /50x.html
        #
        error_page   500 502 503 504  /50x.html;
        location = /50x.html {
            root   /usr/share/nginx/html;
        }

        location /api/ {
            proxy_pass {{.Values.tutorialServer.proto}}://{{.Values.tutorialServer.host}}:{{.Values.tutorialServer.port}}/;
            proxy_http_version 1.1;
            proxy_set_header Upgrade $http_upgrade;
            proxy_set_header Connection "Upgrade";
            proxy_connect_timeout       {{ .Values.tutorialServer.streamTimeout }};
            proxy_send_timeout          {{ .Values.tutorialServer.streamTimeout }};
            proxy_read_timeout          {{ .Values.tutorialServer.streamTimeout }};
            send_timeout                {{ .Values.tutorialServer.streamTimeout }};
        }
    }
Note
An alternative approach would be to update the NGINX.conf file in the Dockerfile, but this would have required hardcoding the Tutorial Server address into the file. This is not good practice as it would require rebuilding the image if the Tutorial Server address changed. Instead, use a late-binding approach that gives the flexibility to adjust the configuration at deployment time.
Update the Deployment to Use the ConfigMap#
Next we need to mount the ConfigMap into the container. To do this, extend the volumes and volumeMounts section that you added to the deployment.yaml file on the previous page.
templates/deployment.yaml#
Edit the Deployment File: Open the
tutorial-web-ui/templates/deployment.yamlfile.Update Volumes: Update the spec.template.spec.volumes section of the Deployment as follows:
# Add to the end of the file under "spec.template.spec.volumes:"
volumes:
  - name: tmp
    emptyDir: { }
  - name: nginx-config
    configMap:
      name: {{ include "tutorial-web-ui.fullname" . }}
Update VolumeMounts: Update the spec.template.spec.containers.volumeMounts section of the Deployment as follows:
    # Add to the end of the nginx container definition under "spec.template.spec.containers.volumeMounts:"
    volumeMounts:
      - name: tmp
        mountPath: /tmp
      - name: nginx-config
        mountPath: /etc/nginx/conf.d
Test the NGINX Configuration#
Now you can test the NGINX configuration by upgrading the tutorial-web-ui
Helm chart. Check if the config map is installed:
helm -n tutorial upgrade tutorial-web-ui ./tutorial-web-ui
kubectl -n tutorial get configmap tutorial-web-ui -o yaml
Reactivate the port-forward to the service again with:
kubectl -n tutorial port-forward service/tutorial-web-ui 8080:8080
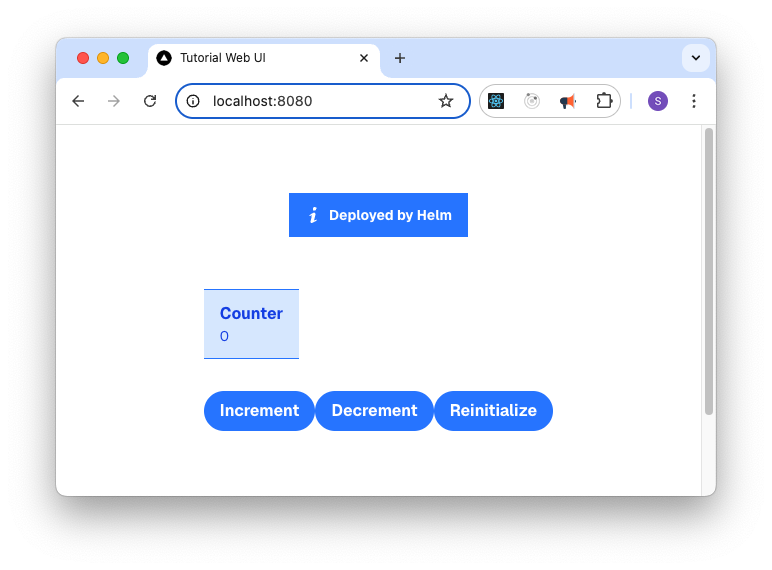
In a web browser open http://localhost:8080. You should see the
message being set properly.
In the next step, you will create a deployment package so that you can deploy this with Edge Manageability Framework Application Orchestration.