Tutorial: Live Video Captioning with Nx Witness#
This tutorial walks through the complete end-to-end setup of Live Video Captioning (LVC) as a Analytics App in the VMS Adapter Plugin. Camera streams come from Nx Witness (VMS REST API).
At the end of this tutorial, you will have:
LVC running and accessible from VAP
Cameras discovered from Nx Witness.
A captioning pipeline running against a live camera RTSP stream
AI-generated captions pushed as bookmarks to the Nx Witness camera timeline
Prerequisites#
A host machine running the Ubuntu OS (version 22.04 or 24.04) with Docker and Docker Compose installed.
The
edge-ai-suitesrepository cloned:git clone --filter=blob:none --sparse --branch release-2026.2.0 https://github.com/open-edge-platform/edge-ai-suites.git cd edge-ai-suites git sparse-checkout set metro-ai-suite
At least one IP camera with an accessible RTSP stream.
Architecture Overview#

Key data flows:
VAP discovers cameras from Nx Witness (queries REST API).
On run start, VAP resolves the selected
camera_idto an RTSP URL and sendsPOST /api/runsto the LVC backend.LVC processes the stream with DL Streamer and a Vision-Language Model (VLM), then emits captions as an SSE stream.
VAP proxies the SSE stream to the dashboard at
/v1/analytics-apps/live_captioning/results/stream.MediaMTX (in the LVC stack) serves the WebRTC video feed, and nginx proxies it at
/whep/.
Part 1 — Set Up Live Video Captioning#
LVC must be running before VAP starts. VAP fetches the LVC OpenAPI schema at startup to build the dynamic analytics form.
1.1 Install and Start LVC#
cd metro-ai-suite/live-video-analysis/live-video-captioning
Follow the LVC Get Started guide to download models and configure its .env, then start the stack:
docker compose up -d
1.2 Verify LVC Is Running#
curl http://localhost:4173/health
Expected: {"status": "ok"} or similar.
Verify MediaMTX (WebRTC relay) is also up:
curl http://localhost:8889/
LVC exposes two services that VAP depends on:
Service |
Default Port |
Purpose |
|---|---|---|
LVC Backend |
|
REST API + SSE caption stream |
MediaMTX |
|
WebRTC signalling (WHEP endpoint for the video player) |
Part 2 — Set Up Nx Witness#
2.1 Download and Install Nx Witness#
Download the Windows x64 — Client & Server installer from the official Nx Witness releases page:
Select Windows x64 — Client & Server and run the installer. This installs:
Nx Witness Server — the VMS backend that manages cameras and exposes the REST API.
Nx Witness Desktop Client — the GUI for camera management and viewing.
Follow the on-screen installation wizard. After installation:
The Nx Witness Server starts automatically as a Windows service.
Open the Nx Witness Desktop Client.
Connect to
localhostwith the admin credentials you set during installation.
Verify the REST API is accessible from the Ubuntu VAP host:
curl -k -s https://<NX_HOST_IP>:7001/rest/v4/info | python3 -m json.tool | grep '"name"\|"version"'
Note
Replace <NX_HOST_IP> with the Windows machine’s LAN IP address.
2.2 Add Cameras to Nx Witness#
In the Nx Witness Desktop Client:
Right-click the server in the resource tree → Add Device.
Add cameras by entering their RTSP URLs or using auto-discovery on the local network.
Confirm each camera appears in the resource tree with a live video feed.
Note the Device ID, a Universally Unique Identifier (UUID), for each camera you plan to use:
Desktop client: right-click a camera → Camera Settings → Information tab.
REST API:
curl -k -u admin:<password> https://<NX_HOST_IP>:7001/rest/v4/devices \
  | python3 -m json.tool | grep '"id"\|"name"'
2.3 Enable Digest Authentication for RTSP#
VAP constructs RTSP URLs in this format and passes them to LVC:
rtsp://<NX_USERNAME>:<NX_PASSWORD>@<NX_HOST_IP>:7001/<device-uuid>?onvif_replay=true
For DL Streamer (used internally by LVC) to authenticate against Nx Witness, digest authentication must be enabled:
In the Nx Witness desktop client, go to Main Menu (hamburger icon) → User Management.
Select the user account that VAP will use (
NX_USERNAME).Under Info, check Allow insecure (digest) authentication. Re-enter the password and click OK.
Click Apply.
Why this is needed: GStreamer’s
rtspsrcelement uses RTSP digest challenge-response. If Nx Witness only accepts bearer tokens, the pipeline fails with401 Unauthorized.
2.4 Verify RTSP Access#
Test the RTSP URL is reachable from the Ubuntu VAP host:
gst-launch-1.0 rtspsrc \
  location="rtsp://<NX_USERNAME>:<NX_PASSWORD>@<NX_HOST_IP>:7001/<device-uuid>?onvif_replay=true" \
  ! fakesink
A pipeline that runs for a few seconds without errors confirms the RTSP connection is working.
Part 3 — Configure VAP#
3.1 Create the .env File#
Navigate to the VAP directory:
cd metro-ai-suite/vms-adapter-plugin
cp .env.example .env
Edit .env for your Nx Witness setup:
# PostgreSQL
PG_PASSWORD=changeme

# LVC
LVC_HOST=host.docker.internal
LVC_BASE_URL=http://host.docker.internal:4173
MEDIAMTX_URL=http://host.docker.internal:8889

# Nx Witness
NX_HOST=<NX_HOST_IP>
NX_USERNAME=admin
NX_PASSWORD=<nx_admin_password>

# VAP ports
UI_HTTPS_PORT=3443
Note
Replace host.docker.internal with the actual IP address if LVC runs on a different host.
3.2 Verify config/config.yaml#
Open config/config.yaml, and confirm the following sections match your setup. The file
uses ${ENV_VAR} placeholders resolved from .env at startup.
LVC Analytics App (always required):
analytics_apps:
  - type: live_captioning
    display_name: "Live Video Captioning"
    base_url: "http://${LVC_HOST:-host.docker.internal}:${LVC_PORT:-4173}"
    mediamtx_url: "http://${MEDIAMTX_HOST:-host.docker.internal}:${MEDIAMTX_PORT:-8889}"
Nx Witness VMS instance:
vms_instances:
  - name: nx-main
    vendor: nx_witness
    base_url: "https://${NX_HOST}:7001"
    auth:
      username: "${NX_USERNAME}"
      password: "${NX_PASSWORD}"
      auth_type: digest
3.3 Allow API Integrations registration requests#
In the Nx Witness desktop client:
Go to Main Menu → System Administration.
In the window, click Integrations.
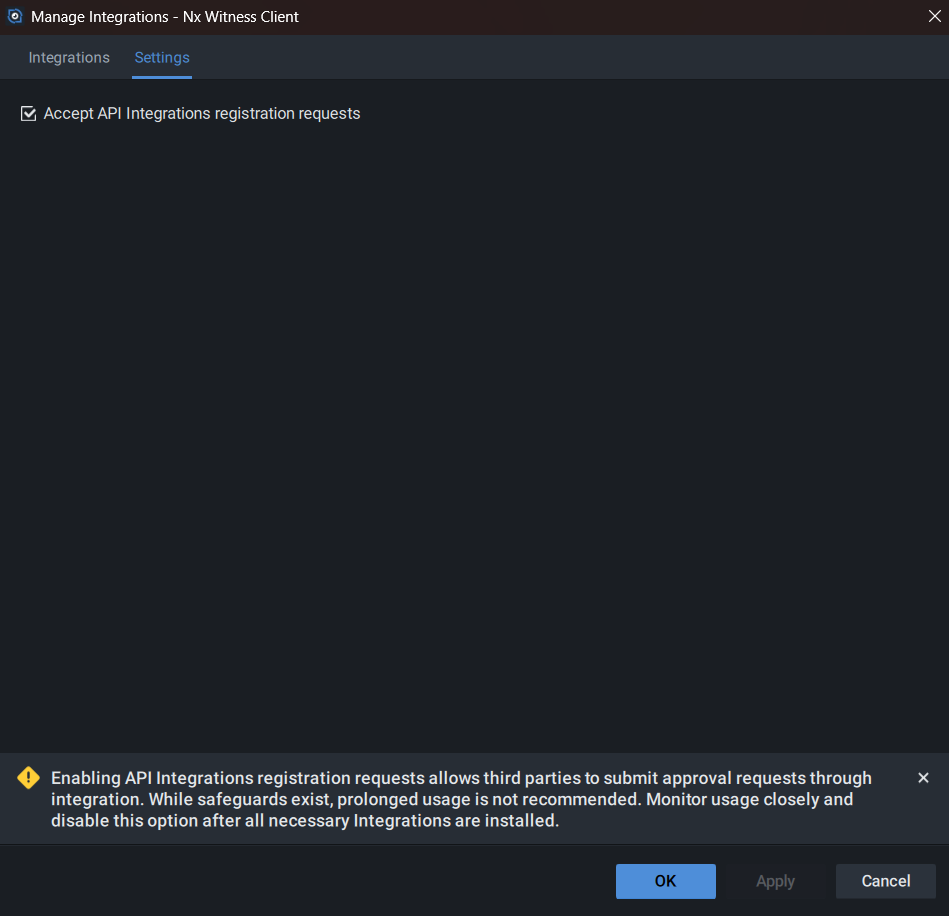
In the Manage Integrations window, go to the Settings tab and check Accept API Integrations registration requests to enable REST-based API integration.
Click OK
Part 4 — Start VAP and verify LVC schema#
4.1 Build and Start VAP#
Go to app directory
cd metro-ai-suite/vms-adapter-plugin
4.1.1 Build from source (Optional):#
docker compose build
Note
You can skip this optional step since docker compose up -d that is run later in this document automatically pulls the required images.
4.1.2 Start VAP#
docker compose up -d
Check that all VAP services are healthy:
docker compose ps
Expected output:
NAME                          STATUS
vms-adapter-backend           Up (healthy)
vms-adapter-ui                Up
vms-adapter-postgres          Up (healthy)
4.2 Verify the LVC schema#
curl -k https://localhost:3443/v1/analytics-apps/live_captioning/schema \
  | python3 -m json.tool | head -20
If you see a JSON schema with fields like prompt, model_name, and pipeline_name, LVC
integration is working correctly.
Check VAP logs for startup issues:
docker compose logs vms-adapter-backend | grep -i "lvc\|schema\|analytics_app\|error"
Part 5 — Discover Cameras and Start a Captioning Run#
5.1 Start a Captioning Run from the Nx Witness Client (Recommended, Nx only)#
When using Nx Witness, the recommended way to start and stop an LVC pipeline is directly from the Nx Witness camera settings panel. VAP polls Nx every 5 seconds and reacts to per-camera settings changes automatically.
5.1.1 Open Camera Settings#
In the Nx Witness desktop client, close any open camera visualizer window.
Navigate to the left panel, and under the server, find the camera you wish to run analytics on and right-click to open context menu.
Select Camera Settings.
Go to the Integrations tab.
Click VAP Analytics Integration to expand the per-camera settings.
You will see a Live Video Captioning group with the following fields:
Field |
Type |
Description |
|---|---|---|
Enable Live Video Captioning Pipeline |
Checkbox |
Starts or stops the LVC pipeline for this camera |
Device |
Dropdown |
Inference device: |
Prompt |
Text field |
Custom prompt sent to the VLM. Leave empty to use the LVC default. |
5.1.2 Enable the Pipeline#
Optionally enter a Prompt (e.g.,
"Describe what you see in one sentence.")Select the Device from the dropdown (e.g.,
GPU).Check the Enable Live Video Captioning Pipeline checkbox.
Click Apply, and then OK.
VAP detects the change within 5 seconds, and starts the captioning pipeline. Check the VAP logs to confirm:
docker compose logs -f vms-adapter-backend
Expected output:
[info] lvc_run_registered             camera_id=nx:<device-uuid> run_id=<run-id>
[info] nx_pipeline_started            app_id=live_captioning device_id=<device-uuid> run_id=<run-id>
5.1.3 Stop the Pipeline#
Re-open Camera Settings → Integrations → VAP Analytics Integration.
Uncheck the Enable Live Video Captioning Pipeline checkbox.
Click Apply, and then OK.
Expected log output:
[info] lvc_run_stopped                run_id=<hex-instance-id>
[info] nx_pipeline_stopped        device_id=<device-uuid>  run_id=<hex-instance-id>  success=True
Note
To run Live Video Captioning and Loitering Detection simultaneously, see the Run Both Applications Simultaneously guide.
5.2 What Happens When You Click Start#
VAP resolves the selected
camera_idto an RTSP URL:Nx Witness camera: calls
GET /rest/v4/deviceson Nx; RTSP URL isrtsp://<NX_USERNAME>:<NX_PASSWORD>@<NX_HOST>:7001/<device-uuid>?onvif_replay=true.
Frame Resolution is mapped to
frameWidth/frameHeightif notdefault(for example,1280×720→{frameWidth: 1280, frameHeight: 720}).VAP sends
POST /api/runsto the LVC backend with all parameters.LVC’s DL Streamer pipeline starts consuming the RTSP stream at the configured frame rate.
The VLM generates captions and publishes them to an MQTT broker → LVC SSE stream.
VAP proxies the SSE stream at
/v1/analytics-apps/live_captioning/results/stream.
5.3 Verify the Run Is Active#
Via the API:
curl -k https://localhost:3443/v1/analytics-apps/live_captioning/runs | python3 -m json.tool
Part 6 — View Live Captions in Nx Witness#
6.1 Captions as Nx Bookmarks#
When a captioning pipeline is running against an Nx Witness camera, VAP pushes each AI-generated caption as a bookmark on the camera’s timeline.
To view captions in the Nx Witness client:
Open the Nx Witness Desktop Client and connect to your server.
Double-click the camera that the pipeline is running on.
In the camera panel, open the Bookmarks tab (or press Ctrl+B).
Each caption appears as a bookmark entry timestamped to when it was generated. The caption text is the bookmark name:
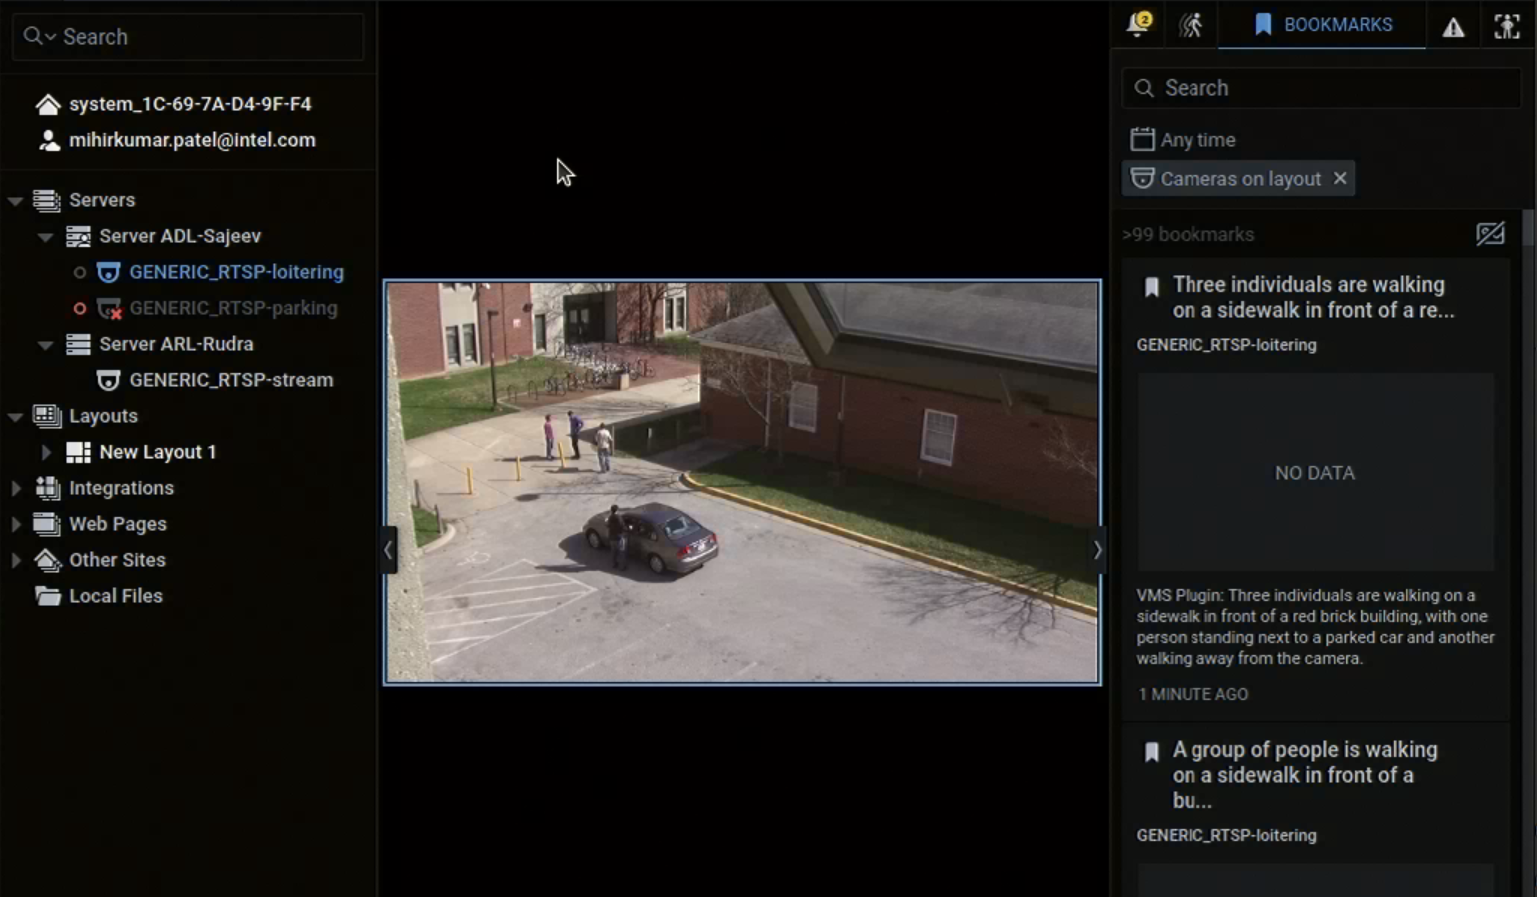
How it works: VAP’s LVC MQTT subscriber receives captions from the LVC backend and calls
POST /rest/v4/devices/{deviceId}/bookmarkson the Nx REST API for each one — up to the first 500 characters of the caption text.
6.2 Stop the Captioning Run#
Nx Witness (recommended):
Re-open Camera Settings → Integrations → VAP Analytics Integration.
Uncheck Enable Live Video Captioning Pipeline.
Click Apply then OK.
Or, via the API:
LVC API (alternative):
curl -k -X DELETE https://localhost:3443/v1/analytics-apps/live_captioning/runs/<run_id>
Troubleshooting#
Analytics Form Does Not Render#
Symptom: The Analytics Engine panel shows an error or blank form after clicking Discover Apps.
Cause: VAP could not reach the LVC backend to fetch the OpenAPI schema at startup.
Fix:
Verify LVC is running:
curl http://localhost:4173/healthCheck connectivity from inside VAP:
docker compose exec vms-adapter-backend curl http://host.docker.internal:4173/healthRestart VAP:
docker compose restart vms-adapter-backend
No Cameras After Discovery#
Symptom: Clicking Discover Cameras returns an empty list.
Nx Witness checks:
Verify
NX_HOST,NX_USERNAME,NX_PASSWORDare correct in.env.Check VAP can reach Nx:
docker compose exec vms-adapter-backend curl -k https://<NX_HOST_IP>:7001/rest/v4/infoCheck logs:
docker compose logs vms-adapter-backend | grep -i "nx\|discover"
No Captions Appearing#
Symptom: Run is active but the caption overlay stays blank.
Checks:
Verify the SSE stream is emitting data:
curl -k -N https://localhost:3443/v1/analytics-apps/live_captioning/results/stream
You should see
data: {...}lines every few seconds.Check the run is active in LVC directly:
curl http://localhost:4173/api/runs | python3 -m json.tool
Check LVC logs for pipeline errors (from the LVC directory):
docker compose logs | grep -i "error\|pipeline\|rtsp"
WebRTC Video Not Loading#
Symptom: The Live Stream video player is blank.
Checks:
Verify MediaMTX is running:
curl http://localhost:8889/Check
MEDIAMTX_URLin.envis correct.Verify nginx
/whep/proxy:docker compose exec vms-adapter-ui cat /etc/nginx/conf.d/default.conf | grep whep
Run Start Fails with Nx Witness Camera#
Symptom: Starting a run with an Nx Witness camera returns an error.
Checks:
Confirm digest auth is enabled for the Nx Witness user (see Step 2.3).
Test the RTSP URL:
gst-launch-1.0 rtspsrc \
  location="rtsp://<NX_USERNAME>:<NX_PASSWORD>@<NX_HOST_IP>:7001/<device-uuid>" \
  ! fakesink
Check VAP logs:
docker compose logs vms-adapter-backend | grep -i "error\|start_run\|rtsp"
Summary#
Step |
Where |
|---|---|
Install and start LVC and MediaMTX |
|
Nx Witness: install Client & Server, add cameras, enable digest auth, enable API Integrations |
Nx Witness Desktop Client |
Set |
|
Configure VMS instance(s) in |
|
Start VAP |
|
Discover cameras |
|
Nx Witness: Start pipeline |
Camera Settings → Integrations → VAP Analytics Integration → Enable checkbox |
View live captions |
Nx Witness client → camera Bookmarks tab (each caption is a bookmark) |
Nx Witness: Stop the run |
Camera Settings → Integrations → VAP Analytics Integration → Uncheck the checkbox |