Tutorial: Loitering Detection with Nx Witness#
This tutorial walks through the end-to-end setup of Loitering Detection (a general DL Streamer-based vision application) as an Analytics Application in VMS Adapter Plugin (VAP), with Nx Witness as the VMS. At the end of this tutorial, you will have:
Loitering Detection application running with its MQTT broker exposed to the host
Nx Witness connected to VAP and automatically registered as an analytics integration
Detection bounding boxes pushed from the application to Nx Witness in real time
Pipeline runs started and stopped from the Nx Witness desktop client
Note
Although this tutorial demonstrates Loitering Detection as an analytics application, the same instructions apply to any other DL Streamer-based vision application.
Prerequisites#
A host machine running the Ubuntu OS (version 22.04 or 24.04) with Docker and Docker Compose installed.
An Nx Witness server (version 5.x or above) accessible over the network from the VAP host. Nx Witness admin credentials are required.
The
edge-ai-suitesrepository cloned (sparse or full):git clone --filter=blob:none --sparse --branch release-2026.2.0 https://github.com/open-edge-platform/edge-ai-suites.git cd edge-ai-suites git sparse-checkout set metro-ai-suite manufacturing-ai-suite
Architecture Overview#

Key data flows:
VAP sends
POST /pipelines/user_defined_pipelines/object_tracking_gpu(in case of GPU) to the DL Streamer Pipeline Server, specifying the camera RTSP URL as source and an MQTT topic as destination.dls_vision’s DL Streamer Pipeline Server processes the RTSP stream, runs detection, and publishes inference metadata to the MQTT broker on topicnx/dls_vision/{device_uuid}.VAP’s
MqttSubscriberreceives the MQTT messages, translates DL Streamer GStreamer Video Analytics (GVA) JSON to Nx analytics object format, and callsNxWitnessVmsShim.push_analytics_objects().Nx Witness receives the push and overlays bounding boxes on the camera feed.
Part 1 — Set Up the Loitering Detection Application#
1.1 Configure the Loitering Detection Environment#
Clone the edge-ai-suites repository as instructed in the setup document, and install Loitering
Detection according to the Loitering Detection
Get Started Guide.
Do not bring up the application yet.
Note
The setup generates a docker-compose.yml file.
1.2 Verify the MQTT Port Exposure and Set the MQTT Host for the DL Streamer Pipeline Server#
The Docker Compose stack includes an Eclipse Mosquitto MQTT broker. Confirm that port 1883
is published to the host in docker-compose.yml, and set MQTT_HOST so the DL Streamer Pipeline
Server can publish to it:
broker:
  image: docker.io/library/eclipse-mosquitto:2.0.21
  ports:
    - "1883:1883"

dlstreamer-pipeline-server:
  environment:
    - MQTT_HOST=${HOST_IP} # we set to HOST_IP as broker is running in the same host
    - MQTT_PORT=1883
This is the default configuration. The Mosquitto broker uses an anonymous-access configuration
(allow_anonymous true), which is required for the VMS Analytics Plugin and the DL Streamer
Pipeline Server to publish and subscribe without credentials.
Important
The plugin connects to this MQTT broker from outside the dls_vision Docker
network. The broker must be reachable at <HOST_IP>:1883 from the plugin’s container. If VAP
runs on the same host, host.docker.internal resolves to the host from inside the plugin
container.
1.3 Start the Loitering Detection Application#
Start the application:
docker compose up -d
Part 2 — Set Up Nx Witness#
2.1 Install and Start Nx Witness Server#
Install or start Nx Witness Server on a machine reachable from the VAP host. Refer to the Nx Witness documentation for installation instructions.
After installation, verify the Nx Witness REST API is accessible:
curl -k -s -o /dev/null -w 'HTTP %{http_code}\n' https://<NX_HOST_IP>:7001/api/moduleInformation
You should get a response- HTTP 200 to confirm REST API is up.
2.2 Enable Digest Authentication for RTSP#
VAP constructs RTSP URLs in the following format and passes them directly to the DL Streamer Pipeline Server:
rtsp://<NX_USERNAME>:<NX_PASSWORD>@<NX_HOST_IP>:7001/<device-uuid>?onvif_replay=true
The Nx Witness RTSP server is exposed on the same port as the REST API (default 7001). It
uses digest authentication, meaning the username and password embedded in the URL are
verified with an MD5 challenge-response — credentials are never sent in plaintext over the wire.
For analytics applications such as DL Streamer to successfully connect to these RTSP URLs, two things must be confirmed in Nx Witness:
2.2.1 Enable “Digest Authentication for RTSP” in System Settings#
By default, newer Nx Witness versions restrict legacy RTSP clients to bearer-token authentication
only. To allow digest authentication (which GStreamer’s rtspsrc element and most analytics
frameworks require):
Open the Nx Witness desktop client and connect to your server.
Go to Main Menu (hamburger icon) → User Management. This opens the Site Administration window.
Select the user account VAP will use to connect. This opens the User window.
Under Info, check Allow insecure (digest) authentication. Re-enter the password, and click OK.
Click Apply.
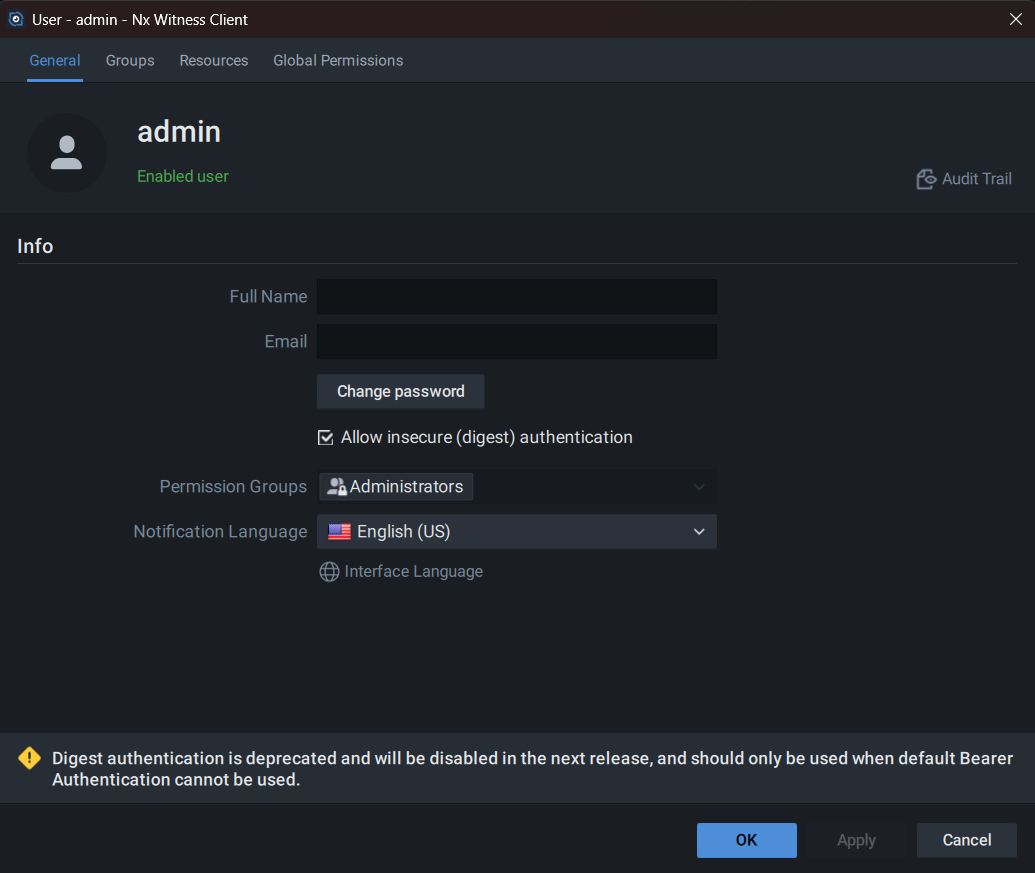
Why this is needed: GStreamer’s
rtspsrcelement (used by DL Streamer) negotiates authentication via the standard RTSPDESCRIBEchallenge. If Nx only accepts bearer tokens (HTTP Authorization header), the GStreamer client cannot authenticate, and the pipeline immediately fails with401 Unauthorized.
2.2.2 Confirm the User Has “View Live Video” Permission#
Note
Ignore the following if NX_USERNAME is an administrator.
The credentials embedded in the RTSP URL (NX_USERNAME / NX_PASSWORD) must belong to a user
with at least the Live Viewer role on all cameras used for analytics.
To verify or assign the role in the Nx Witness client:
Go to Main Menu → User Management (or System Administration → Users).
Find the user account matching
NX_USERNAME.Confirm the role is Live Viewer, Advanced Viewer, or Administrator.
If you are using a dedicated service account (recommended over using the
adminaccount directly), ensure the account is assigned to all relevant camera groups.
2.2.3 Verify RTSP Access from the Analytics Host#
Before starting the full pipeline, verify the RTSP URL is reachable from the machine that will run the DL Streamer Pipeline Server:
You can test with GStreamer directly:
The <device-uuid> value can be found in the Nx Witness client. Right-click a camera in the
list, and choose Camera Settings. In the camera settings window, under the General tab,
look for the Camera ID.
To run this test in a DL Streamer Pipeline Server container:
docker run -it --entrypoint bash --rm --net host intel/dlstreamer-pipeline-server:2026.2.0-ubuntu24
Then run the GStreamer command:
gst-launch-1.0 rtspsrc \
  location="rtsp://<NX_USERNAME>:<NX_PASSWORD>@<NX_HOST_IP>:7001/<device-uuid>?onvif_replay=true" \
  ! fakesink
A pipeline that runs for a few seconds without errors confirms the RTSP connection is working.
2.3 Add Cameras to Nx Witness#
In the Nx Witness desktop client:
Open Server → Add Device (or right-click the server in the resource tree).
Add cameras by entering their RTSP URLs or by using automatic discovery on the network.
Confirm each camera appears in the resource tree and shows a live feed.
Note the Device ID, a Universally Unique Identifier (UUID), of each camera you intend to use. You can find this in:
Nx Witness desktop client: right-click a camera → Camera Settings → Information tab.
Or via the REST API:
curl -k -u admin:<password> https://<NX_HOST_IP>:7001/rest/v4/devices | python3 -m json.tool | grep '"id"\|"name"'
2.4 Allow API Integration Registration Requests#
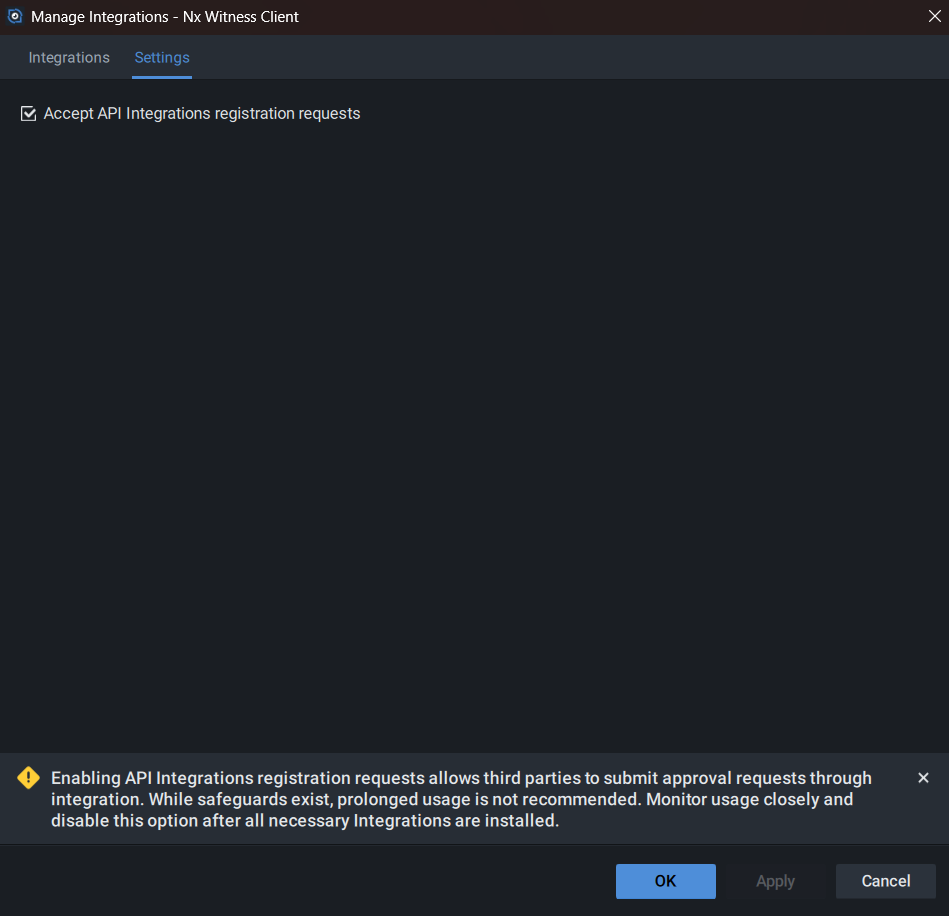
In the Nx Witness desktop client:
Go to Main Menu → System Administration.
In the window, click Integrations.
In the Manage Integrations window, go to the Settings tab, and check Accept API Integrations registration requests to enable REST-based API integration.
Click OK.
Part 3 — Configure VAP for dls_vision and Nx Witness#
3.1 Prepare the VAP Environment File#
Navigate to the VAP directory:
cd metro-ai-suite/vms-adapter-plugin
cp .env.example .env
Edit .env with the following values for the dls_vision and Nx Witness scenario:
# PostgreSQL
PG_PASSWORD=changeme

# Nx Witness
NX_HOST=<NX_HOST_IP>
NX_USERNAME=admin
NX_PASSWORD=<nx_admin_password>
NX_TLS_VERIFY=false
NX_CA_BUNDLE=

# dls_vision / DL Streamer Pipeline Server
# Hostname as seen from inside the VAP container.
# If dls_vision runs on the same host: use host.docker.internal
DLS_VISION_HOST=host.docker.internal
DLS_VISION_PORT=8080
DLS_VISION_TLS_VERIFY=false
DLS_PIPELINE_CPU=object_tracking_cpu
DLS_PIPELINE_GPU=object_tracking_gpu
DLS_PIPELINE_NPU=
DLS_VISION_CA_BUNDLE=

# MQTT Broker — address as seen by VAP (subscribing from outside the dls_vision Docker network)
# If dls_vision runs on the same host: use host.docker.internal
MQTT_HOST=host.docker.internal
MQTT_PORT=1883

# DLS Vision App MQTT — broker address as seen by VAP (for subscribing)
MQTT_HOST=
MQTT_PORT=1883

# VAP ports
UI_HTTPS_PORT=3443

# MQTT Broker host for VAP's own broker (used by LVC; leave empty if not using LVC)
MQTT_BROKER_HOST=
MQTT_BROKER_PORT=1883
NX_TLS_VERIFY and DLS_VISION_TLS_VERIFY are false by default for compatibility with
self-signed certificates. Set either value to true to enforce certificate verification. When
enabled, set the matching *_CA_BUNDLE to a Certificate Authority (CA) certificate path that
exists inside the vms-adapter-backend container.
3.2 Configure VAP config.yaml#
Open config/config.yaml, and confirm the following sections match your setup. The file
uses ${ENV_VAR} placeholders resolved from .env at startup.
Nx Witness VMS instance:
vms_instances:
  - name: nx-main
    vendor: nx_witness
    base_url: "https://${NX_HOST}:7001"
    tls_verify: ${NX_TLS_VERIFY:-false}
    tls_ca_bundle: "${NX_CA_BUNDLE:-}"
    auth:
      username: "${NX_USERNAME}"
      password: "${NX_PASSWORD}"
      auth_type: digest
The analytics_manifest_path is optional. VAP automatically uses the bundled manifest at
vms_shim/nxwitness/nx_integration.json when this field is absent. Set it only if you need to
supply a custom manifest.
dls_vision Analytics App:
analytics_apps:
  - type: object_detection
    app_id: "dls_vision"
    display_name: "Loitering Detection"
    base_url: "http://${DLS_VISION_HOST:-host.docker.internal}:${DLS_VISION_PORT:-8080}/pipelines"
    tls_verify: ${DLS_VISION_TLS_VERIFY:-false}
    tls_ca_bundle: "${DLS_VISION_CA_BUNDLE:-}"
    mqtt_host: "${MQTT_HOST:-host.docker.internal}"
    mqtt_port: ${MQTT_PORT:-1883}
    pipeline:
      cpu: ${DLS_PIPELINE_CPU:-}
      gpu: ${DLS_PIPELINE_GPU:-}
      npu: ${DLS_PIPELINE_NPU:-}
    label_type_map:
      vehicle: vap.vehicle
      pedestrian: vap.pedestrian
      background: vap.background
At least one of DLS_PIPELINE_CPU, DLS_PIPELINE_GPU, or DLS_PIPELINE_NPU must be set.
In the Nx UI, the Device dropdown only shows configured devices, and selecting one starts
the corresponding configured pipeline with the same device in detection-properties.device.
3.3 Configure the label_type_map#
The label_type_map translates DL Streamer detection labels (from the model) into Nx Witness
object typeIds. These typeIds are automatically added to the Nx analytics manifest at startup,
so Nx knows which object types to expect.
How it works:
When
dls_visiondetects a"pedestrian", VAP pushes it to Nx as typeId"vap.pedestrian".Nx renders this as an object overlay on the camera feed with the label
"vap.pedestrian".Labels not listed in the map fall back to
"python.detected.object".
Customize for your model: If your model detects labels different from the ones listed above
(for example, "car", "person", etc.), add them to the map.
label_type_map:
  car: vap.vehicle
  truck: vap.vehicle
  bus: vap.vehicle
  motorcycle: vap.vehicle
  bicycle: vap.vehicle
  van: vap.vehicle
  person: vap.person
  pedestrian: vap.person
Any vap.* typeId you add here is automatically registered in the Nx manifest. You do not need
to manually edit vms_shim/nxwitness/nx_integration.json.
Part 4 — Start VAP and Verify Nx Integration Registration#
4.1 Build and Start VAP#
Go to app directory
cd metro-ai-suite/vms-adapter-plugin
4.1.1 Build from source (Optional):#
docker compose build
Note
You can skip this optional step since docker compose up -d that is run later in this document automatically pulls the required images.
4.1.2 Start VAP#
docker compose up -d
Check that all VAP services are healthy:
docker compose ps
Expected output:
NAME                          STATUS
vms-adapter-backend           Up (healthy)
vms-adapter-ui                Up
vms-adapter-postgres          Up (healthy)
4.2 Understand Automatic Integration Registration#
When VAP starts, the Orchestrator automatically registers the analytics integration with Nx Witness. You do not need to register it manually. The process is:
VAP reads the integration manifest — the bundled
vms_shim/nxwitness/nx_integration.jsonby default, or a custom path ifanalytics_manifest_pathis set inconfig.yaml.Any
label_type_mapentries fromconfig.yamlare merged into the manifest automatically (so Nx knows all typeIds without manual edits).VAP calls
POST /rest/v4/analytics/integrations/*/requestson the Nx API.VAP immediately approves the request via
POST .../requests/{requestId}/approve.Nx returns integration user credentials (
username,password), which VAP stores in PostgreSQL and uses for subsequent metadata pushes.
Verify in the VAP logs:
docker compose logs vms-adapter-backend | grep -i "nx_integration\|autoregist"
You should see entries like:
nx_integration_approved username=VAP Analytics Integration request_id=...
nx_integration_autoregistered vms=nx-main analytics_app_id=VAP Analytics Integration status=approved
If VAP has already registered before (database record exists and integration exists in Nx), VAP restores the integration credentials from its database and skips re-registration. You will see:
nx_integration_already_registered vms=nx-main analytics_app_id=VAP Analytics Integration
nx_integration_credentials_restored vms=nx-main username=VAP Analytics Integration
4.3 Verify the Integration in Nx Witness#
To confirm the integration was registered, check via the Nx Witness REST API:
curl -k -u admin:<password> https://<NX_HOST_IP>:7001/rest/v4/analytics/integrations \
  | python3 -m json.tool | grep '"name"\|"id"\|"status"'
You should see an integration named VAP Analytics Integration with "status": "active" or
equivalent.
In the Nx Witness desktop client, navigate to System Administration → Analytics (or Plugins) to see the integration listed.
Part 5 — Enable the Analytics Integration for a Camera#
Before VAP can push detection overlays to a specific camera, the analytics integration must be
enabled for that camera device in Nx Witness. VAP does this automatically on the first metadata
push for a device (by calling PATCH /rest/v4/analytics/engines/{engineId}/deviceAgents/{deviceId}
with {"isEnabled": true}), but you can also enable it manually in advance.
5.1 Enable via the Nx Witness Desktop Client#
In the Nx Witness desktop client, close any open camera visualizer window.
Navigate to the left panel, and under the server, find the camera you wish to run analytics on and right-click to open context menu.
Select Camera Settings.
Go to the Integrations tab.
Find VAP Analytics Integration in the list.
Toggle the switch to Enable.
Click Apply or OK.
Repeat for each camera you plan to use with dls_vision.
5.2 Enable via the Nx Witness REST API (Optional)#
First, get the analytics engine ID:
ENGINE_ID=$(curl -k -u admin:<password> \
  https://<NX_HOST_IP>:7001/rest/v4/analytics/engines \
  | python3 -c "
import json, sys
engines = json.load(sys.stdin)
for e in engines:
    if 'DLStreamer' in e.get('name', ''):
        print(e['id'])
")
echo "Engine ID: $ENGINE_ID"
Enable the integration for a specific camera device:
DEVICE_ID=<camera-device-uuid>

curl -k -u admin:<password> \
  -X PATCH \
  -H "Content-Type: application/json" \
  -d '{"isEnabled": true}' \
  "https://<NX_HOST_IP>:7001/rest/v4/analytics/engines/${ENGINE_ID}/deviceAgents/${DEVICE_ID}"
A 200 OK response confirms the device agent is enabled.
Note
VAP also performs this step automatically on the first push for a device (“lazy enablement”). If you start a pipeline run before enabling manually, VAP enables the device agent and pushes the manifest on the first detection.
Part 6 — Start a Pipeline Run#
The recommended way to start and stop a pipeline is directly from the Nx Witness desktop client. VAP polls the Nx Witness API every 5 seconds and reacts to per-camera settings changes automatically.
6.1 Discover Cameras#
Before starting a pipeline, VAP must know about your cameras. Trigger discovery once after VAP starts:
curl -k -X POST https://localhost:3443/v1/cameras/discover
Cameras are stored in PostgreSQL and reused across restarts.
6.2 Start the Pipeline from the Nx Witness Client (Recommended)#
6.2.1 Open Camera Settings#
Open the Nx Witness desktop client and connect to your server.
In the resource tree, right-click the camera you want to enable analytics on.
Select Camera Settings.
6.2.2 Navigate to the Integration Panel#
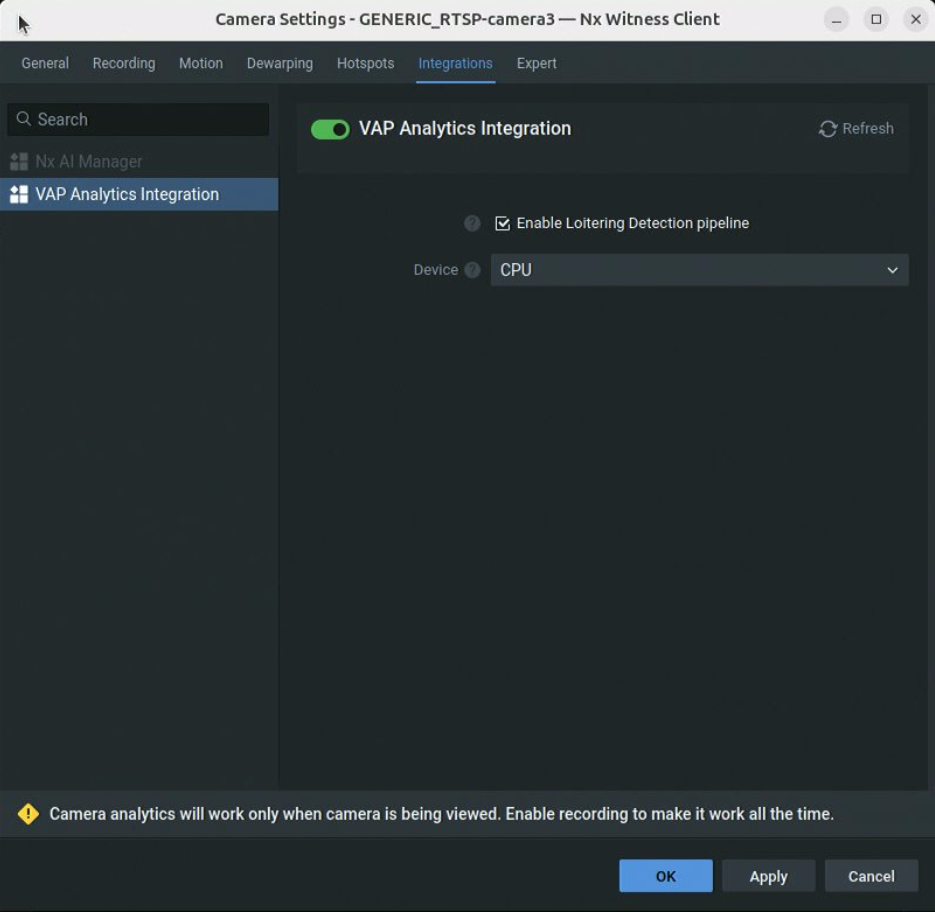
In the Camera Settings window, click the Integrations tab.
Click VAP Analytics Integration to expand the per-camera settings.
You will see:
Field |
Type |
Description |
|---|---|---|
Enable Loitering Detection Pipeline |
Checkbox |
Starts or stops the pipeline for this camera |
Device |
Dropdown |
Inference device: |
6.2.3 Enable the Pipeline#
Select the Device from the dropdown (e.g.,
GPU).Check the Enable Loitering Detection Pipeline checkbox.
Click Apply, and then OK.
VAP detects the change within 5 seconds, and starts the pipeline. Check the VAP logs to confirm:
docker compose logs -f vms-adapter-backend
Expected output:
[info] {'source': {'uri': '<rtsp_url>', 'type': 'uri', 'properties': {'protocols': 'tcp',
        'add-reference-timestamp-meta': True, 'latency': 100}},
  'destination': {'metadata': {'type': 'mqtt', 'topic': 'nx/dls_vision/<device-uuid>'}},
        'parameters': {'detection-properties': {'device': 'GPU'}}}
[info]  od_run_started  pipeline=user_defined_pipelines/object_tracking_gpu run_id=<hex-instance-id>
[info]  nx_pipeline_started app_id=dls_vision device_id=<device-uuid> run_id=<hex-instance-id>
6.2.4 Stop the Pipeline#
Re-open Camera Settings → Integrations → VAP Analytics Integration.
Uncheck the Enable Loitering Detection Pipeline checkbox.
Click Apply, and then OK.
VAP stops the run on the next poll.
Expected log output:
[info] od_run_stopped          instance_id=<hex-instance-id>
[info] nx_pipeline_stopped     app_id=dls_vision device_id=<device-uuid> run_id=<hex-instance-id> success=True
Note
To run Loitering Detection and Live Video Captioning simultaneously, see the Run Both Applications Simultaneously guide.
6.3 What Happens When VAP Starts a Pipeline#
When VAP starts a pipeline run, it executes the following:
Resolves the selected
camera_id(nx:<uuid>) to an RTSP URL usingNxWitnessVmsShim.get_live_stream_url().Builds an MQTT publish topic:
nx/dls_vision/<device-uuid>(the topic wheredls_visionpublishes, and VAP subscribes).Sends
POST /pipelines/user_defined_pipelines/object_tracking_gputo the DL Streamer Pipeline Server with the payload:{ "source": { "uri": "rtsp://admin:<password>@<NX_HOST_IP>:7001/<device-uuid>", "type": "uri", "properties": { "protocols": "tcp", "add-reference-timestamp-meta": true, "latency": 100 } }, "destination": { "metadata": { "type": "mqtt", "topic": "nx/dls_vision/<device-uuid>" } }, "parameters": { "detection-properties": { "model": "<model-path>", "device": "<selected-device>" } } }
The Pipeline Server starts the GStreamer pipeline, consuming the RTSP stream and publishing inference results to the MQTT broker.
VAP’s
MqttSubscriber(running as a background task since startup) receives messages on the wildcard topic+/dls_vision/+.
Part 7 — Observe Detection Overlays in Nx Witness#
7.1 Open the Camera in Nx Witness Client#
Open the Nx Witness desktop client and connect to your server.
Double-click the camera that you started the pipeline for.
The live video feed opens in a layout panel.
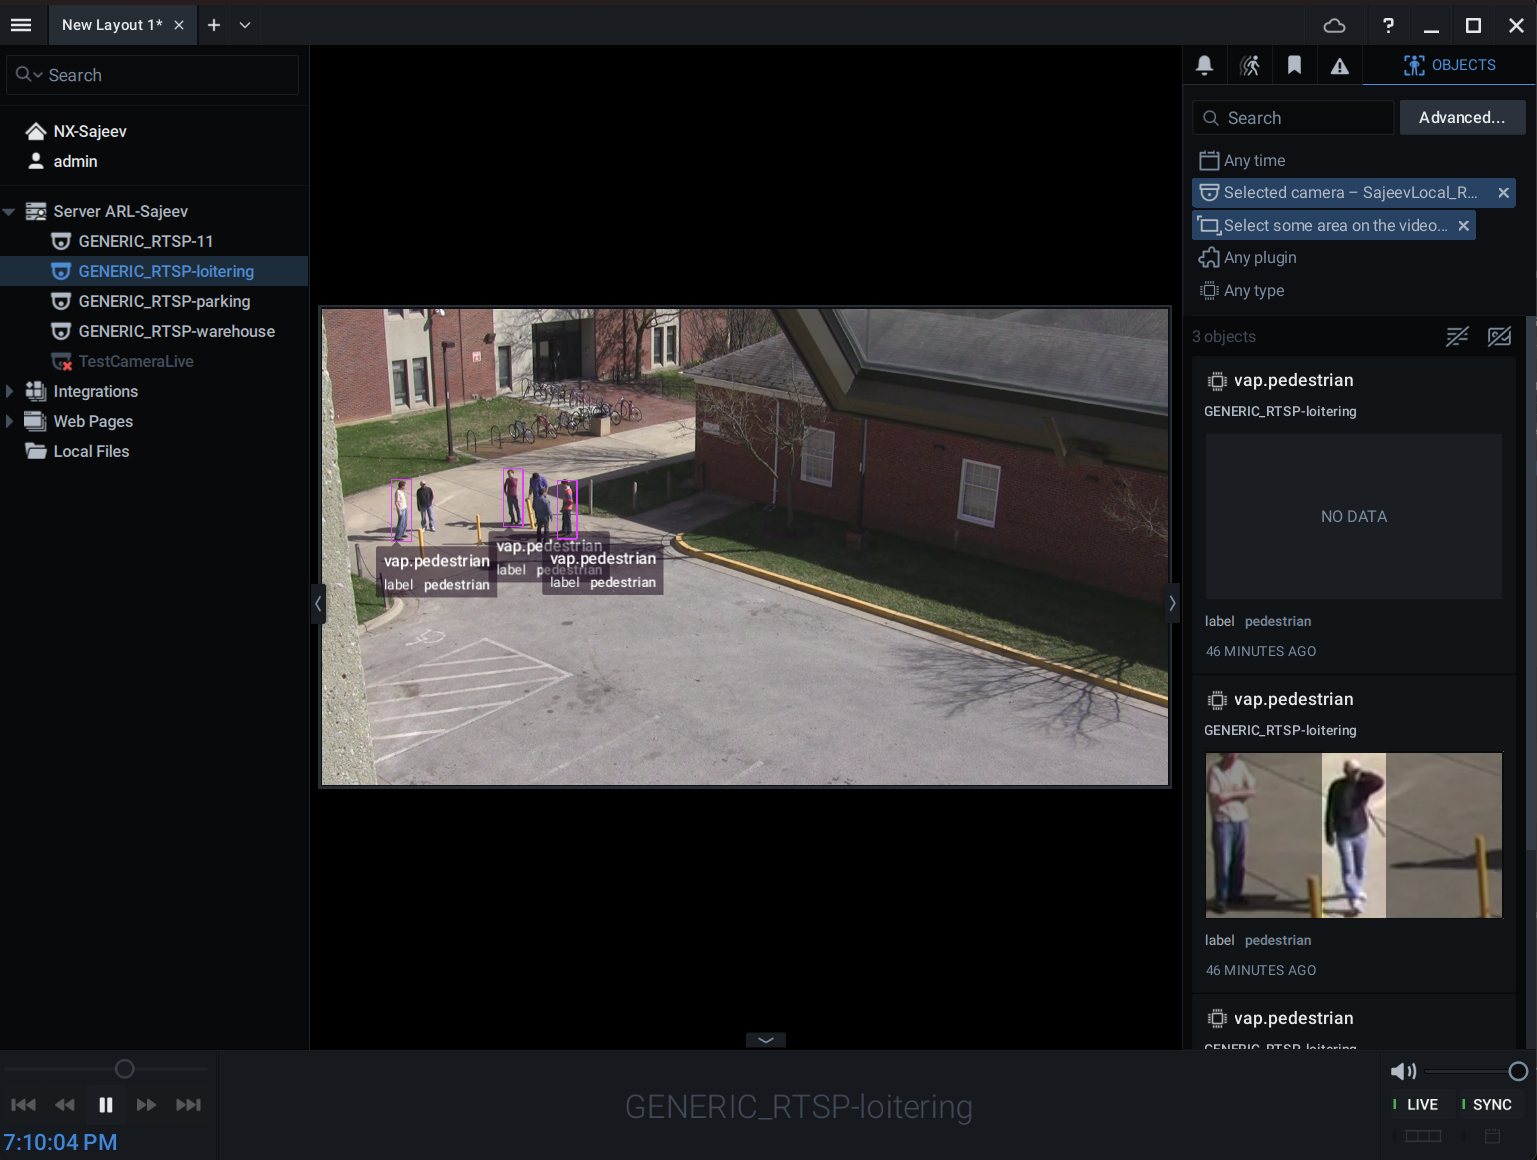
Click the Object Search button (or press Alt+O).
7.2 Verify Detections Are Appearing#
Within a few seconds of starting the run, detection bounding boxes should appear overlaid on the video feed:
Each detected object (for example,
pedestrian,vehicle,background) is shown as a colored rectangle.The label shows the Nx
typeId(for example,vap.pedestrian,vap.vehicle, orpython.detected.objectfor unmapped labels).
If detections do not appear, see the Troubleshooting section.
7.3 Stop the Plugin#
To stop VAP, run:
docker compose down
Caution
Be careful not to remove the volume with the docker compose down -v command,
as this deletes the database, as well as any integration information and credentials you
created. If this happens, the integration in Nx becomes stale. Either delete it from Nx Witness,
or use a different VMS integration name in the vms_shim/nxwitness/nx_integration.json file.
Troubleshooting#
Nx Integration Not Registered#
Symptom: VAP logs show nx_integration_exists_in_vms_not_in_db or
nx_integration_exists_in_db_not_in_vms.
Cause: The Nx integration and the VAP database are out of sync (for example, the integration was manually deleted from Nx, or the VAP database was cleared).
Fix:
In the Nx Witness client, delete the
VAP Analytics Integrationintegration from System Administration → Analytics.Drop the VAP integration record from the database:
docker compose exec vms-adapter-postgres psql -U vms -d vms_plugin \
  -c "DELETE FROM nx_integrations WHERE vms_name = 'nx-main';"
Restart VAP to trigger fresh registration:
docker compose restart vms-adapter-backend
Detections Not Appearing in Nx#
Symptom: Pipeline run is active, dls_vision logs show detections, but no overlays appear in
Nx.
Checks:
Verify VAP’s MQTT subscriber is receiving messages:
docker compose logs vms-adapter-backend | grep "mqtt_pushed_objects\|mqtt_no_objects\|mqtt_push_failed"
Confirm the MQTT topic matches. VAP subscribes to
+/dls_vision/+.dls_visionpublishes to the topic VAP sends in the pipeline start payload (nx/dls_vision/<device-uuid>). Both must match.Verify MQTT connectivity from the VAP side:
# Install mosquitto-clients if not present
sudo apt-get install -y mosquitto-clients
mosquitto_sub -h <HOST_IP> -p 1883 -t '#' -v
Start a pipeline run, and check whether messages appear.
Confirm the analytics integration is enabled for the camera in Nx Witness (see Part 5).
Check the Nx push in VAP logs:
docker compose logs vms-adapter-backend | grep "nx_push\|push_analytics\|device_agent"
DL Streamer Pipeline Server Returns Error on Start#
Symptom: Clicking Start Run shows an error; VAP logs show a non-2xx from the Pipeline Server.
Checks:
Confirm
DLS_VISION_HOSTandDLS_VISION_PORTin.envare reachable from inside thevms-adapter-backendcontainer:docker compose exec vms-adapter-backend curl http://${DLS_VISION_HOST}:${DLS_VISION_PORT}/pipelines
If
dls_visionuses HTTPS (for example, via nginx on port 443), updatebase_urlinconfig.yamlaccordingly.Verify
loitering_appears in the pipeline list returned byGET /pipelines.
RTSP Stream Not Reachable from dls_vision#
Symptom: Pipeline starts but immediately fails; DL Streamer logs show RTSP connection errors.
Checks:
The Nx RTSP URL includes credentials and is formed as
rtsp://admin:<password>@<NX_HOST_IP>:7001/<device-uuid>?onvif_replay=true. Confirm this URL is reachable from thedls_visionDocker network.If DL Streamer logs show
401 Unauthorized, digest authentication is not enabled in Nx Witness. Enable it in System Administration → Security → Allow digest authentication for cameras, and retry. See Part 2.2 for details.Add
<NX_HOST_IP>tono_proxyin thedls_visionenvironment if a proxy is configured.
Summary#
Step |
Where |
|---|---|
Start |
|
Nx Witness: install Server + Client, add cameras, enable digest auth, enable API Integrations |
Nx Witness Desktop Client |
Configure Nx Witness connection and MQTT settings in |
|
Configure |
|
Start VAP (integration auto-registers on startup) |
|
Discover cameras |
|
Nx Witness: Start pipeline |
Camera Settings → Integrations → VAP Analytics Integration → Enable checkbox |
View detection overlays |
Nx Witness client → live camera feed (Objects panel) |
Nx Witness: Stop the run |
Camera Settings → Integrations → VAP Analytics Integration → Uncheck the checkbox |