Get Started#
Agentic Smart Community is an AI Agent-native video analysis platform built around the Model Context Protocol (MCP). This guide installs the MCP server and its dependent services, then connects an agent host. You can then register a custom use case to tailor the video-analysis workflow to your camera-monitoring requirements.
For the validated use cases, e.g., Fridge Monitor, Child Safety, and Elder Wakeup reference demo, including user-provided video setup, see Ready-to-Run Demo.
Prerequisites#
Before you begin, ensure the following:
System Requirements: Verify that your system meets the minimum requirements.
GPU Driver Installed: This guide assumes that the target machine already has the Intel GPU driver. Otherwise, follow the official Installing Packages from the Intel PPA guide.
Docker Installed: Install Docker by following Get Docker.
Core command-line tools: All services — including the MCP server — run as containers, so the host only needs
gitto clone the repo andcurl/jqfor the setup script and health checks:sudo apt-get update sudo apt-get install -y git curl jq
Publishing local videos as RTSP (the Ready-to-Run Demo and the local-video monitor example in Step 3) additionally needs ffmpeg, Python 3 with venv, and MediaMTX on the host:
sudo apt-get install -y ffmpeg python3 python3-venv python3-pip
mkdir -p "$HOME/.local/bin"
export PATH="$HOME/.local/bin:$PATH"
grep -qxF 'export PATH="$HOME/.local/bin:$PATH"' "$HOME/.bashrc" || \
  echo 'export PATH="$HOME/.local/bin:$PATH"' >> "$HOME/.bashrc"
curl -fL --retry 3 \
  https://github.com/bluenviron/mediamtx/releases/download/v1.12.2/mediamtx_v1.12.2_linux_amd64.tar.gz \
  | tar xz -C "$HOME/.local/bin" mediamtx
This guide assumes basic familiarity with Docker commands and terminal usage. For an introduction, see the Docker Documentation.
Memory and swap requirements#
Qwen/Qwen3.6-35B-A3B in FP8 with a 60k context window is memory-intensive on a shared-RAM host. The default configuration targets a 64 GB system:
Provide at least 32 GB of swap so weight loading and the KV cache can spill under peak pressure without triggering the OOM killer. See how to Add Swap Space. The first startup takes about 30 minutes while the weights are downloaded and compiled. The serving becomes healthy once it answers on
http://<host>:41091/v1/models.
Step-by-step installation#
Clone the repository and change to agentic-smart-community:
git clone https://github.com/open-edge-platform/edge-ai-suites ~/edge-ai-suites -b release-2026.2.0
cd ~/edge-ai-suites/metro-ai-suite/agentic-smart-community
Step 1 - Start all services#
The on-device stack is defined in docker/compose.yaml and managed by setup_docker.sh. All four services — including the MCP server — come up together:
Service |
Port |
Role |
|---|---|---|
|
|
On-device model serving for VLM and LLM requests |
|
|
Video-summary microservice |
|
|
Video capture and optional detector-as-prefilter; posts events to the MCP webhook |
|
|
MCP server: Streamable-HTTP + Web UI, and the events webhook |
First, create the runtime data directory and copy the configuration templates into it. The MCP server reads these at startup (if you skip this, it auto-seeds the same templates on first start):
export SMART_COMMUNITY_DATA_DIR="${SMART_COMMUNITY_DATA_DIR:-$HOME/.mcp-smart-community}"
mkdir -p "$SMART_COMMUNITY_DATA_DIR"
cp config.yaml.example "$SMART_COMMUNITY_DATA_DIR/config.yaml"
# Starts with an empty monitors.yaml; add monitors at runtime by chatting with the agent.
cp monitors.yaml.example "$SMART_COMMUNITY_DATA_DIR/monitors.yaml"
Customize $SMART_COMMUNITY_DATA_DIR/config.yaml and $SMART_COMMUNITY_DATA_DIR/monitors.yaml as needed, then start the stack:
# Change to mirror endpoint if you are in China and want to use the mirror site for Hugging Face.
export HF_ENDPOINT=https://hf-mirror.com

source docker/set_env.sh

# Start all four on-device services.
bash setup_docker.sh
setup_docker.sh pulls every image it needs, so there is nothing to build or download beforehand. To build the service images from source instead, see Build the service images from source.
Note
Use
bash setup_docker.sh --lightto reuse an already warm serving and start onlymultilevel-video-understanding,videostream-analytics, andsmart-community-mcp-server.Use
bash setup_docker.sh --light-downto stop the app tier while leavingvllm-ipex-servingrunning (avoids its 3-20 min recompile), orbash setup_docker.sh --downto stop all four services.If the YOLO11s OpenVINO™ IR is missing,
setup_docker.shautomatically downloads the model and converts it before startingvideostream-analytics.If
vllm-ipex-servingcrashes while loading weights, Docker restarts it andsetup_docker.shwaits up to one hour. SetVLLM_RETRY_TIMEOUT=<seconds>to change this;0stops immediately. On failure, the script reports the likely cause and stops all containers, but preserves volumes and cached model weights.
Confirm the model serving is ready before continuing:
curl -fsS http://localhost:41091/v1/models
curl -fsS http://localhost:8192/v1/health
curl -fsS http://localhost:8999/health
Step 2 - Verify the MCP server#
The MCP server starts as part of the stack in Step 1 (the smart-community-mcp-server container). It uses host networking, so it exposes the same endpoints as before:
UI:     http://localhost:3100/
MCP:    http://localhost:3100/mcp
Events: http://localhost:3101/events
Logs:   docker logs -f smart-community-mcp-server
It always uses $SMART_COMMUNITY_DATA_DIR/config.yaml and $SMART_COMMUNITY_DATA_DIR/monitors.yaml (bind-mounted at the same absolute path inside the container). For later configuration changes, update these two files and reload the server:
docker compose -f docker/compose.yaml up -d --force-recreate smart-community-mcp-server
Verify that the MCP endpoint, events webhook, and data root are available:
curl -fsS -X POST http://localhost:3100/mcp \
  -H "Content-Type: application/json" \
  -H "Accept: application/json, text/event-stream" \
  -d '{"jsonrpc":"2.0","id":1,"method":"initialize","params":{"protocolVersion":"2024-11-05","capabilities":{},"clientInfo":{"name":"startup-check","version":"1.0"}}}'
curl -fsS http://localhost:3101/health
ls ~/.mcp-smart-community/smart-community.db
ls ~/.mcp-smart-community/config.yaml ~/.mcp-smart-community/monitors.yaml
Note
Use bash setup_docker.sh --light-down to stop the MCP server (and the rest of the app tier) while keeping the model serving warm, or bash setup_docker.sh --down for a full teardown.
Step 3 - Connect an agent host#
The MCP server is framework-agnostic. Once configured, a compatible MCP client can access the full smart_community_* tool set through Streamable HTTP at http://localhost:3100/mcp.
Agentic Smart Community Dashboard
Open http://localhost:3100/ to use the Agentic Smart Community Web UI. It provides live camera views, activity timelines, alert records, and report generation for registered monitors. The chat panel can also connect to a supported agent framework.
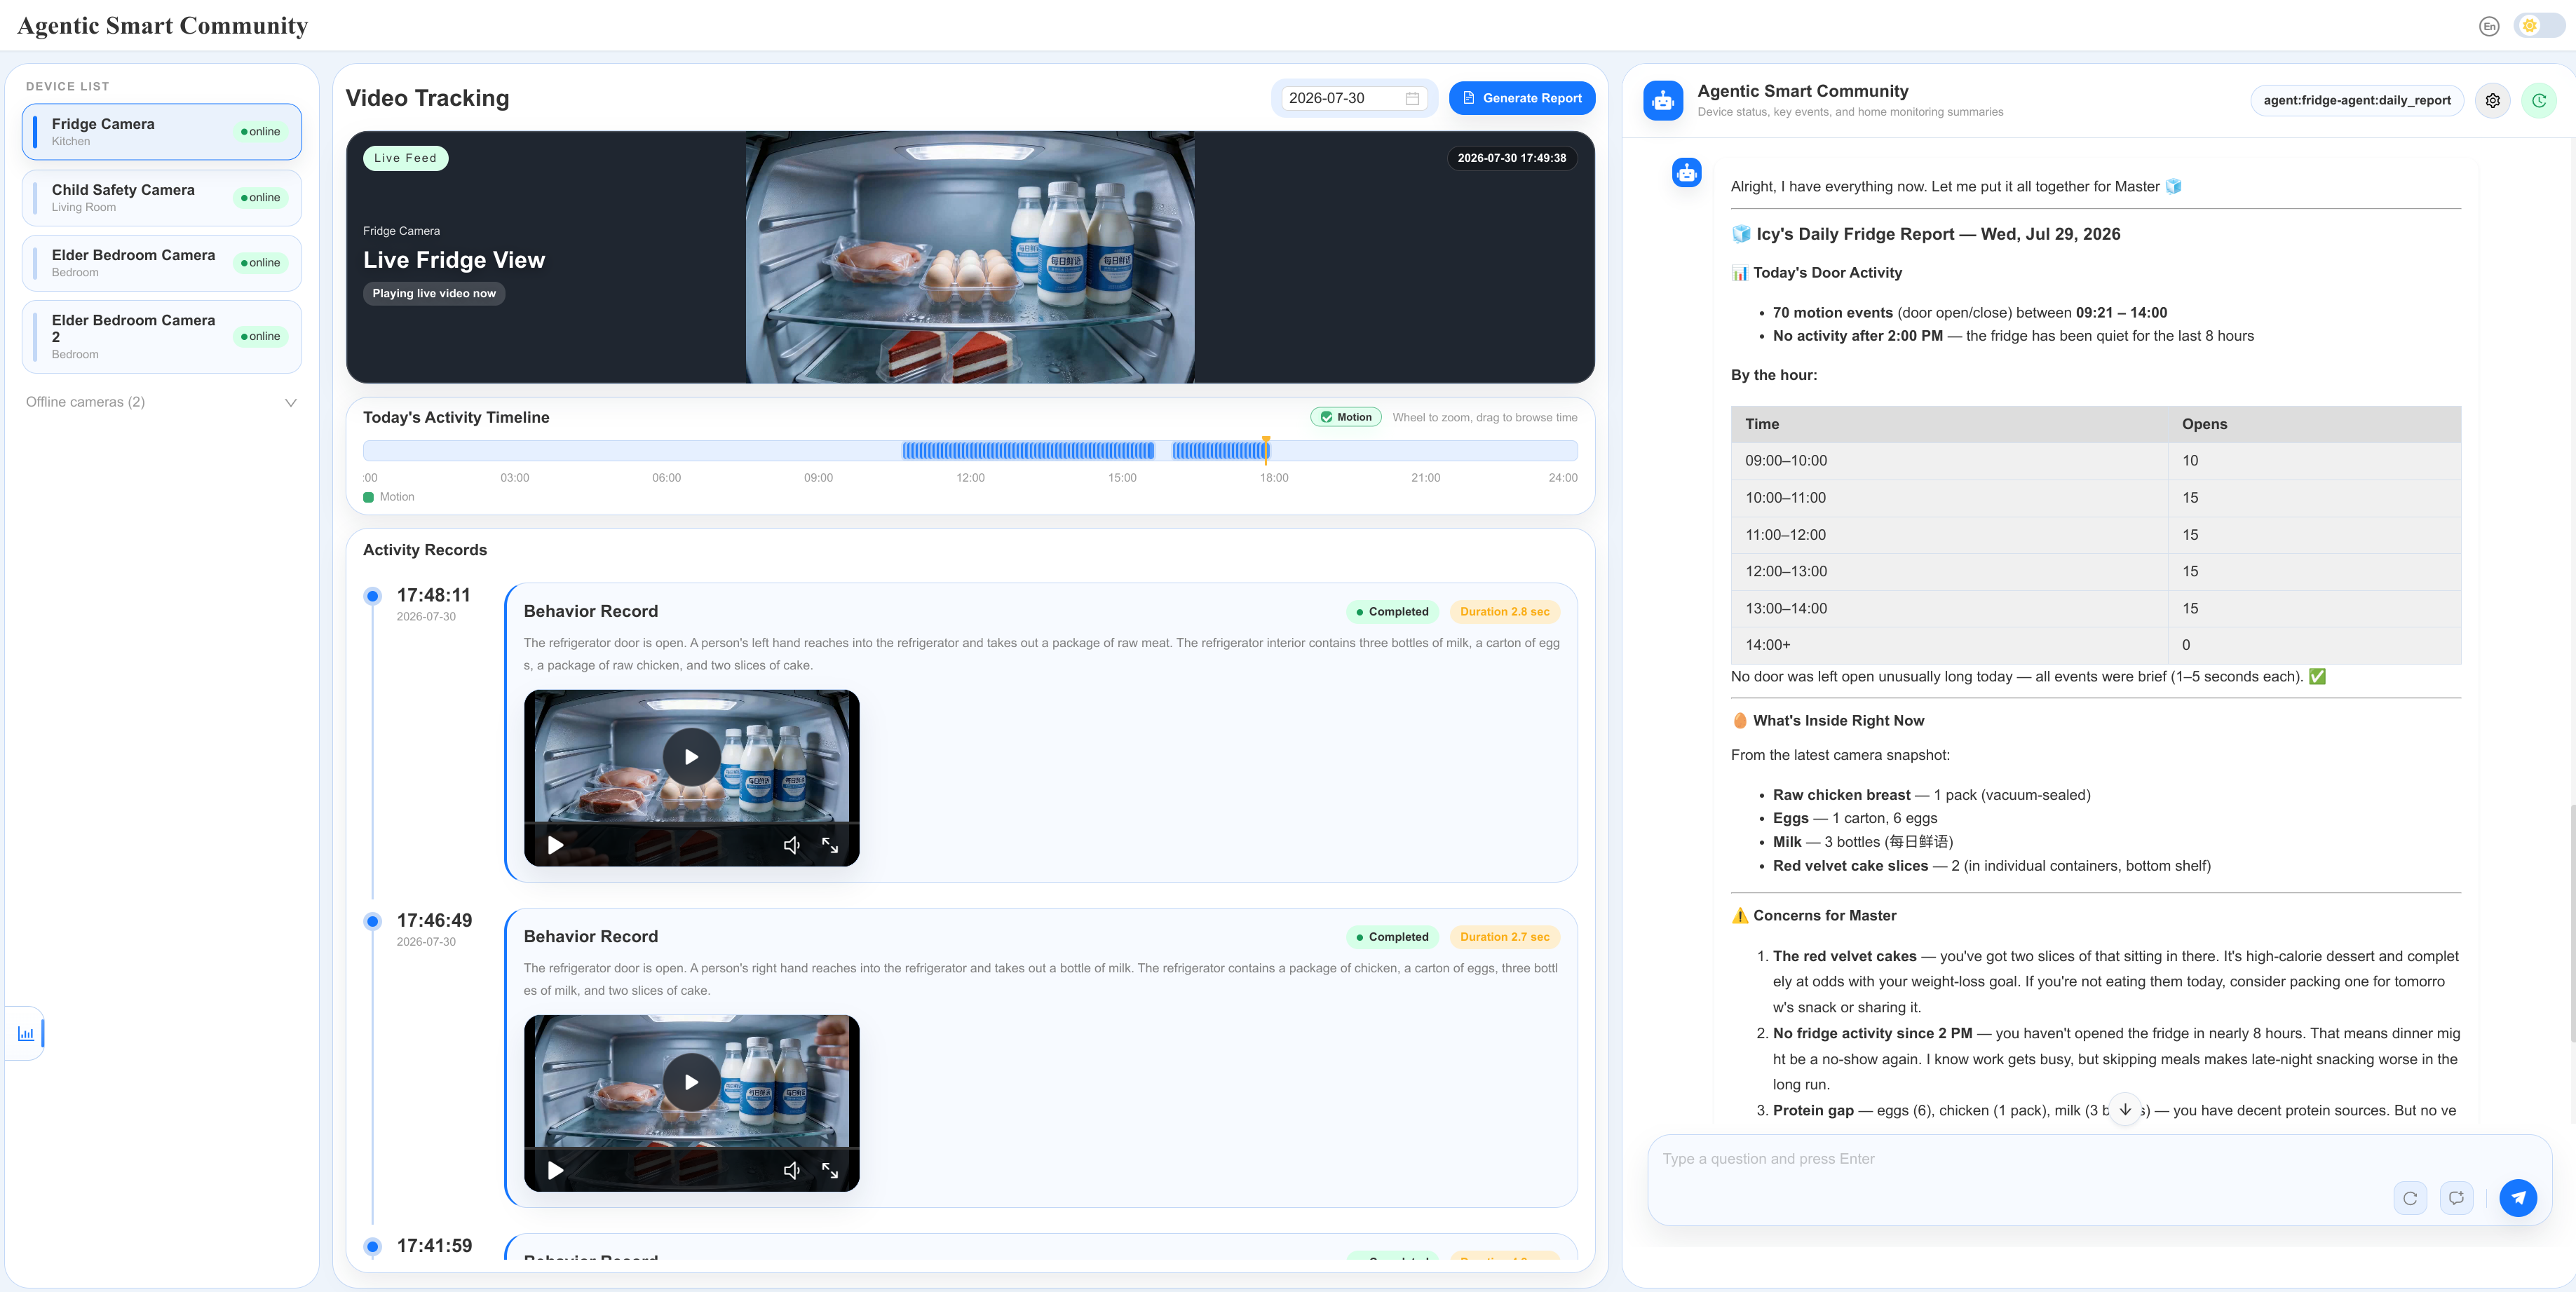 Figure: Agentic Smart Community Dashboard
OpenClaw#
Install OpenClaw using the official OpenClaw documentation, or use our validated platform guide.
Ensure that OpenClaw has a valid model provider configured, such as MiniMax, Kimi, DeepSeek, etc. Alternatively, run the following script to add the model served by
vllm-ipex-servingfrom Step 1 - Start all services, into~/.openclaw/openclaw.json:bash scripts/openclaw/configure_local_model.shAdd the MCP server to
~/.openclaw/openclaw.json. The transport must bestreamable-http, and the URL must include/mcp:{ "mcp": { "servers": { "smart-community": { "transport": "streamable-http", "url": "http://localhost:3100/mcp" } } } }
Import the skills and restart the gateway:
mkdir -p ~/.openclaw/skills
cp -rf ~/edge-ai-suites/metro-ai-suite/agentic-smart-community/skills/* ~/.openclaw/skills/
openclaw gateway restart
Open the OpenClaw Control UI to talk to your agents.
openclaw dashboard
# Then open:
# http://localhost:18789/
Note
If there is no GUI on your host, run:
ssh -N -L 18789:127.0.0.1:18789 username@your-host-ipFind the gateway token from
~/.openclaw/openclaw.json
Agents can now use the MCP tools when you ask them to create a use case, analyze a monitor, or generate a report. Try the following examples in the OpenClaw Control UI (http://localhost:18789) or Agentic Smart Community Web UI(http://localhost:3100/).
To use OpenClaw from the Agentic Smart Community Web UI, open http://localhost:3100/, select OpenClaw in the chat panel (as the figure shows below), and enter the gateway URL and token. After connecting, select an OpenClaw session to chat alongside the live video and activity views. Alternatively, you can use the standalone OpenClaw Control UI at http://localhost:18789/.
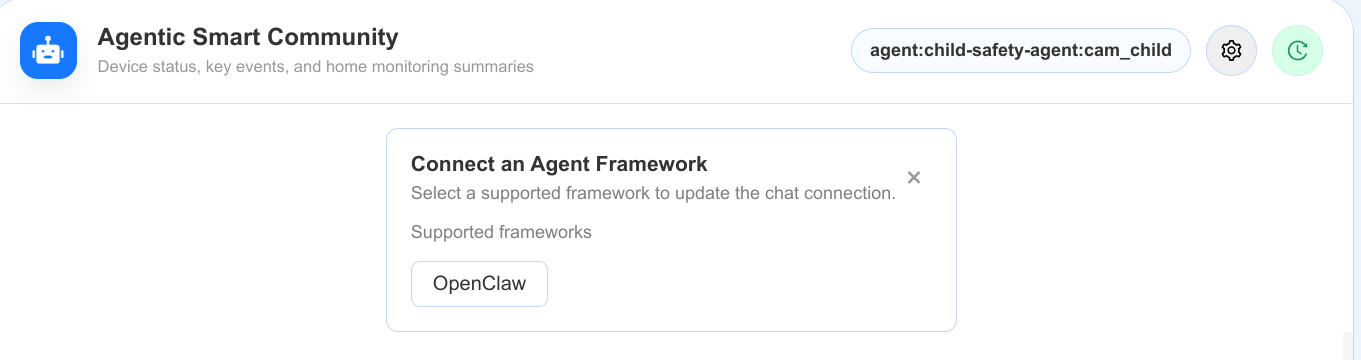 Figure: Configure the Agent Chat Session from Dashboard
A. Inspect the Smart Community tools:
Ask the agent what capabilities and bundled use cases are available:
"List the available Smart Community tools."
"List the current Smart Community use cases."
B. Register a camera-source monitor upon use case: child_safety:
Prepare a valid RTSP video stream as a camera monitor source
You can publish a local video as a looping RTSP stream. Keep this command running while the monitor is in use:
bash scripts/helpers/local_video_to_rtsp.sh /path/to/your-video.mp4 rtsp://localhost:8555/live/test
The stream is available at
rtsp://localhost:8555/live/test.Ask the agent to register the stream with a bundled use case:
"Register a camera source at rtsp://localhost:8555/live/test using the child_safety use case, name it: cam_test"
Follow the agent’s guidance and answer the required questions to complete the monitor registration and bring it online. When no monitor ID is specified, the MCP server assigns
cam_child_safety. Here we provide a monitor ID explicitly ascam_test. As shown below: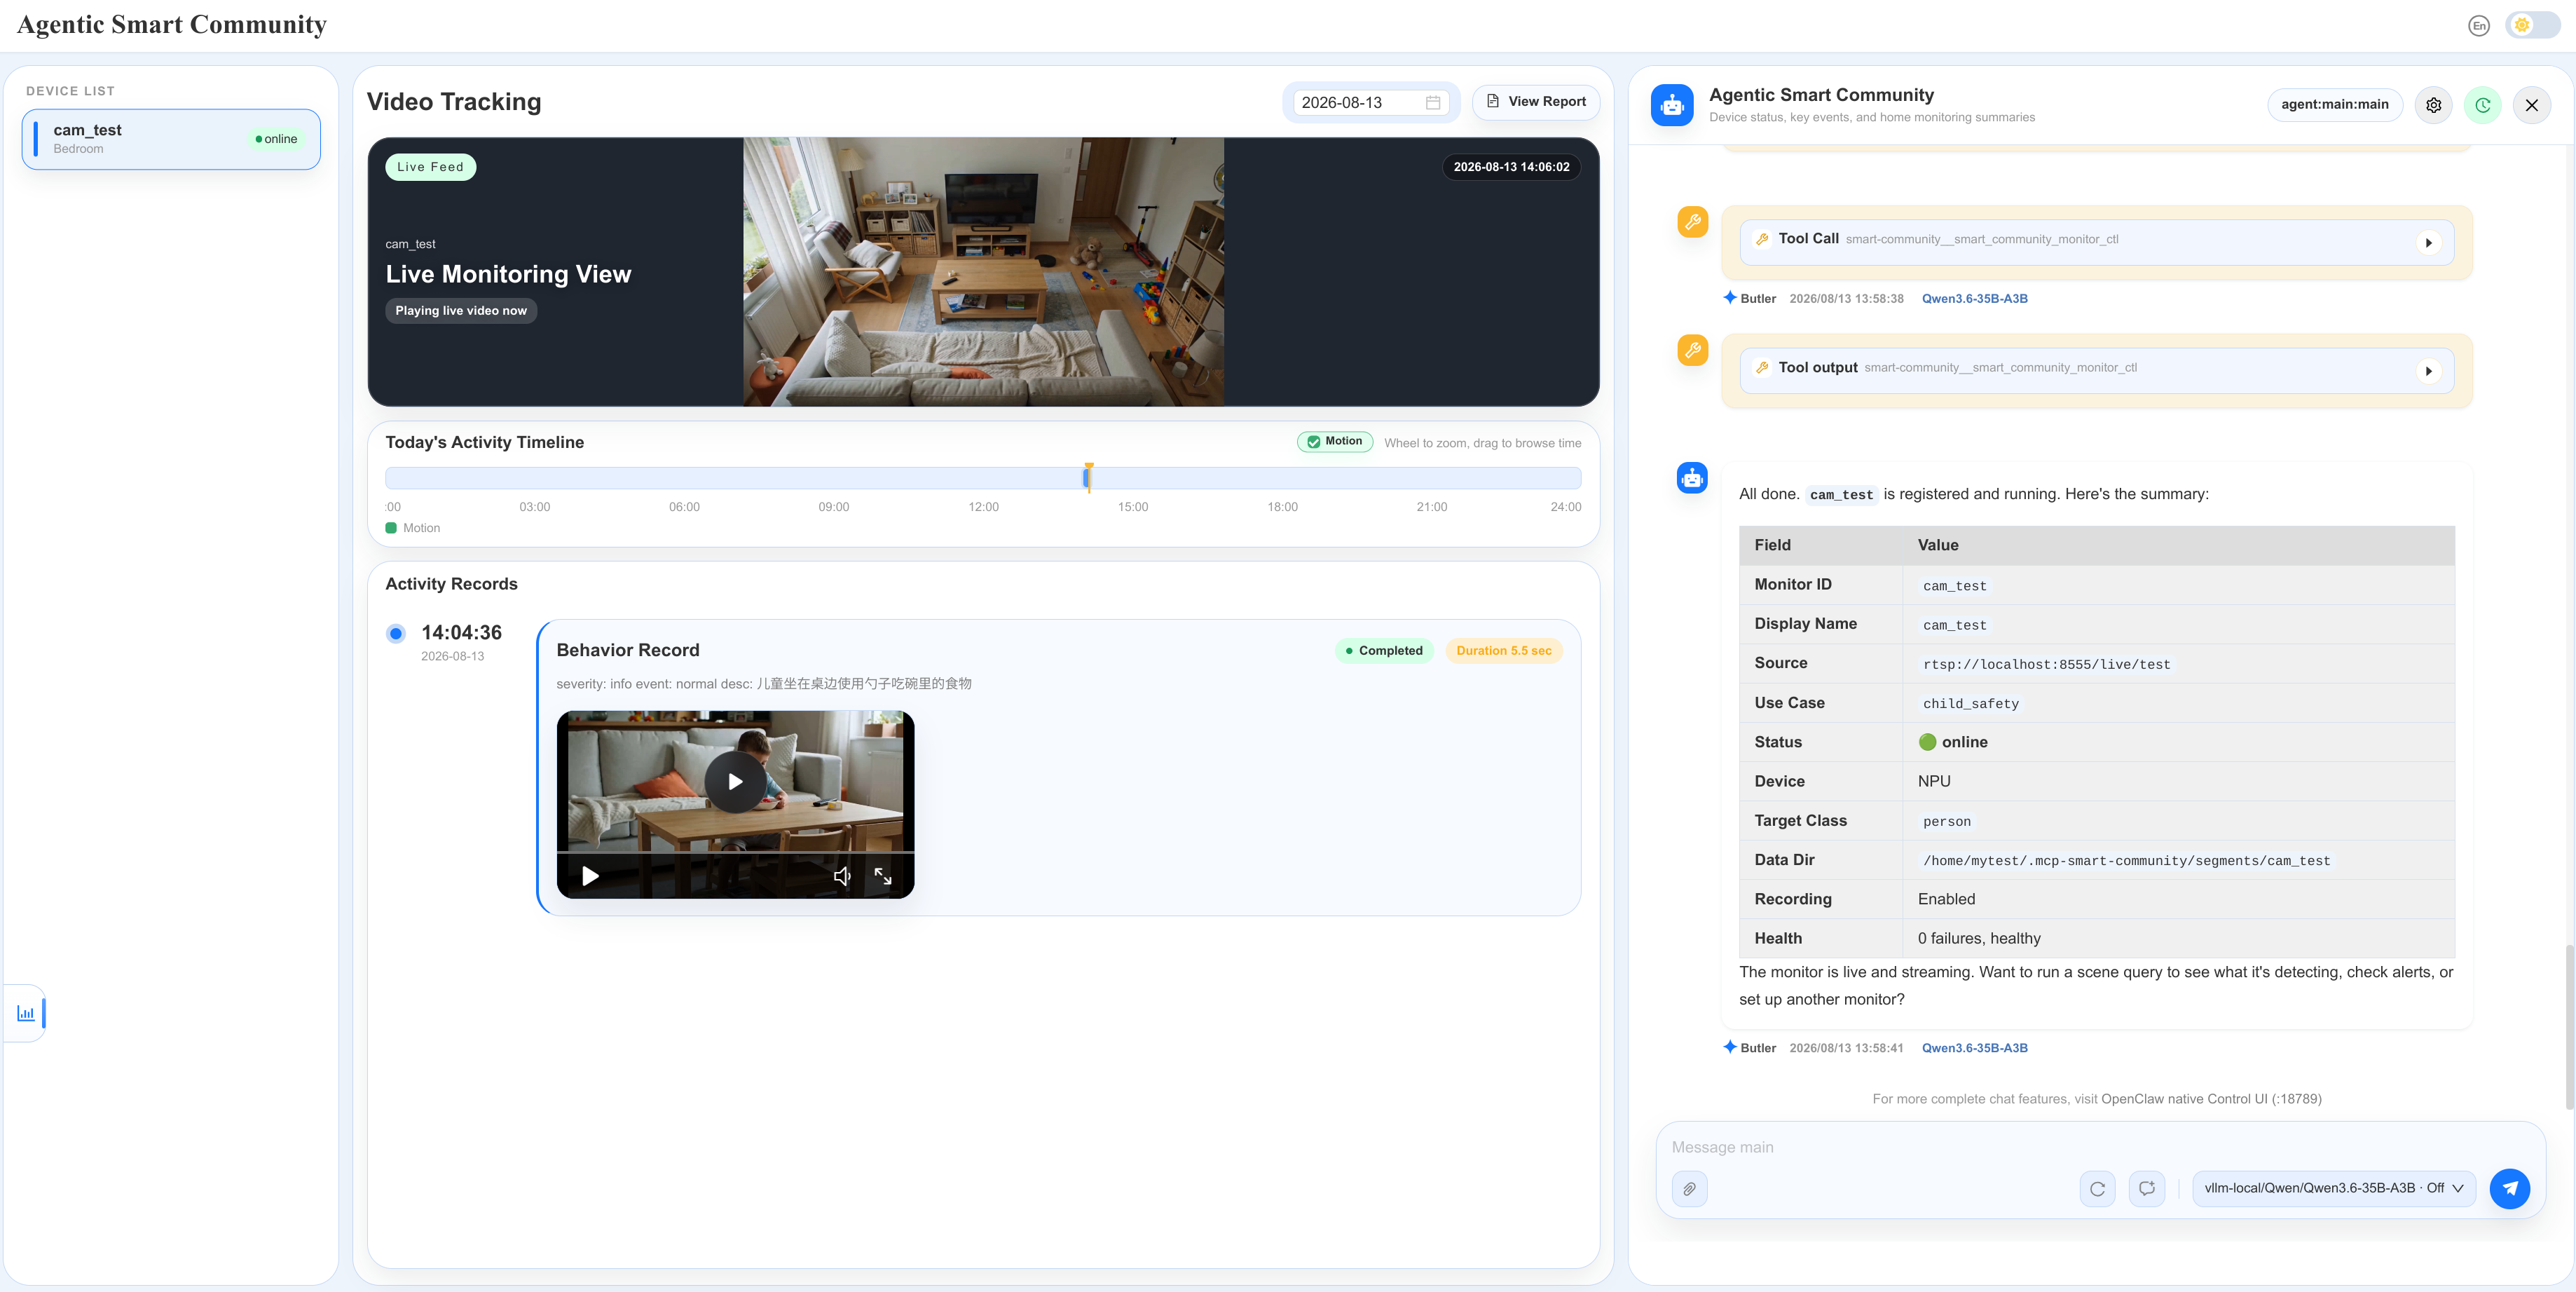
C. Generate a report:
Leave the monitor online long enough to process video and store events in ~/.mcp-smart-community/smart-community.db. Then ask the agent:
"Generate today's report for the cam_test monitor."
D. Delete a monitor:
Ask the agent to delete the monitor registered in the previous step:
"Delete the cam_test monitor."
Note
Only do this if you don’t need this monitor any more
Real-Time Alert Notifications#
MCP Server subscriptions can deliver alert updates directly to connected clients. To enable real-time notifications through the OpenClaw adapter:
First, install the adapter as the
smart-community-alertsOpenClaw plugin:cd ~/edge-ai-suites/metro-ai-suite/agentic-smart-community bash packages/framework-adapter-sdk/examples/openclaw/scripts/install_as_openclaw_plugin.sh
Then, ask the agent to configure real-time alert notifications:
Configure the system to push alerts from cam_test to this agent in real time.
This OpenClaw adapter is built with the Framework Adapter SDK. For details about building the plugin and configuring alert routes, see the OpenClaw adapter guide.
Other MCP clients#
Hermes, Claude Desktop, Cursor, and other compatible MCP clients can similarly use the same http://localhost:3100/mcp endpoint through their own MCP-server configuration. The client can use the server reactively without an adapter, or subscribe to monitor alert updates as described in MCP Subscription Reference.
If your agent framework requires an adapter to route those updates into agent sessions or external channels, use the Framework Adapter SDK.
Step 4 - Register a new use case#
The MCP server includes these bundled use cases:
Use case |
Capability |
|---|---|
Fridge Monitor |
Tracks fridge activity and supports inventory-oriented daily reports. |
Child Safety |
Detects potentially dangerous child behavior and creates safety alerts and reports. |
Elder Wakeup |
Tracks wakeup activity and supports weekly wakeup reports. |
To use a bundled use case, ask the connected agent to register a monitor with its monitor ID, RTSP URL, and use-case key: fridge, child_safety, or elder_wakeup.
Furthermore, you can simply describe your requirements to an agent to create a customized use case without restarting the core services. See Register a New Use Case for the complete registration workflow.
Build the service images from source#
This is optional. By default setup_docker.sh pulls the prebuilt images from Docker Hub — intel/multilevel-video-understanding, intel/smart-community-mcp-server, and intel/videostream-analytics — and vllm-ipex-serving runs from the upstream intel/llm-scaler-vllm image. Build locally only when you have modified the sources or need an image for a tag that is not published.
source docker/set_env.sh

bash setup_docker.sh --build        # build the three images, do not start
bash setup_docker.sh --build-prod   # build, then start the full stack
Building takes considerably longer than pulling. setup_docker.sh clones the multilevel-video-understanding build context from edge-ai-libraries on demand into .external/edge-ai-libraries; delete that directory to refresh it.
To pre-stage the prebuilt images instead — for example on a host with restricted network access at deployment time — pull them explicitly:
docker pull intel/multilevel-video-understanding:2026.2.0
docker pull intel/smart-community-mcp-server:2026.2.0
docker pull intel/videostream-analytics:2026.2.0
Note
setup_docker.sh resolves each image as ${REGISTRY_URL}<service>:${TAG}, which with the defaults in docker/set_env.sh. Export TAG before sourcing docker/set_env.sh so it matches the tag you pulled or built.
Data directory#
All runtime data lives under one root controlled by an environment variable:
export SMART_COMMUNITY_DATA_DIR=/path/to/data # default: ~/.mcp-smart-community
$SMART_COMMUNITY_DATA_DIR/
|- config.yaml
|- config.yaml.<YYYYMMDD-HHMMSS>.bak
|- monitors.yaml
|- monitors.yaml.<YYYYMMDD-HHMMSS>.bak
|- smart-community.db
|- use-cases/
|  |- <use_case>/
|  |  |- prompt.md
|  |  `- evaluate_rules.py
|  `- .backup/
|- segments/
|  `- <monitor_id>/
|     |- latest.jpg
|     |- recordings/<YYYY-MM-DD>/
|     |- motion_events/<YYYY-MM-DD>/
|     `- queries/<YYYY-MM-DD>/
`- logs/
   |- reports/
   `- monitors/<monitor_id>/<YYYY-MM-DD>.log
The timestamped backup entries are present only after the launcher replaces a different active configuration. config.yaml and monitors.yaml are not removed by automatic data cleanup.
Use-case artifacts live under use-cases/<use_case>/. prompt.md stores the compiled prompt for the use case, and evaluate_rules.py stores the custom alert rule when the use case uses the extended schema. When a use case is unregistered, its artifacts are archived under use-cases/.backup/.
Automatic cleanup runs on server start and then daily at approximately 00:05 local time. It removes .log files older than logging.retention_days (default: 14 days in config.yaml.example) and date directories under segments/<id>/{recordings,motion_events,queries}/ older than storage.retention_days (default: 2 days in config.yaml.example). It leaves latest.jpg, smart-community.db, and non-date directory names untouched.