How to Integrate Cameras and Sensors into Intel® SceneScape#
This guide provides step-by-step instructions to integrate cameras and other sensors into Intel® SceneScape. By completing this guide, you will:
Configure your camera and sensor data for ingestion into Intel® SceneScape.
Publish sensor messages to the correct MQTT topics.
Validate integration through timestamped, ID-labeled messages and visual scene updates.
This task is critical for enabling real-time scene understanding and updates in SceneScape using data from physical devices.
Prerequisites#
Before you begin, ensure the following:
Dependencies Installed: Install Python, OpenCV, an MQTT client, and configure MQTT access credentials.
Access and Permissions: You must have sensor IDs pre-provisioned in your scene in SceneScape.
Familiarity with MQTT, JSON formatting, and camera calibration is recommended. If needed, refer to:
Basic Data Flow#
All sensors, from cameras to microphones to environmental sensors like temperature or air quality, digitize something happening in the scene at a given moment in time.
A sensor system must acquire data, provide a timestamp, attach a sensor ID, and then publish this data to SceneScape in a recognized format. It must also know where to publish each message. This flow is shown in the top box of Figure 1.
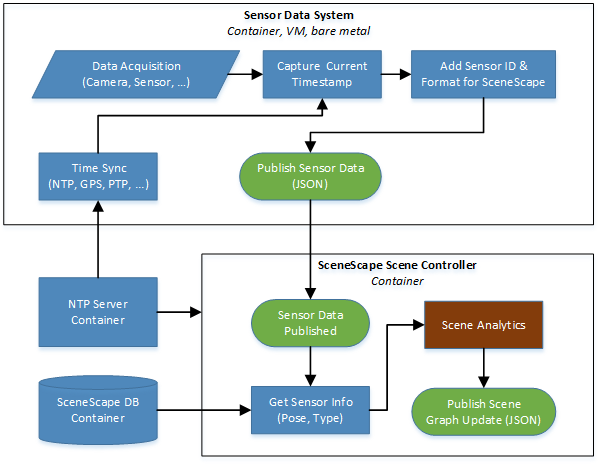
Figure 1: SceneScape basic data flow
There are a few things to note about the sensor data system:
The system time should be synchronized as well as possible with the scene controller, and the timestamp must represent the time at data acquisition. This minimizes jitter during the scene analytics process, particularly when many sources of data are pushing data into the scene asynchronously.
Every message should include a sensor ID, a timestamp, and a value that was measured or digitized by the sensor.
The sensor does not know its scene context at all. It just needs to know where to publish the data.
The scene controller needs to know about the sensor before it can do anything with the data. For example, if a sensor ID does not already exist in the database that sensor data is ignored. Similarly, if the sensor is attached to a given scene, then only the state for that scene will be updated (a sensor, like any node in a scene graph, may only exist in one scene at a time).
The SceneScape scene controller then picks up this data, utilizes information already known about the sensor, updates the state of the scene using the data, and then publishes an update to the scene graph if appropriate.
Figure 2 is a flow chart of how camera-based metadata is generated and published.
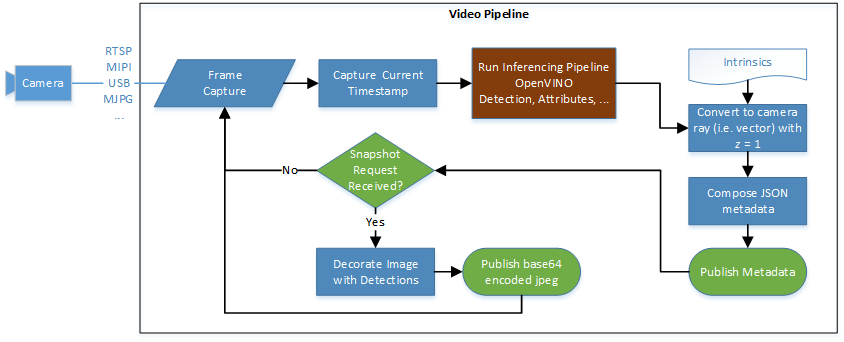
Figure 2: SceneScape video pipeline
Figure 2 above makes use of the following:
Common sensor message properties#
All sensor and camera messages share two properties: timestamp and ID.
{
  "id": "sensor1",
  "timestamp": "2022-09-19T21:33:09.832Z",
  ...
}
Sensor ID The ID is the key used to associate the published data with the camera or sensor as provisioned in SceneScape. Before its data can be analyzed, each camera or sensor must be added to an existing scene with a unique ID.
Notes:
Publishing data using an ID that has not been provisioned will result in a “Camera not in database” error and the data being discarded.
If a scene with cameras or sensors is deleted, those sensors will be “orphaned.” They can be added back to a scene by editing them from the camera or sensor lists.
Timestamps Timestamps are in ISO 8601 UTC format. Time synchronization is an entire discipline of its own, but since the SceneScape scene controller must merge various sources of data the following two principles are paramount:
Notes:
Systems feeding data into SceneScape must be time synchronized with the scene controller.
Data should be timestamped as close to acquisition as possible.
Python Timestamp Example
import datetime
timestamp = datetime.datetime.utcnow().isoformat() + 'Z'
JavaScript Timestamp Example
var time_now = new Date();
var timestamp = time_now.toISOString();
Object Detection Data#
2D Detections from Cameras The most common method of indicating the location of an object in a camera frame is with a bounding box (a rectangle drawn around an object in an image). Here is an example of an array of bounding boxes from a person detector along with an ID and timestamp for an image frame:
{
  "timestamp": "2022-09-19T21:33:09.832Z",
  "id": "camera1",
  "objects": [
    {
      "id": 1,
      "category": "person",
      "confidence": 0.9958761930465698,
      "bounding_box": {
        "x": 0.0017505188455242745,
        "y": -0.4183740040803016,
        "width": 0.16804980917033036,
        "height": 0.40962140985268025
      }
    },
    {
      "id": 2,
      "category": "person",
      "confidence": 0.5717072486877441,
      "bounding_box": {
        "x": -0.29758820373912664,
        "y": -0.03150933921943694,
        "width": 0.09977957419488362,
        "height": 0.34135117487723354
      }
    }
  ]
}
Note: Bounding boxes are in normalized image space. For more information on how to transform pixel-based bounding boxes, see convert-object-detections-to-normalized-image-space.md.
3D Detections from Cameras and Other Sensors Sometimes sensors and AI models provide 3D detections instead of 2D detections. 3D detections may be directly measured by sensors (e.g. GPS), inferred from 2D data (e.g. monocular images), and/or inferred from 3D data (e.g. point clouds). In those cases a 3D bounding box (i.e. cuboid) can be provided like in the example below:
{
  "timestamp": "2024-05-22T22:10:56.649Z",
  "id": "camera1",
  "objects": [
    {
      "category": "person",
      "translation": [
        1.8509220689711061,
        -1.1447132184500803,
        15.646203419777198
      ],
      "rotation": [
        0.0007493523329913518,
        0.003771683635429448,
        0.05213021598136364,
        0.9986328922358665
      ],
      "size": [
        0.5,
        0.5,
        2.0
      ],
      "bounding_box": {
        "x": 1.8509220689711061,
        "y": -1.1447132184500803,
        "z": 15.646203419777198,
        "width": 100,
        "height": 100,
        "depth": 1
      },
      "id": 1000
    },
    {
      "category": "car",
      "translation": [
        1.8509220689711061,
        -1.1447132184500803,
        15.646203419777198
      ],
      "rotation": [
        0.0007493523329913518,
        0.003771683635429448,
        0.05213021598136364,
        0.9986328922358665
      ],
      "size": [
        0.5,
        0.5,
        2.0
      ],
      "bounding_box": {
        "x": 1.8509220689711061,
        "y": -1.1447132184500803,
        "z": 15.646203419777198,
        "width": 100,
        "height": 100,
        "depth": 1
      },
      "id": 1001
    }
  ]
}
Note: Translation and size currently need to be also provided in the bounding_box property. When providing 3d detection data, one of the key things to keep in mind is the SceneScape’s coordinate system convention. 3D data in other conventions should be converted in order to ensure correct ingestion. SceneScape follows the same convention as OpenCV where the scene axes are oriented like below:
# Right-handed, z-UP
#    z
#    | y
#    |/
#    +---x
It’s also important to keep in mind the orientation of a camera with no translation or rotation with respect to the scene. Again, the convention is the same as the one used by OpenCV, where the right side of the image is in the x direction, the top of the image is in the -y direction, and the camera looks in the z direction.
Detection Metadata#
Other metadata associated with each detection can also be tagged on the object and will be passed on to the scene update for that detection. For example, if a vision-based hat detector is used then a “hat” object could be added:
{
  "timestamp": "2022-09-19T21:33:09.832Z",
  "id": "camera1",
  "objects": [
    {
      "id": 1,
      "category": "person",
      "confidence": 0.9958761930465698,
      "bounding_box": {
        "x": 0.0017505188455242745,
        "y": -0.4183740040803016,
        "width": 0.16804980917033036,
        "height": 0.40962140985268025
      },
      "hat": {
        "confidence": 0.9123,
        "value": true
         }
      }
   ]
}
Metadata for camera-based detections can be validated against the SceneScape metadata schema, which is extensible to allow for many kinds of data to be passed on to the scene.
Camera Calibration Methods#
Camera calibration can be performed using the following methods:
Manual Calibration: Use the user interface to calibrate cameras by marking points on the camera view and matching them with corresponding points on the map view. This process determines the camera’s pose. You can also optionally unlock intrinsic parameters and distortion values, which will automatically adjust based on the selected points to improve calibration accuracy.
Automatic Calibration: For automated calibration, refer to the Auto Camera Calibration Microservice.
Camera Calibration Support#
The SceneScape user interface utilizes occasional frames, or snapshots, from cameras for the purposes of camera calibration and “live” preview. These frames are not stored and are requested directly by the user interface and not the scene controller.
To support snapshots, the vision pipeline needs to listen to a command topic and then publish the image to the correct topic (see Figure 2 above). This could be supported in many ways, but here is a Python example of how to generate a base64 encoded JPEG from an OpenCV frame:
import cv2
import base64
import numpy as np

# Blank "image" frame
frame = np.zeros((600, 800, 3), np.uint8)

# Create base64 encoded JPEG image from the frame
ret, jpeg = cv2.imencode(".jpg", frame)
jpeg = base64.b64encode(jpeg).decode('utf-8')
The command topic is scenescape/cmd/camera/<sensorID>. If the message “getimage” is published to this topic then the snapshot should be published to scenescape/image/sensor/cam/<sensorID>.
Snapshot sample code For a complete example with MQTT connectivity, see snapshot.py. It can be run by providing the required arguments from within a SceneScape container or you can adapt it for your own code.
Here is its help output from inside a SceneScape container:
~/scenescape$ tools/scenescape-start --shell
scenescape@<hostname>:/home/<user>/scenescape$  ./tools/snapshot.py -h
usage: snapshot.py [-h] [-b BROKER] [--port PORT] -p PASSWORD -u USERNAME -i ID

Sample of generating a snapshot and publishing it over MQTT upon request.

optional arguments:
  -h, --help            show this help message and exit
  -b BROKER, --broker BROKER
                        MQTT broker (default: localhost)
  --port PORT           MQTT port (default: 1883)
  -p PASSWORD, --password PASSWORD
                        MQTT password (default: None)
  -u USERNAME, --username USERNAME
                        MQTT user name (default: None)
  -i ID, --id ID        Sensor ID (or mqttid) (default: None)
Singleton sensor data#
“Singleton” sensors publish a given value that varies in time. This could be a temperature reading, a light sensor, whatever. Currently, SceneScape tags a given object track with any singleton data received when the object is within the singleton measurement area.
Suppose a temperature sensor is configured to apply to an entire scene. SceneScape tags each object track in the scene with the latest temperature value and any changes to that temperature value that occurred while that object is tracked. The same thing applies when the measurement area is configured as a smaller portion of the scene (currently a circle or polygon area), except that objects are only tagged with the value if they are within the measurement area.
At minimum, a singleton should publish a “value” property to this topic:
scenescape/data/sensor/<sensorID>
Example singleton message and topic Here is an example message:
{
  "id": "temperature1",
  "timestamp": "2022-09-19T21:33:09.832Z",
  "value": 22.5
}
The “id” should match the topic, which in this case would be:
scenescape/data/sensor/temperature1
Singleton sample code See singleton.py for a sample of publishing random values to a singleton topic. You can run this sample by providing the required arguments from within a SceneScape container or adapt it to run in your own code.
Here is its help output from inside a SceneScape container:
Notes:
Ensure that the broker service is running.
~/scenescape$ docker run --rm -it --init --privileged --network <network_name> -v "$(pwd)":/workspace --tty -v /run/secrets/root-cert:/certs/scenescape-ca.pem:ro scenescape bash
~/scenescape$ ./tools/singleton.py -h
usage: singleton.py [-h] -b BROKER [--port PORT] -p PASSWORD -u USERNAME -i ID [--min MIN] [--max MAX] [-t TIME]

Sample of publishing pseudo-random singleton data to SceneScape.

optional arguments:
  -h, --help            show this help message and exit
  -b BROKER, --broker BROKER
                        MQTT broker (default: localhost)
  --port PORT           MQTT port (default: 1883)
  -p PASSWORD, --password PASSWORD
                        MQTT password (default: None)
  -u USERNAME, --username USERNAME
                        MQTT user name (default: None)
  -i ID, --id ID        Sensor ID (or mqttid) (default: None)
  --min MIN             Minimum sensor value (default: 0)
  --max MAX             Maximum sensor value (default: 1)
  -t TIME, --time TIME  Delay time in seconds between messages (default: 1.0)
Accessing singleton data on scene objects When singleton data applies to a tracked object, it is available in the scene graph update for that object under the “sensors” property. Using the above example of a singleton named “temperature1” then a person traversing that sensor’s measurement area will be tagged with an array of values and their associated timestamps:
{
   "timestamp": "2022-10-05T17:53:33.724Z",
   ...,
   "objects": [
      {
         "category": "person",
         ...,
         "translation": [
            0.5735071548523805,
            1.8229405125883953,
            0
         ],
         ...,
         "sensors": {
            "temperature1": [
               [
                  "2022-10-05T10:53:31.753z",
                  72.62185709310417
               ],
               [
                  "2022-10-05T10:53:32.754z",
                  77.70613289111834
               ]
            ]
         }
      },
      ...
   ]
}
Using this data, a developer can easily write an application to trigger alerts or take other action based on the history of sensor data for a tracked object or person.