LLM Robotics Demo#
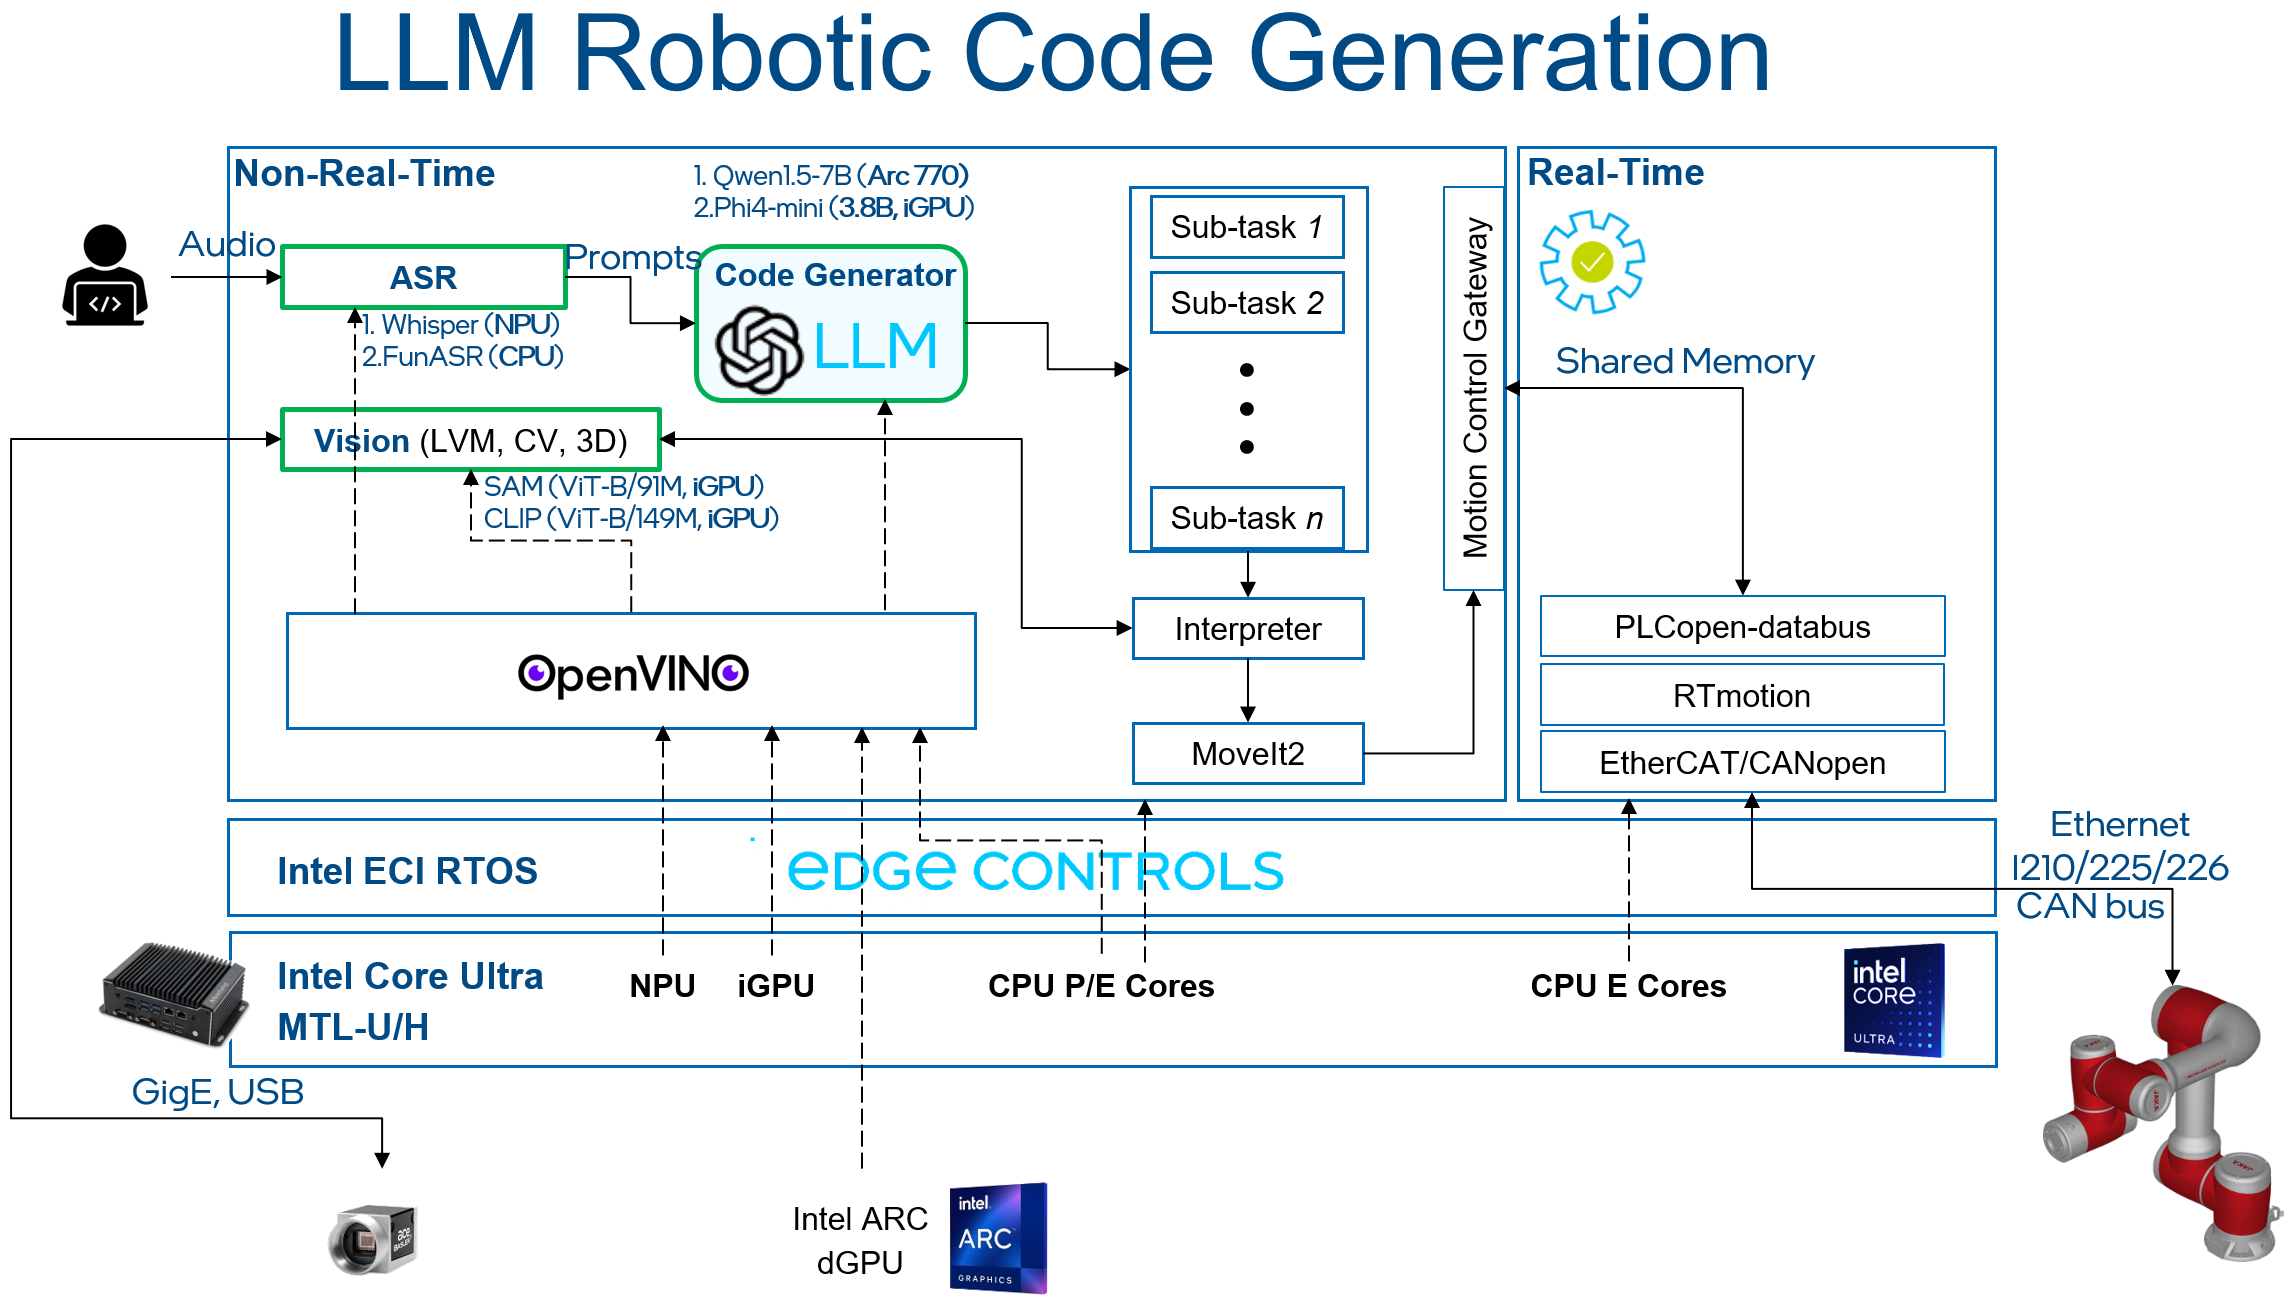
We have built a code generation pipeline for robotics, interacting with a chat bot utilizing AI technologies such as large language models (Phi-4) and computer vision (SAM, CLIP). It will use the user’s voice or enter a text commands to provide a prompt to the robotics agent to generate corresponding actions.
This tutorial will provide a step-by-step guide to set up a real-time system to control a JAKA robot arm with movement commands generated using an LLM. The picture below shows the architecture of the demo:
Prerequisites#
Please make sure you have finished setup steps in Installation & Setup and also ensure you have the following list-table prerequisites:
Specification |
Recommended |
|---|---|
Processor |
Intel® Core™ Ultra 7 Processor 265H |
Storage |
256G |
Memory |
LPDDR5, 6400 MHz, 16G x 2 |
JAKA robot arm setup#
This section will provide a step-by-step guide to setup a simulation JAKA robot-arm ROS2 application.
Install PLCopen library#
Install dependency:
$ sudo apt install libeigen3-dev python3-pip python3-venv cmake
$ sudo python3 -m pip install pymodbus==v3.6.9
Install PLCopen library:
$ sudo apt install libshmringbuf libshmringbuf-dev plcopen-ruckig plcopen-ruckig-dev plcopen-motion plcopen-motion-dev plcopen-servo plcopen-servo-dev plcopen-databus plcopen-databus-dev
Install ROS2 Iron#
Install dependency:
$ sudo apt update && sudo apt install -y locales curl gnupg2 lsb-release
Setup the Intel® oneAPI APT repository:
$ sudo -E wget -O- https://apt.repos.intel.com/intel-gpg-keys/GPG-PUB-KEY-INTEL-SW-PRODUCTS.PUB | gpg --dearmor | sudo tee /usr/share/keyrings/oneapi-archive-keyring.gpg > /dev/null
$ echo "deb [signed-by=/usr/share/keyrings/oneapi-archive-keyring.gpg] https://apt.repos.intel.com/oneapi all main" | sudo tee /etc/apt/sources.list.d/oneAPI.list
$ sudo apt update
Setup the public ROS2 Iron APT repository:
$ sudo curl -sSL https://raw.githubusercontent.com/ros/rosdistro/master/ros.key  -o /usr/share/keyrings/ros-archive-keyring.gpg
$ echo "deb [arch=$(dpkg --print-architecture) signed-by=/usr/share/keyrings/ros-archive-keyring.gpg] http://packages.ros.org/ros2/ubuntu $(source /etc/os-release && echo $UBUNTU_CODENAME) main" | sudo tee /etc/apt/sources.list.d/ros2.list > /dev/null
$ sudo bash -c 'echo -e "Package: *\nPin: origin eci.intel.com\nPin-Priority: -1" > /etc/apt/preferences.d/isar'
$ sudo apt update
Install ROS2 Iron packages:
$ sudo apt install -y python3-colcon-common-extensions python3-argcomplete python3-pykdl
$ sudo apt install -y ros-iron-desktop ros-iron-moveit* ros-iron-osqp-vendor ros-iron-ament-cmake-google-benchmark librange-v3-dev ros-iron-ros-testing
$ sudo bash -c 'echo -e "Package: *\nPin: origin eci.intel.com\nPin-Priority: 1000" > /etc/apt/preferences.d/isar'
Install JAKA robot arm application#
Download the source code of JAKA robot arm:
$ cd ~/Downloads/
$ sudo apt source ros-humble-pykdl-utils ros-humble-jaka-bringup ros-humble-jaka-description ros-humble-jaka-hardware ros-humble-jaka-moveit-config ros-humble-jaka-moveit-py ros-humble-jaka-servo ros-humble-run-jaka-moveit ros-humble-run-jaka-plc
Create workspace for robot arm source code:
$ mkdir -p ~/ws_jaka/src
$ cp -r ~/Downloads/ros-humble-jaka-bringup-3.2.0/robot_arm/ ~/ws_jaka/src
Build JAKA robot arm source code:
$ cd ~/ws_jaka/ && source /opt/ros/iron/setup.bash
$ touch src/robot_arm/jaka/jaka_servo/COLCON_IGNORE
$ colcon build
FunASR setup#
This section will provide a step-by-step guide to setup a FunASR (A Fundamental End-to-End Speech Recognition Toolkit) server.
Install dependency#
$ sudo apt-get install cmake libopenblas-dev libssl-dev portaudio19-dev ffmpeg git python3-pip -y
Add OpenVINO speech model to FunASR#
Install FunASR environment:
$ sudo apt install funasr llm-robotics
$ cd /opt/funasr/
$ sudo bash install_funasr.sh
Install the
asr-openvinomodel script:$ sudo chown -R $USER /opt/funasr/ $ sudo chown -R $USER /opt/llm-robotics/ $ mkdir /opt/funasr/FunASR/funasr/models/intel/ $ cp -r /opt/llm-robotics/asr-openvino-demo/models/* /opt/funasr/FunASR/funasr/models/intel/
Create a virtual FunASR Python environment:
$ cd /opt/funasr/
$ python3 -m venv venv-asr
$ source venv-asr/bin/activate
$ pip install modelscope==1.17.1 onnx==1.16.2 humanfriendly==10.0 pyaudio websocket==0.2.1 websockets==12.0 translate==3.6.1 kaldi_native_fbank==1.20.0 onnxruntime==1.18.1 torchaudio==2.4.0 openvino==2024.3.0
Build
asr-openvinomodel:$ cd /opt/funasr/FunASR/ $ pip install -e ./ $ python ov_convert_FunASR.py $ cp -r ~/.cache/modelscope/hub/iic/speech_seaco_paraformer_large_asr_nat-zh-cn-16k-common-vocab8404-pytorch /opt/llm-robotics/asr-openvino-demo/
Quantitative model using
ovc:$ cd /opt/llm-robotics/asr-openvino-demo/speech_seaco_paraformer_large_asr_nat-zh-cn-16k-common-vocab8404-pytorch/ $ ovc model.onnx --output_model=model_bb_fp16 $ ovc model_eb.onnx --output_model=model_eb_fp16
Modify the
configuration.jsonfile of the speech model:# modify model_name_in_hub.ms & file_path_metas.init_param { "framework": "pytorch", "task" : "auto-speech-recognition", "model": {"type" : "funasr"}, "pipeline": {"type":"funasr-pipeline"}, "model_name_in_hub": { "ms":"", "hf":""}, "file_path_metas": { "init_param":"model_bb_fp16.xml", "config":"config.yaml", "tokenizer_conf": {"token_list": "tokens.json", "seg_dict_file": "seg_dict"}, "frontend_conf":{"cmvn_file": "am.mvn"}} }
Reinstall the
funasrmodel of FunASR:$ cd /opt/funasr/FunASR/ $ pip uninstall funasr $ pip install -e ./
LLM and vision models setup#
This section will provide a step-by-step guide to setup a virtual Python environment to run LLM demo.
Setup a virtual environment for application#
Install the
pippackages for LLM:$ cd /opt/llm-robotics/LLM/ $ python3 -m venv venv-llm $ source venv-llm/bin/activate $ pip install -r requirement.txt
Set the environment variable:
$ # If you have connection issue on HuggingFace in PRC, please set-up the networking environment by following commands:
$ export HF_ENDPOINT="https://hf-mirror.com"
$ # transformers offline: export TRANSFORMERS_OFFLINE=1
Setup the SAM model#
Follow the OpenVINO documentation below to export and save SAM model:
Modify the loading PATH of models to the exported model path, the default path is:
# /opt/llm-robotics/LLM/utils/mobilesam_helper.py:L88-L89
ov_sam_encoder_path = f"/home/intel/ov_models/sam_image_encoder.xml"
ov_sam_predictor_path = f"/home/intel/ov_models/sam_mask_predictor.xml"
Setup the CLIP model#
Follow the OpenVINO documentation below to export and save CLIP (ViT-B) model:
Modify the loading PATH of models to the exported model path, the default path is:
# /opt/llm-robotics/LLM/utils/mobilesam_helper.py:L87
clip_model_path = f"/home/intel/ov_models/clip-vit-base-patch16.xml"
Setup the Phi-4-mini-instruct-int8-ov model#
Follow the below commands to download Phi-4-mini-instruct-int8-ov models:
$ sudo apt install git-lfs
$ mkdir ~/ov_models && cd ~/ov_models
$ GIT_LFS_SKIP_SMUDGE=1 git clone https://hf-mirror.com/OpenVINO/Phi-4-mini-instruct-int8-ov
$ git lfs pull
Set the environment variable:
Modify the loading PATH of models to the exported model path, the default path is:
# /opt/llm-robotics/LLM/llm_bridge.py:L27
self.model_path = "/home/intel/ov_models/Phi-4-mini-instruct-int8-ov"
Run pipeline#
This section will provide a step-by-step guide to launch LLM robotics demo.
Prepare System#
Please connect the following items to the Intel® Core™ Ultra IPC.
Item |
Explanation |
LINK |
|---|---|---|
Camera |
Intel® RealSense™ Depth Camera D435 |
|
USB Mic |
Audio input device of FunASR, 16k sampling rate |
UGREEN CM564 |
Launch LLM Robotic Demo#
The LLM Robotic demo includes the real-time component, non-real-time ROS2 component, and non-real-time LLM component.
Important
Please ensure a stable network connection before running the demo. The FunASR and LLM applications require an active network connection.
Launch the OpenVINO FunASR server:
$ source /opt/funasr/venv-asr/bin/activate
$ python3 /opt/funasr/FunASR/runtime/python/websocket/funasr_wss_server.py --port 10095 --certfile "" --keyfile "" --asr_model /opt/llm-robotics/asr-openvino-demo/speech_seaco_paraformer_large_asr_nat-zh-cn-16k-common-vocab8404-pytorch/
Launch the real-time application:
$ # affinity real time application to core 3
$ sudo taskset -c 3 plc_rt_pos_rtmotion
If the real-time application launches successfully, the terminal will show the following:
Axis 0 initialized.
Axis 1 initialized.
Axis 2 initialized.
Axis 3 initialized.
Axis 4 initialized.
Axis 5 initialized.
Function blocks initialized.
Launch the JAKA robot arm ROS2 node:
Important
Execute the following commands as privileged user (
root).$ source ~/ws_jaka/install/setup.bash $ ros2 launch jaka_moveit_py jaka_motion_planning.launch.py
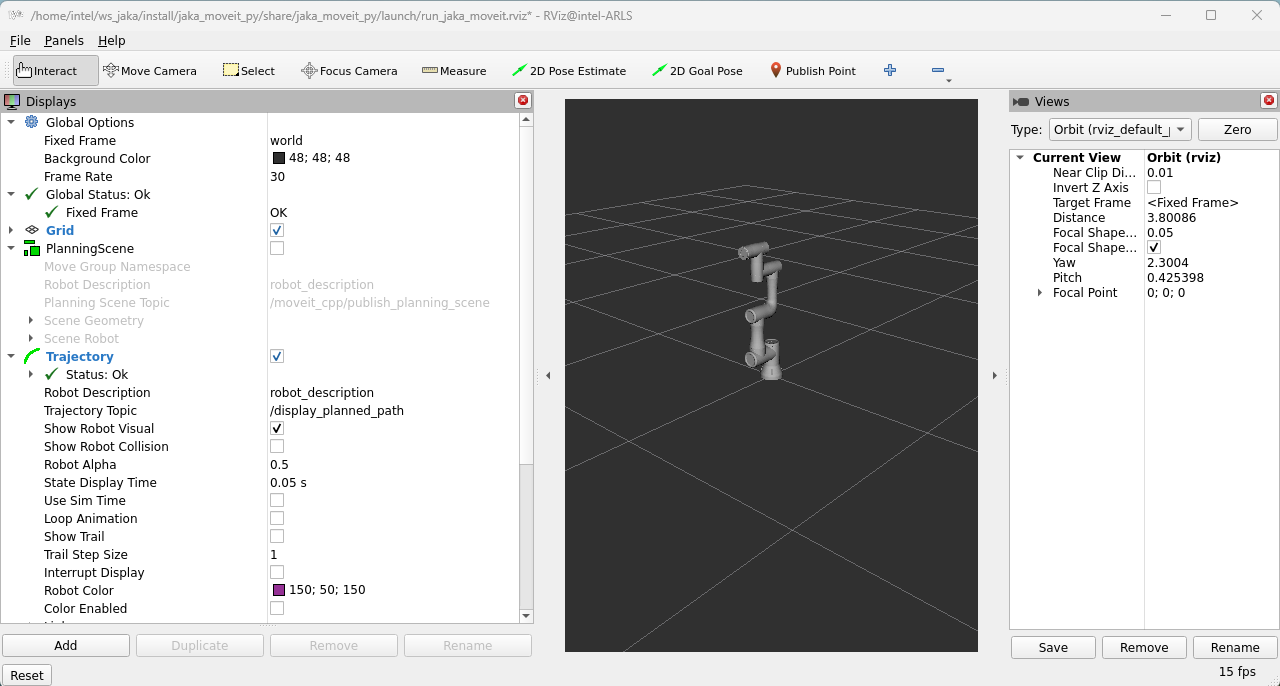
- If the ROS2 node launches successfully, RVIZ2 will display the following:
Launch the LLM application:
$ source /opt/intel/oneapi/setvars.sh
$ cd /opt/llm-robotics/LLM/
$ source venv-llm/bin/activate
$ python main.py
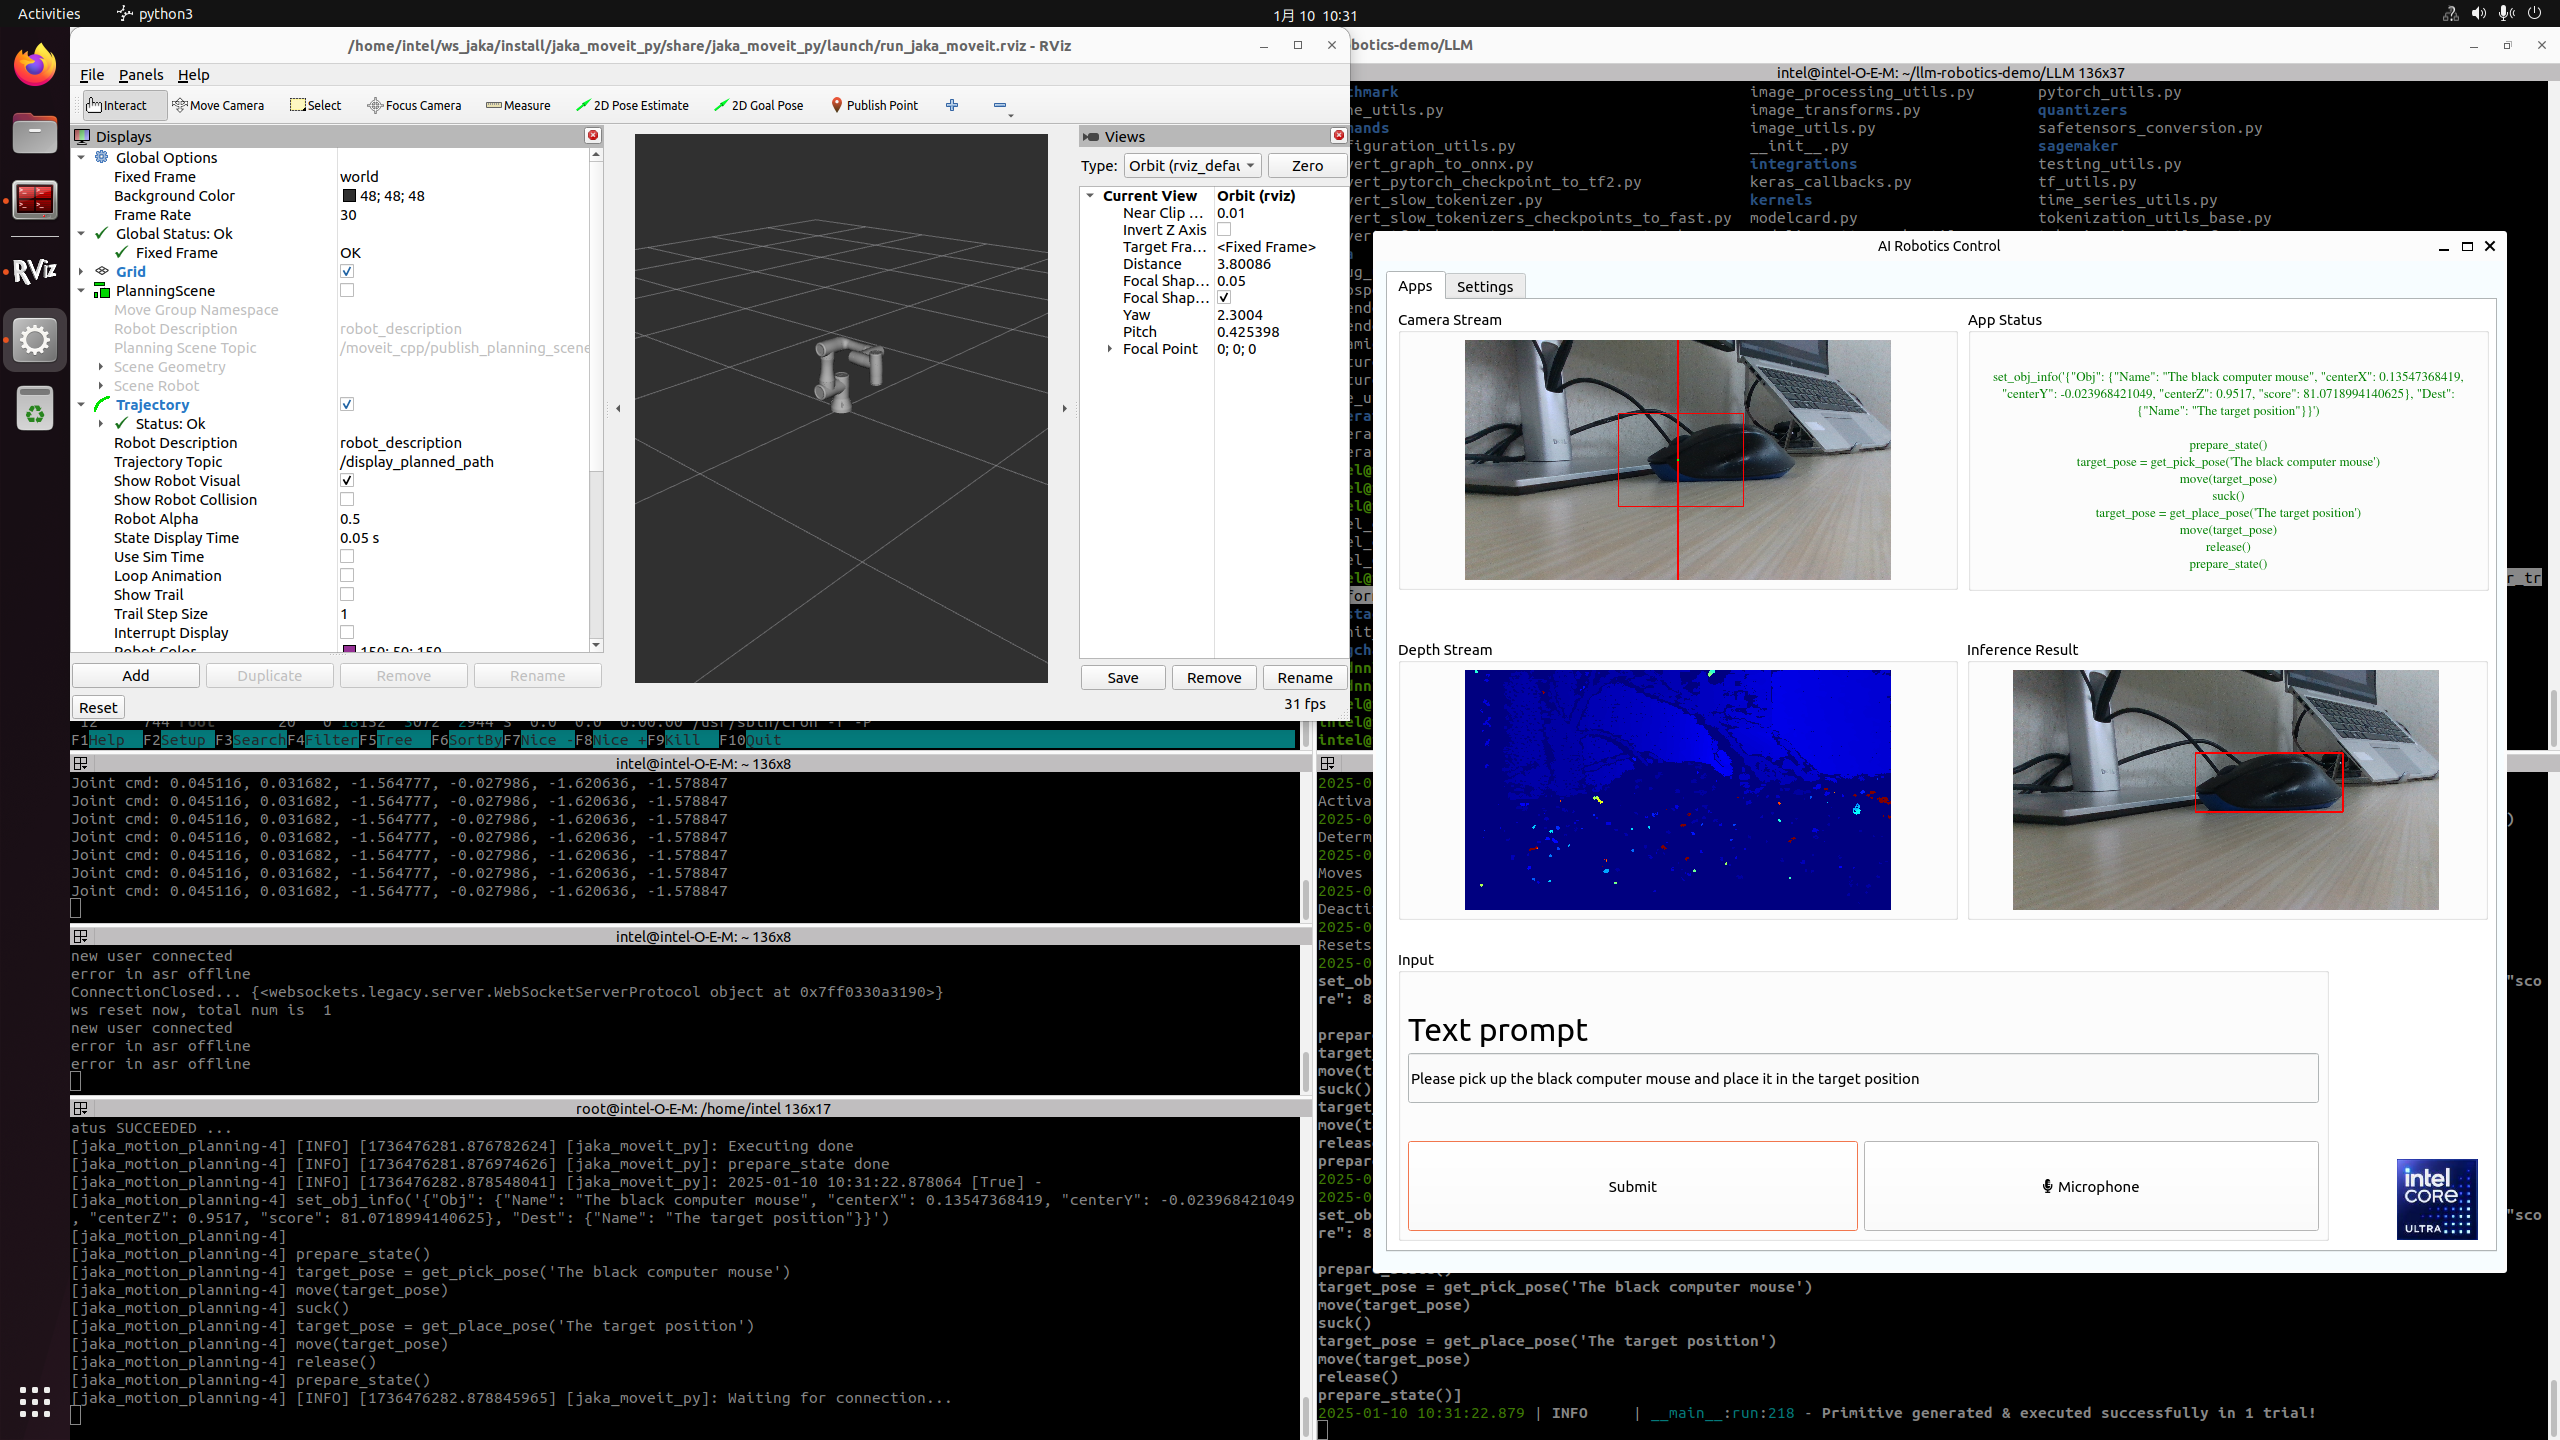
If the LLM application launches successfully, the demo UI will display the following:
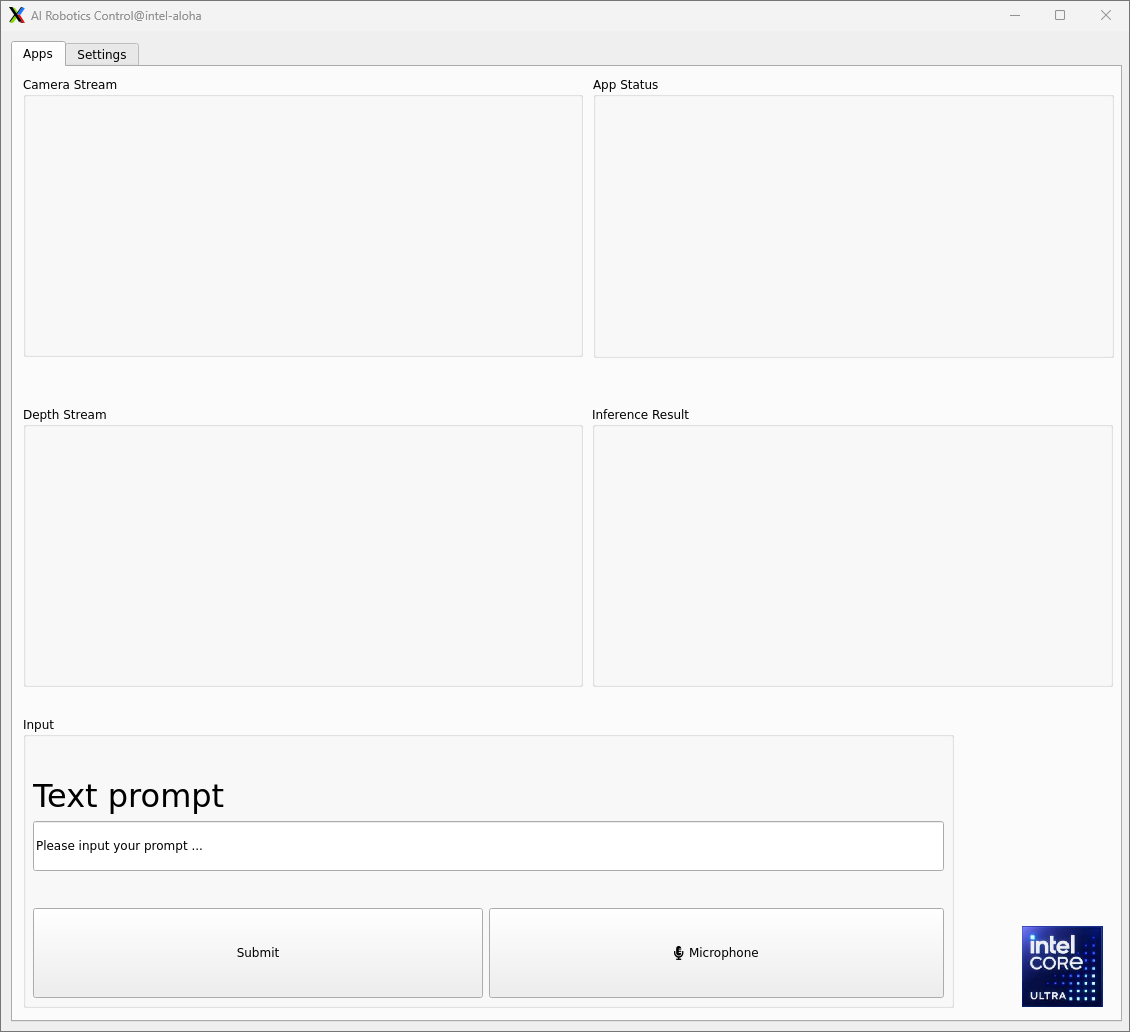
Camera Stream & Depth Stream: displays the real-time color and depth streams from the camera.
App status: indicates the status and outcome of code generation.
Inference Result: presents the results from the SAM and CLIP models.
Text prompt: enter prompts in English via keyboard or in Chinese using the microphone. Press the “Submit” button to start the inference process.
Attach a demo picture with the prompt (Please pick up the black computer mouse and place it in the target position) as shown below: