Install Hermes, Set the Persona, and Bring Up the WebUI#
Do the tasks on this page on the central host. Use the same user account that will run the fleet setup. Do not do them on the edge nodes.
The sections are in order:
Install Hermes with a Local Model#
The Agent Harness Installer installs Hermes. It also installs a local OpenVINO™ Model Server (OVMS) and an Inference Router.
Before you start:
Read the get-started prerequisites of the installer.
For a GPU install, make sure that the Intel GPU driver and compute runtime are installed.
Make sure that the host has enough memory and disk space for the model and the container images.
Review the license of the OpenVINO/Qwen3.5-9B-int8-ov model prior to deployment.
For a reproducible deployment, use the reviewed repository revision of your site.
If your network needs a proxy, set it in the installer environment before you run the installer.
Caution
The installer can change the Docker daemon proxy and restart Docker. Run it on a host where a Docker restart does not interrupt other workloads.
Clone the installer repository:
git clone https://github.com/open-edge-platform/edge-ai-libraries.git -b release-2026.3.0
cd edge-ai-libraries/frameworks/agent-harness-install
Install Hermes with the OVMS image and the model:
Tip
Go with the default values during the
./install.shexecution.export no_proxy="${no_proxy:-${NO_PROXY:-localhost,127.0.0.1,::1}}" HARNESS_OVMS_IMAGE=openvino/model_server:2026.4.1-gpu ./install.sh --harness hermes --model OpenVINO/Qwen3.5-9B-int8-ov
Read the install output. Make sure that the model registration is successful. A completed download is not sufficient.
OVMS serves the model through the Inference Router service. Hermes uses this local model for all inference.
The installer prepares the host, starts OVMS and the Inference Router, downloads the model,
and installs Hermes. The OpenVINO/* models are pre-converted. OVMS serves the model only if
the downloaded repository has the graph.pbtxt file.
If the model needs access credentials, supply them through environment variables. Do not put them in the command or the inventory.
Verify the Local Model#
The installer does not configure or test Hermes — follow these steps to configure and test it:
Find the
hermes config setcommands in the installer output. They point Hermes to the Inference Router. Do not use the OVMS endpoint directly.Run the commands. For example:
hermes config set model.provider custom
hermes config set model.base_url http://127.0.0.1:8010/v1
hermes config set model.default Qwen3.5-9B-int8-ov
Use the values from your installer output. The base URL is the Inference Router and ends in
/v1.model.defaultis the served model name.If the installer reports that the router needs an API key, set the key as the installer output says. Do not put the key in a file that you commit.
Start a test chat:
hermes
Ask a simple question. Make sure that Hermes gives a response.
If the model does not respond, do not continue. Fix the problem first:
Run
./install.sh statusin the installer checkout. It shows the health of OVMS, the router, and the agent.Run
./install.sh models list. It shows if the model is served.
When the model responds, return to the factory-defects-inspector-agent directory of this
repository.
Note
The fleet installer clones each node profile from the default profile. The node profiles
inherit the model configuration. If you change the default model, run fleet-setup.sh
again to recreate the node profiles. After deployment, test the Model Context Protocol
(MCP) tool calls with this model. Tool-calling behavior depends on the model.
To use a hosted provider, run hermes setup model. Get approval for the provider and model
from your administrator first. A hosted provider can receive prompts and tool results. Use it
only with data that the provider is approved for.
Set the Factory Defects Inspector Agent Persona#
SOUL.md is the persona template for this agent. It defines these items:
The purpose of the assistant.
Evidence-based reporting.
The administrator and operator workflows.
The confirmation boundaries for operational changes.
SOUL.md has no node addresses, credentials, or model selections.
Install the persona before you run the fleet installer. The installer clones each node
profile from the default profile. The clone copies SOUL.md at that time. A persona that you
install later reaches the node profiles only when you run the installer again.
Read
SOUL.md.From the
factory-defects-inspector-agentdirectory, run:./hermes-webui.sh startThe command installs
SOUL.mdin the Hermes home and then starts the WebUI. The default Hermes home is~/.hermes; ifHERMES_HOMEis set, it uses that directory. The file has owner-only permissions. See Bring Up the Hermes WebUI for the WebUI details.The command never overwrites an existing persona. To replace it with the template, delete
SOUL.mdfrom the Hermes home and run the command again.Start a new chat on the default profile, in the CLI or the WebUI.
Ask the agent to explain its role. Ask how it handles a request to stop a pipeline.
Make sure that the agent identifies the target and asks for approval. It must not make a change.
Note
The persona is behavioral guidance. It is not access control. The fleet installer never installs or overwrites the persona of the default profile. A change to the template does not change an existing Hermes installation.
Bring Up the Hermes WebUI#
The Hermes WebUI is community software. It gives browser-based chat for the local Hermes installation.
It is not a part of the fleet deployment. Using it is optional; you can use the Hermes CLI instead.
The start command that installs the persona also starts the WebUI. Run
./hermes-webui.sh stop to stop it.
Warning
The WebUI gives terminal and file access with the permissions of the central Hermes user. The administrator and operator roles in this guide are not access-control roles. Give access only to trusted operators. A profile selection is not a security boundary.
Before you start, make sure that:
git, Python 3,curl, andopensslare installed.The host can reach the WebUI Git repository.
~/.hermes/config.yamlexists. IfHERMES_HOMEis set, check that directory.Local port
8787is free.
Start the WebUI:
Run the command as the user who configured Hermes. Use the
factory-defects-inspector-agentdirectory:./hermes-webui.sh startOn the first run, the script clones the WebUI to
~/hermes-webui. It checks out the pinned releasev0.52.492.On the first run only, the script asks for a password and asks you to repeat it. The password must have at least 12 characters. It must not contain quotes. If the script runs without an interactive terminal (for example, from automation), it does not prompt. It generates a random password instead. The script saves the password in
~/hermes-webui/.env. Later runs ofstartreuse it and do not ask again. To read it, rungrep HERMES_WEBUI_PASSWORD ~/hermes-webui/.env. To change it, edit that line in the file, then run./hermes-webui.sh stopand./hermes-webui.sh start. A running WebUI keeps the old password until it is stopped.The script creates a self-signed certificate in
~/.hermes/webui-tls(cert.pemandkey.pem, mode600, valid 365 days) if there is none or it expires within 30 days. It adds the certificate to~/hermes-webui/.env, so the WebUI serves HTTPS only. The certificate nameslocalhost, the host name, and the IPv4 addresses of the host at creation time. To create a new one, for example after an address change, delete thewebui-tlsdirectory and runstartagain.Before it starts the WebUI, the script checks that the certificate and the key match. If they do not, it stops with an error instead of starting. The server would otherwise fall back to plain HTTP.
Wait for the message that the WebUI is up. The script stores the settings in
~/hermes-webui/.envwith mode600. It starts the daemon and checks the/healthendpoint over HTTPS. If the server cannot load the certificate, it would fall back to plain HTTP. The script then stops it and reports an error.Open https://127.0.0.1:8787/. The browser warns about the self-signed certificate. Accept it once, or import
~/.hermes/webui-tls/cert.pemas a trusted certificate on the client.After you sign in, make sure that the chat view shows the
defaultprofile and the local model that you installed, for exampleQwen3.5 9B Int8 OV.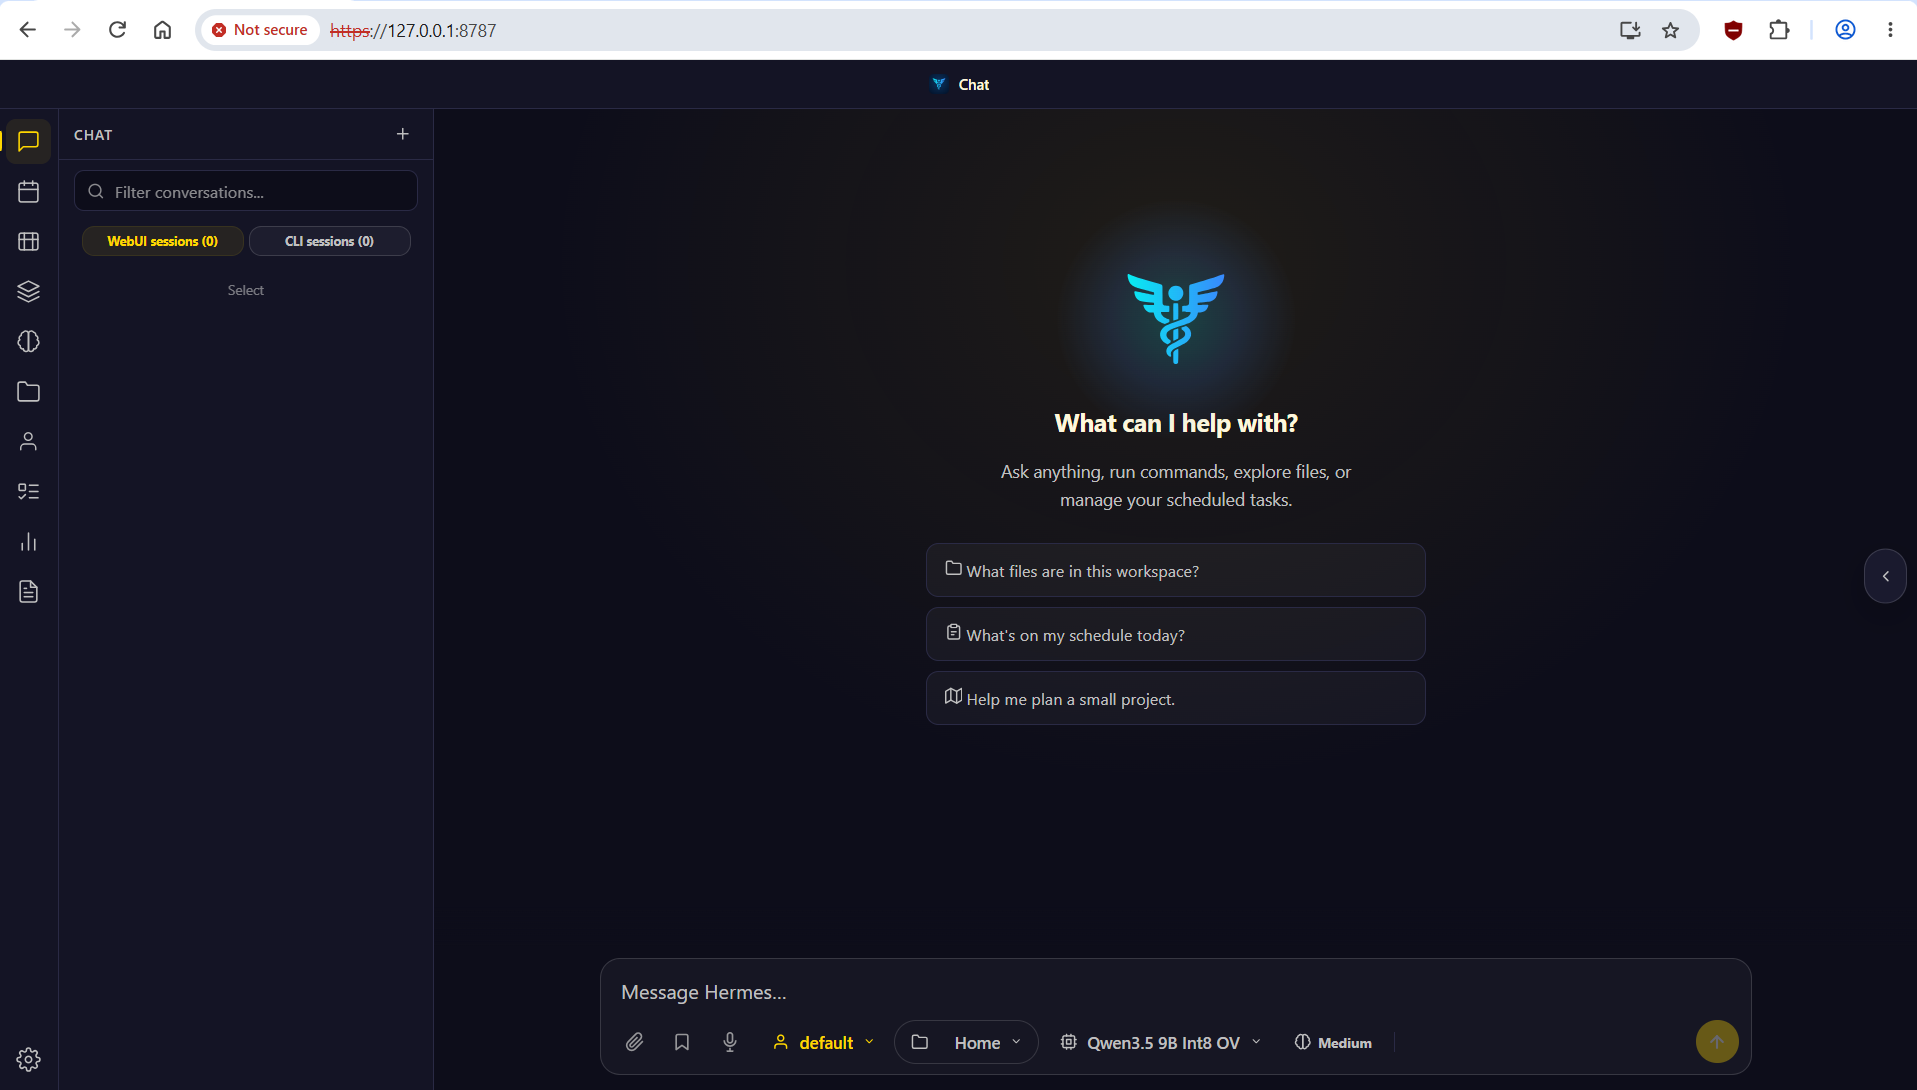
To choose the bind address, add --host <ADDR> to start.
Remote Access#
By default, the WebUI listens on 127.0.0.1 only. Choose one of these options to reach it from
another system. The WebUI password in ~/hermes-webui/.env is required in both options.
Option 1: Direct Access on a Trusted Network#
Caution
The connection is encrypted, but the certificate is self-signed. Clients must trust it, or users learn to click through browser warnings. Use a firewall to limit access to authorized clients, and expose the service only on a trusted network.
On the central Hermes host, set
--hostto the IPv4 address of the interface that your operators use:./hermes-webui.sh --host <central-host-ip> start
To listen on all IPv4 interfaces, use
0.0.0.0. Prefer a specific address, because0.0.0.0also exposes the WebUI on other interfaces, such as Docker bridges../hermes-webui.sh --host 0.0.0.0 start
A running WebUI restarts with the new address. The script saves the bind address for the next starts.
On the remote system, open
https://<central-host-ip>:8787/.0.0.0.0is not a browser address.
To return to loopback, run this command on the central Hermes host:
./hermes-webui.sh --host 127.0.0.1 start
Option 2: Loopback with SSH Forwarding#
Use this option when the network is not trusted. The WebUI stays on 127.0.0.1.
On the remote system (not the central Hermes host), forward the port:
ssh -N -L 8787:127.0.0.1:8787 <user>@<central-host-ip>
<user>is the user that runs the WebUI.On the remote system, open
https://127.0.0.1:8787/.
Manage the WebUI#
Command |
Action |
|---|---|
|
Install or update to the pinned release, install the persona and the TLS certificate if missing, then start. |
|
Stop the daemon. |
For status and logs, run ~/hermes-webui/ctl.sh status or ~/hermes-webui/ctl.sh logs.
To override the defaults, set HERMES_WEBUI_DIR, HERMES_WEBUI_VERSION, or HERMES_WEBUI_PORT.
Use a reviewed stable release tag. If you change the port, also change the browser URL and the
SSH forwarding ports.