Configure the Inventory and Deploy#
Do the tasks on this page on the central host. Do them in this order:
To connect an application that you deploy yourself, see Connect applications that are already running.
Before you start, make sure that:
Hermes uses the local model. See Install Hermes, Set the Persona, and Bring Up the WebUI.
The
SOUL.mdpersona is installed on the default profile../hermes-webui.sh startinstalls it.The edge nodes are ready. See Prepare the Edge Nodes.
The installer recreates each node profile as a clone of the default profile. The node profiles inherit its model configuration and persona. The chat history of a node profile is not kept between runs.
Prepare the Inventory#
Caution
A recipe deployment removes and recreates its managed checkout. Back up local files and manually supplied credentials in the checkout before you deploy again.
Open
hosts.yaml.Replace
node1.example.invalidandnode2.example.invalidwith the real addresses of your edge nodes. These.invalidnames are placeholders.Under
defaults, check the deployment user, the SSH port, and the private-key path. Override a value for a node only when it is different.Give each deployment a stable and unique
name. The name identifies the Hermes profile and the MCP server.Give each deployment a unique
local_port.Review the recipe: repository, branch, application directory, skill, prompt, environment updates, and MCP certificate settings.
Do not put passwords, tokens, or other secrets in the inventory. The installer creates missing application credentials. It sends them to the node over SSH. It asks for an SSH password only to install a key.
Validate the Inventory#
This command does not connect to nodes. It does not change anything.
Print and validate the planned deployments:
./fleet-setup.sh --listCheck the node names, recipes, profiles, hosts, local ports, and skills.
If a value is wrong, edit the inventory. Run the command again.
To use a different inventory file, add --hosts:
./fleet-setup.sh --hosts /path/to/hosts.yaml --list
Run the Installer#
Run the installer in an interactive terminal. Use the same user that installed and configured Hermes.
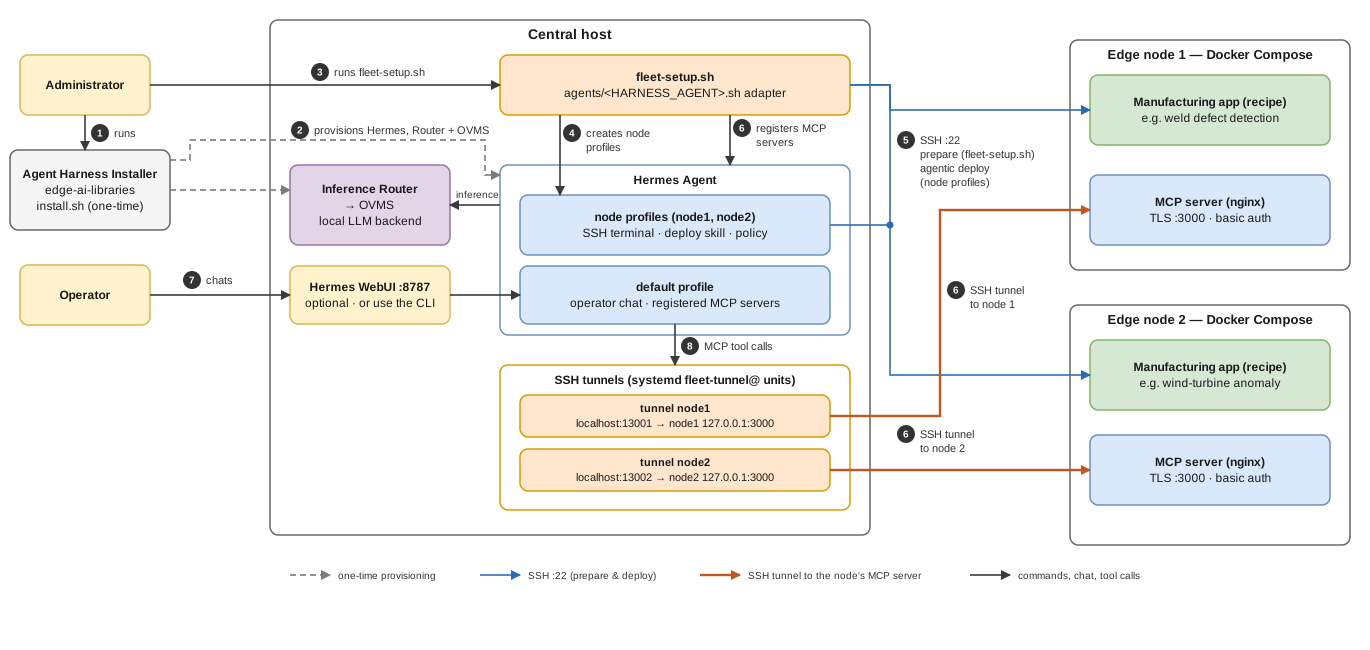
The diagram shows ./fleet-setup.sh without options. The installer reaches each node over SSH.
The agent reaches each MCP server through an SSH tunnel. The node applications are not exposed
to the network.
The arrow colors mean:
Dashed gray: one-time provisioning.
Blue: SSH preparation and deployment.
Orange: SSH tunnels to the node MCP servers.
Black: commands, chat, and tool calls.
Arrows |
Phase |
What happens |
|---|---|---|
1–2 |
Provision (one time) |
The administrator installs Hermes, the Inference Router, and OpenVINO™ Model Server (OVMS) on the central host. See Install Hermes with a local model. |
3 |
Deploy |
The administrator runs |
4 |
Deploy |
|
5 |
Deploy |
|
6 |
Connect |
For each node, the installer starts a |
7 |
Operate |
Operators chat with the default profile in the WebUI or the CLI. |
8 |
Operate |
The questions become MCP tool calls. They go through the SSH tunnels to the node applications. |
To run the installer, do these steps:
From the
factory-defects-inspector-agentdirectory, run:./fleet-setup.sh
Keep the terminal open. Answer the SSH,
sudo, and approval prompts.Wait for the connection summary.
If a step fails, read the error and the stage output. Then run the installer again.
The installer uses hosts.yaml by default. It validates the inventory and checks the
central host. Then, for each deployment, it can do these tasks:
Create or use the SSH key. Run
ssh-copy-idto install the public key on the node. Enter the node password in the terminal. Do not enter it in a Hermes chat.On apt-based systems, install missing packages. Add the deployment account to the
dockergroup. These steps can ask forsudo.Install the deployment skill. Prepare the application checkout and environment. Run the deployment prompt and the smoke check of the recipe.
Open a user-level SSH tunnel. Pin the TLS certificate of the MCP server. Register the server and the allowed tools with Hermes. Test the connection.
Enable user lingering for the central-host user with
loginctl enable-linger. See Restore user lingering.
Installer Options#
Option |
Purpose |
|---|---|
|
Validate and show the planned deployments. Does not connect to nodes or change anything. |
|
Use a different inventory file. |
|
Select a node. Can be repeated. |
|
Select a recipe. Can be repeated. |
|
Work through one deployment in an interactive Hermes session. Not supported with multiple nodes; see the note below. |
|
Connect applications that are already running. See Connect applications that are already running. |
|
Prepare the nodes and node profiles, then stop. Cannot be used with |
|
Remove the central-host state of the selected deployments: tunnel, MCP registration, node profile, stored credential, and pinned certificate. Shows the plan and asks for confirmation in the terminal. Does not connect to nodes. Cannot be combined with |
|
Set the default SSH user when the inventory has none. |
|
Skip the hardware check. Use only for CI or validation. Do not use it to bypass production hardware requirements. |
If you give no --node or --recipe, the installer processes every assignment in the
inventory.
Important
--interactive does not work with multiple nodes. The installer runs several deployments in
parallel, and they cannot share one interactive terminal. If the selection includes more than
one deployment, the installer stops with an error. Use --node and, if the node has more than
one deployment, --recipe to select a single deployment. Or omit --interactive to deploy
all nodes unattended. --no-deploy is not affected.
Example: deploy one node in an interactive session. The checked-in inventory has one
deployment for node1:
./fleet-setup.sh --node node1 --interactive
If a node has more than one deployment, add --recipe with the recipe identifier.
Agent Adapters#
The HARNESS_AGENT environment variable selects the agent adapter. The adapter is the
file agents/<name>.sh. The default and only adapter is hermes. The adapter contract is
in agents/hermes.sh.
Agentic deployment needs an adapter that declares the deploy capability. Other adapters
can run only --prepare-only and --no-deploy.
Verify the MCP Registration#
For each deployment, run
hermes mcp testwith itsnamefrom the inventory:hermes mcp test node1 hermes mcp test node2
If Hermes is already running, start a new session. Or run
/reload-mcp.Optional: check the tools in a one-shot chat:
hermes chat --oneshot -q \
  "Call mcp__node1__describe and mcp__node2__describe and summarize each result."
The tunnel and the MCP server must be available for the test to pass.
Caution
Do not disable certificate verification to fix a TLS error. The installer pins the certificate.
If the application runs with a regenerated certificate, run ./fleet-setup.sh --no-deploy.
This command renews the pin and the registration. It does not redeploy the application.
Connect Applications That Are Already Running#
Two options let you deploy an application yourself and still use the agent. Choose one:
Option |
Use when |
Command |
|---|---|---|
The application already runs on the node. |
|
|
You want the installer to prepare the node, and you deploy the application. |
|
You cannot use --prepare-only and --no-deploy in the same command.
Option 1: Connect an Application That Already Runs#
Before you connect#
Do these checks before you run --no-deploy:
Make sure that the application runs on the node. It must be deployed under the user account that is configured as
userinhosts.yaml(underdefaultsor on the node). The installer connects to the node as this user. It looks for the application and its.envfile in the home directory of this user.Find the location of the application:
If the application is in the managed checkout
~/fleet-deployments/<deployment name>/checkout, do nothing. Do not setapp_path.If the application is in a different location, set
app_pathon its deployment inhosts.yaml. Use a path relative to the home directory of the node user, for exampleapps/weld. Do not use an absolute path,~,., or... The installer rejects them.
Note
A deployment that has
app_pathis connect-only. Deploy and--prepare-onlyruns refuse it. A deployment in the managed checkout can use all the installer modes.Make sure that the
.envfile of the application hasMCP_USERNAMEandMCP_PASSWORD(or the token of the recipe). The installer reads them from this file.If the
.envfile has no credentials, the installer uses the credentials that it stored on the central host. In a terminal, it can ask for them with hidden input. Otherwise it stops and names the missing credential.
Caution
Never put credentials in hosts.yaml, on the command line, or in a chat.
Run the connect command#
From the
factory-defects-inspector-agentdirectory, run:./fleet-setup.sh --node node1 --no-deploy
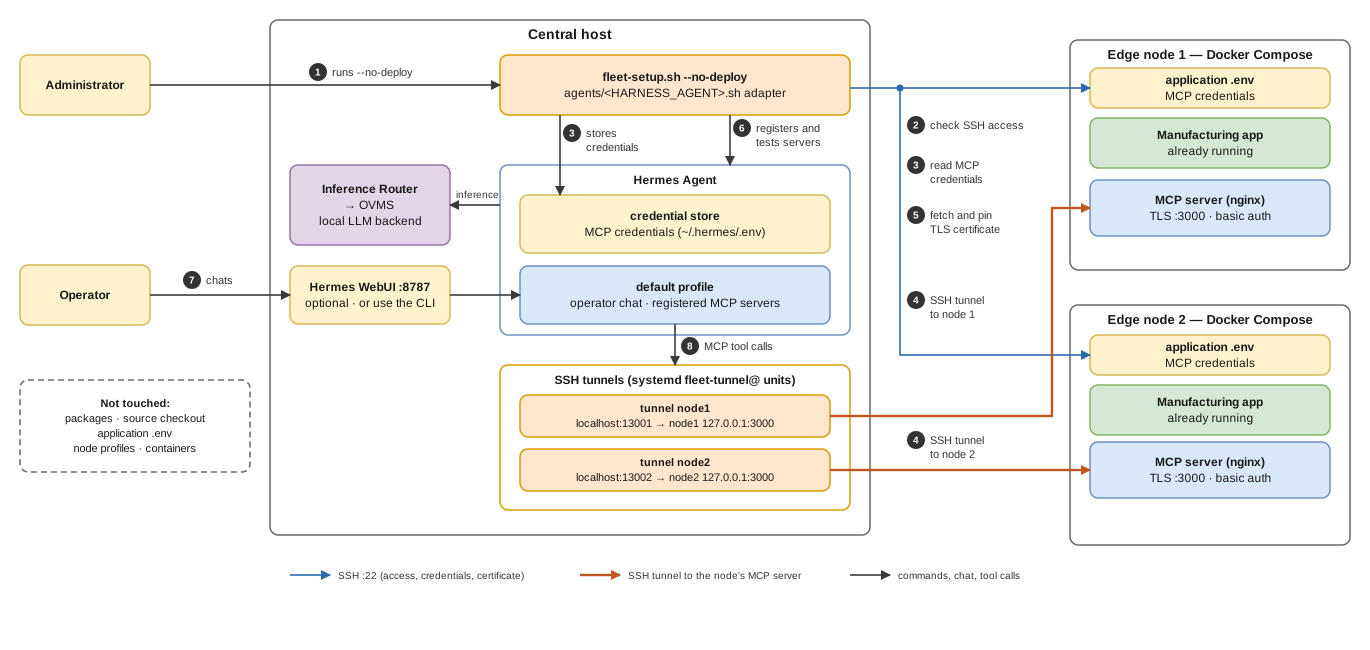
The command does these steps:
Step |
Action |
Where |
|---|---|---|
1 |
Checks SSH access. Installs your public key if necessary. |
Central host to node, over SSH |
2 |
Reads the MCP credentials. |
The |
3 |
Starts the SSH tunnel. |
A |
4 |
Fetches and pins the MCP TLS certificate. |
The nginx container of the node, over SSH |
5 |
Registers the MCP server and its allowed tools. |
The default Hermes profile |
6 |
Tests the connection. |
|
The command does not touch packages, source code, the application .env, node profiles,
or running containers. It does not need sudo. It restarts the tunnel and rewrites the
registration, so it is not read-only.
Option 2: Deploy the Application Yourself, Then Connect It#
On the central host, prepare the node:
./fleet-setup.sh --node node1 --prepare-only
This command installs missing packages. It adds the deployment user to the
dockergroup and can ask forsudo. It puts the recipe source in~/fleet-deployments/<deployment name>/checkout. It generates missing credentials in the.envfile of the application. It creates the node profile. Then it stops.On the node, connect as the deployment user. Go to the application directory:
ssh <deployment user>@<node address>
cd ~/fleet-deployments/<deployment name>/checkout/<app_dir>
Deploy the application. Follow the user guide of the application.
Make sure that the application runs. On the central host, do the steps in Run the connect command.
Change the Credentials Later#
Change the credentials in the
.envfile of the application.Redeploy the application.
Run
--no-deployagain.