Use Environmental and Attribute Sensor Types in Scenescape#
This guide provides step-by-step instructions to integrate and use environmental and attribute sensor types in Scenescape. By completing this guide, you will:
Understand the differences between environmental and attribute sensors.
Learn how to configure and publish sensor data to Scenescape.
Verify that sensor data is properly associated with tracked scene objects.
This task is important for enhancing your scene graph with real-world sensor data, enabling deeper insights from environmental context and object-specific attributes. If you are new to Scene Graphs or Scenescape, see Integrating Cameras and Sensors.
Prerequisites#
Before you begin, ensure the following:
Access and Permissions: When using Scenescape secure broker for publishing sensor data, refer to user access controls and access levels.
If you are new to these concepts, see:
Steps to Integrate Environmental and Attribute Sensors#
1. Understand Sensor Types#
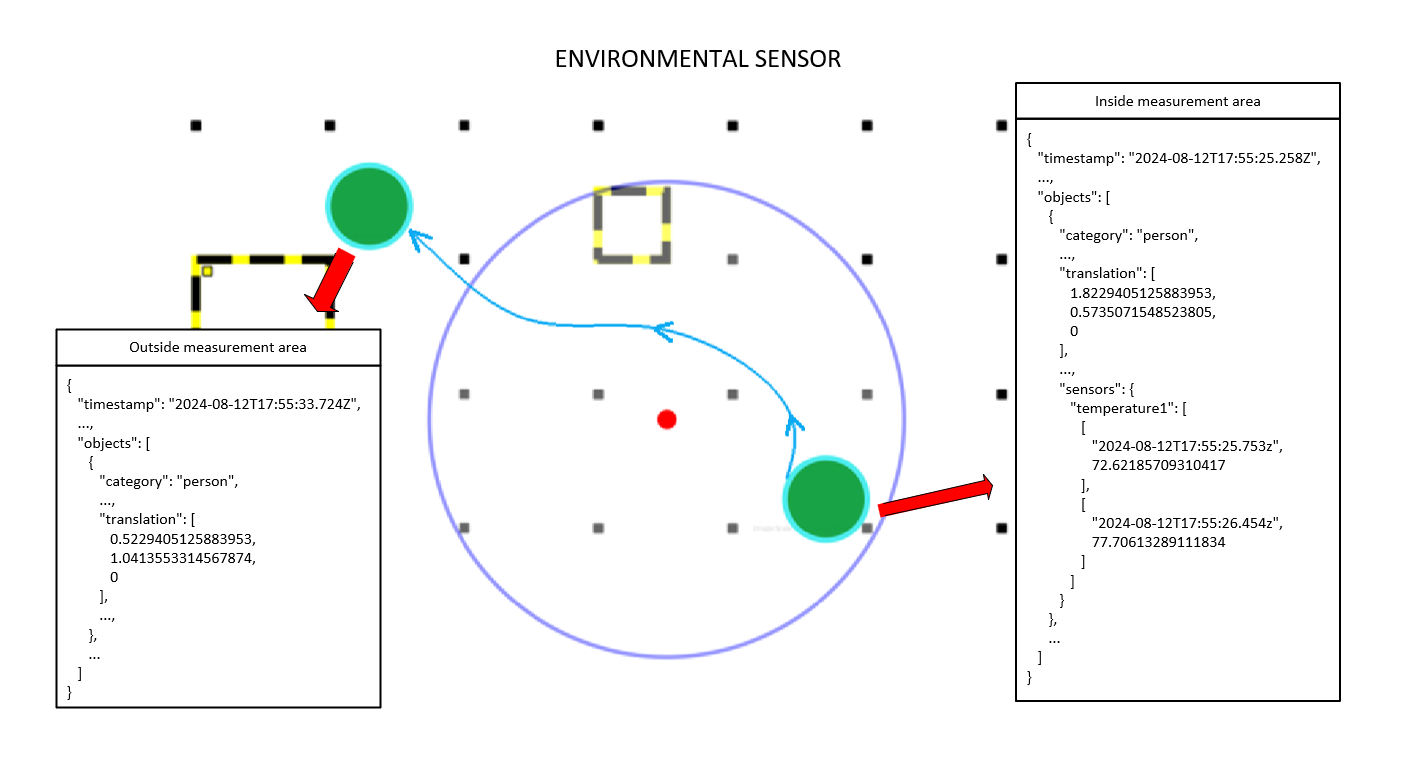
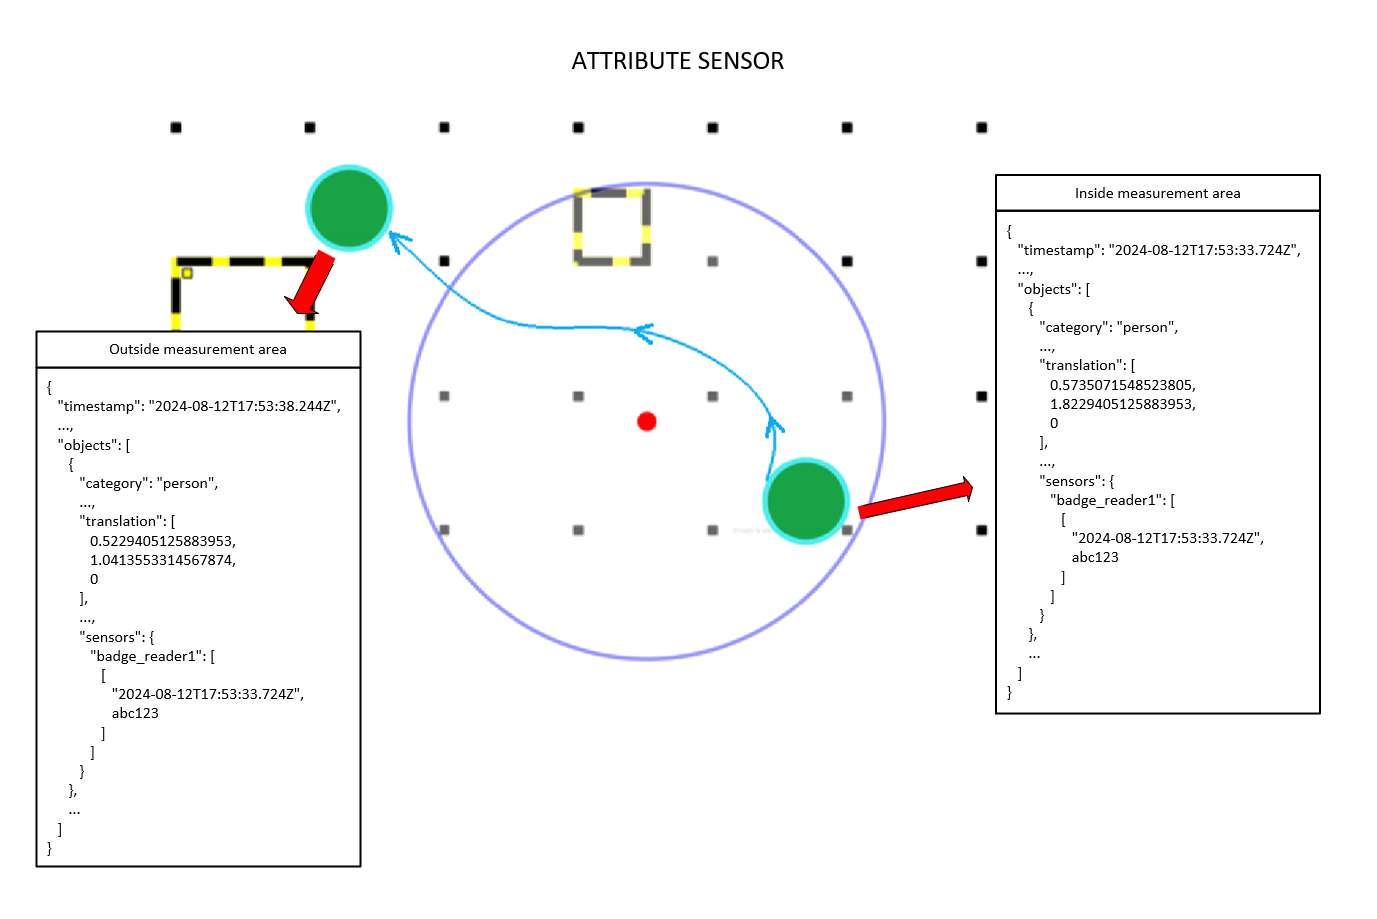
Environmental Sensors measure a property (e.g., temperature) for all objects within a defined measurement zone. Attribute Sensors detect a property (e.g., badge ID) for a specific object and persist that value even after the object leaves the measurement area.
2. Configure and Use an Environmental Sensor#
Create the Sensor#
Log in to Scenescape.
Click on a scene.
Click on
Sensorsat the bottom of the scene.Click
New Sensorto create a sensor.In the New Sensor form, fill out
Sensor ID,NameandScenefields.Update the
Type of Sensorto environmental.Click
Add New Sensorto save.
Modify the Sensor#
Click on
Sensorsat the bottom of the scene.You will see the created sensor. Then click on the
managebutton.In the Manage Sensor view, you can update attributes like Measurement area (Entire Scene, Circle or Custom region), Name, Sensor id, Scene, Singleton type, Color Range, etc. For more details on how to use the Color Range, refer to Visualizing ROI and Sensor Areas.
Cick on
Save Sensorto persist the modified sensor.
In the 3D scene view, expand Sensors Settings and toggle show for the
sensor. The visibility setting is saved immediately and restored after a page
refresh. This setting is shared across users and devices that view the scene.
Publish Environmental Sensor Readings#
From a third party application, publish sensor data to the topic scenescape/data/sensor/<sensorName>
Notes:
Refer to Singleton Sensor Data on what a sensor data looks and how to publish sensor data.
Verify the Results#
Check the scene graph for objects within the sensor region:
Expected Results:
All tracked objects within the region are tagged with the temperature value in their scene graph updates.
3. Configure and Use an Attribute Sensor#
Step 1: Create the Sensor#
Log in to Scenescape.
Click on a scene.
Click on
Sensorsat the bottom of the scene.Click
New Sensorto create a sensor.In the New Sensor form, fill out
Sensor ID,NameandScenefields.Update the
Type of Sensorto attribute.Click
Add New Sensorto save.
Refer to Modify the Sensor on how to modify the attribute sensor.
Step 2: Publish Attribute Sensor Readings#
From a third party application, publish sensor data to the topic scenescape/data/sensor/<sensorName>
Notes:
Refer to Singleton Sensor Data on what a sensor data looks and how to publish sensor data.
Step 3: Verify the Results#
Check updates for the target object:
Expected Results:
The object receives and retains the badge ID even after leaving the sensor zone.
REST API Reference#
Sensors can also be created, updated, listed, and deleted over the REST API instead of the UI — useful for scripting a scene-wide sensor that has no shape to draw.
curl -sk -X POST https://<manager-host>/api/v1/sensor \
    -H "Authorization: Token $TOKEN" \
    -H "Content-Type: application/json" \
    -d '{
        "name": "lobby_temperature",
        "scene": "<scene-uid>",
        "area": "scene",
        "singleton_type": "environmental"
    }'
For the full field reference (all accepted fields, area/singleton_type enum values), see the
canonical OpenAPI spec: API Reference (source:
docs/user-guide/api-docs/api.yaml, Singleton schema). The API reference does not capture these
validation rules, which only live in server-side logic:
center+radiusare required whenareaiscircle;pointsis required whenareaispoly.If
sensor_idis not supplied on create, it defaults tonamewith spaces replaced by underscores.color_ranges.sectors[].colormust be one ofgreen,yellow, orred:{ "color_ranges": { "sectors": [ { "color": "green", "color_min": "0" }, { "color": "yellow", "color_min": "2" }, { "color": "red", "color_min": "5" } ], "range_max": 10 } }