Get Started#
The Smart Parking application uses AI-driven video analytics to optimize parking management. It provides a modular architecture that integrates seamlessly with various input sources and leverages AI models to deliver accurate and actionable insights.
By following this guide, you will learn how to:
Set up the sample application: Use Docker Compose to quickly deploy the application in your environment.
Run a predefined pipeline: Execute a pipeline to see smart parking application in action.
Access the application’s features and user interfaces: Explore the Grafana dashboard, Node-RED interface, and DL Streamer Pipeline Server to monitor, analyze and customize workflows.
Prerequisites#
Verify that your system meets the minimum requirements.
Install Docker: Installation Guide.
Set up and First Use#
Clone the Repository:
Run:
git clone https://github.com/open-edge-platform/edge-ai-suites.git
cd edge-ai-suites/metro-ai-suite/metro-vision-ai-app-recipe/
Setup Application and Download Assets:
Use the installation script to configure the application and download required models:
./install.sh smart-parking
Specify Custom Host IP Address (Advanced Configuration)
For environments requiring a specific host IP address (such as when using Edge Manageability Toolkit or deploying across different network interfaces), you can explicitly specify the IP address:
./install.sh smart-parking <HOST_IP>
Replace
<HOST_IP>with your target IP address.
Run the Application#
Start the Application:
Download container images with Application microservices and run with Docker Compose:
docker compose up -d
Check Status of Microservices
The application starts the following microservices.
To check if all microservices are in Running state:
docker ps
Expected Services:
Grafana Dashboard
DL Streamer Pipeline Server
MQTT Broker
Node-RED (for applications without Scenescape)
Scenescape services (for Smart Intersection only)
Run Predefined Pipelines:
Start video streams to run video inference pipelines:
./sample_start.sh
Check Status and Stop pipelines
To check the status:
./sample_status.sh
To stop the pipelines without waiting for video streams to finish replay:
./sample_stop.sh
View the Application Output:
Open a browser and go to
http://localhost:3000to access the Grafana dashboard.Change the localhost to your host IP if you are accessing it remotely.
Log in with the following credentials:
Username:
adminPassword:
admin
Check under the Dashboards section for the application-specific preloaded dashboard.
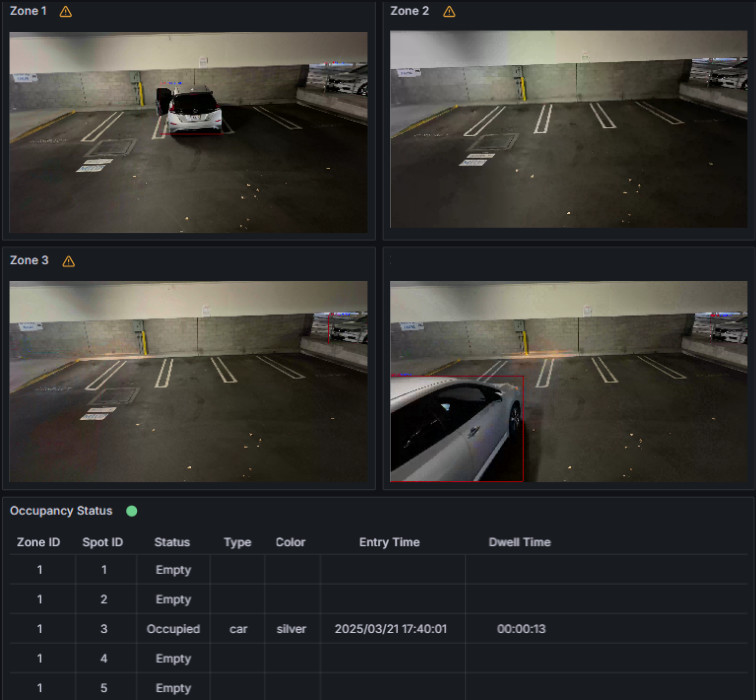
Expected Results: The dashboard displays real-time video streams with AI overlays and detection metrics.
Access the Application and Components#
Grafana UI#
Log in with credentials:
Username:
adminPassword:
admin(You will be prompted to change it on first login.)
In Grafana UI, the dashboard displays the detected cars in the parking lot.

NodeRED UI#
DL Streamer Pipeline Server#
REST API: http://localhost:8080
Check Pipeline Status:
curl http://localhost:8080/pipelines
Stop the Application:#
To stop the application microservices, use the following command:
docker compose down
Other Deployment Option#
Choose one of the following methods to deploy the Smart Parking Sample Application:
Deploy Using Helm: Use Helm to deploy the application to a Kubernetes cluster for scalable and production-ready deployments.
Supporting Resources#
Troubleshooting Guide: Find detailed steps to resolve common issues during deployments.