Enable X11 Desktop UI in ISO Image for Edge Microvisor Toolkit Developer Node#
X11 Desktop UI Pre-Requisite#
Connect through remote SSH, to the system that is pre-installed with the latest Edge Microvisor Toolkit ISO image.
If your system is behind a proxy server, export the proxy environment through the remote terminal. Replace <url_and_port_of_your_proxy_server> with the URL and port of your proxy server:
export http_proxy="<url_and_port_of_your_proxy_server>"
export https_proxy="<url_and_port_of_your_proxy_server>"
Install the required X11 packages through the tdnf package manager. Remove “-E” from the command if your system is not behind a proxy server:
sudo -E tdnf install xorg-x11-server-Xorg xorg-x11-xinit xorg-x11-xinit-session xorg-x11-drv-libinput xorg-x11-apps xterm openbox libXfont2 freefont freetype gtk3 qemu-with-ui
Install the nano text editor (optional). Remove “-E” from the command if your system is not behind a proxy server:
sudo -E tdnf install nano
Install the PyXDG library through the Python package installer. Remove “-E” from the command if your system is not behind a proxy server:
sudo -E python -m pip install PyXDG
Add a basic X11 configuration file for the Intel chipset (optional):
cd /usr/share/X11/xorg.conf.d/
sudo touch 20-modesetting.conf
sudo nano 20-modesetting.conf
Add the following configuration into 20-modesetting.conf, and save:
Section "Device"
  Identifier "Intel_Graphics"
    Driver "modesetting"
    Option "SWcursor" "true"
    Option "AccelMethod" "glamor"
    Option "DRI" "3"
EndSection
Launch X Server#
Manual Launch#
In the remote terminal, export the XDG runtime dir and launch the Xorg server, with the OpenBox Desktop environment running in the background. Remove “-E” from the command if your system is not behind a proxy server:
export XDG_RUNTIME_DIR=/tmp
sudo -E bash -c 'xinit /usr/bin/openbox-session &'
Auto Launch#
For X Server to launch automatically during startup, you need to create a systemd service file as follows:
Create an openbox-session service file:
sudo touch /lib/systemd/system/openbox-session.service
Add the following service content into the openbox-session.service file:
[Unit]
Description=Openbox Session
After=multi-user.target graphical.target
Wants=graphical.target

[Service]
ExecStart=/usr/bin/xinit /usr/bin/openbox-session
Restart=on-failure

[Install]
WantedBy=multi-user.target
Enable the openbox-session service on startup, and restart the system:
cd /etc/systemd/system/multi-user.target.wants
sudo ln -sf /usr/lib/systemd/system/openbox-session.service .
sudo systemctl daemon-reload
sudo systemctl enable openbox-session.service
sudo reboot
Verify the X Server#
In another remote terminal, launch the X11 client application to confirm the functionality:
export DISPLAY=:0
xhost +
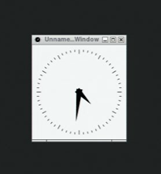
xclock
Verify the output where “xclock” is rendered onto the X11 Desktop as follows:

Note: If you want to disable the OpenBox Desktop UI from going into the sleep mode (blank screen), run the following command in a newly connected remote SSH terminal:
export DISPLAY=:0
xset s off
xset -dpms