Setting up Kernel and Host User Space#
Follow the steps below to generate the necessary kernel and userspace files to set up an Ubuntu 22.04 hypervisor for hosting guest VMs.
Note: To run Windows VM installation for SR-IOV, you need an Ubuntu host with SR-IOV on a supported Intel Core platform with iGPU.
You can build the kernel either on an Ubuntu 22.04 host or in an Ubuntu 22.04 docker container on an Ubuntu host.
Note: You can learn more about specific kernel patches related to VM hosting and SR-IOV implementation in the relevant SPEC file
Required Host BIOS Settings#
Intel (VMX) Virtualization |
Intel Advanced Menu -> CPU Configuration |
Enabled |
VT-d |
Intel Advanced Menu -> System Agent (SA) Configuration |
Enabled |
SRIOV Enable |
Intel Advanced Menu -> System Agent (SA) Configuration -> Graphics Configuration |
Enabled |
Intel(R) TCC Mode |
Intel Advanced Menu -> Intel(R) Time Coordinated Computing |
Disabled |
#AC Split Lock |
Intel Advanced Menu -> Intel(R) Time Coordinated Computing |
Disabled |
Attemp Secure Boot |
Boot Maintenance Manager Menu -> Secure Boot Configuration Menu |
Disabled |
Note: A BIOS menu can vary depending on the release.
Install Ubuntu host#
Install Ubuntu 22.04 (Jammy Jellyfish):
# Copy the iso file into a USB drive
sudo dd if=./ubuntu-22.04-desktop-amd64+intel-iot.iso of=/dev/sdX bs=4M && sync

# Check the boot order number X of the USB drive
sudo efibootmgr

# Select the USB drive as the next boot device
sudo efibootmgr -n X

# Reboot into the drive to start the installation
sudo reboot
Note: If operating behind a corporate firewall, setup proxy settings as required.
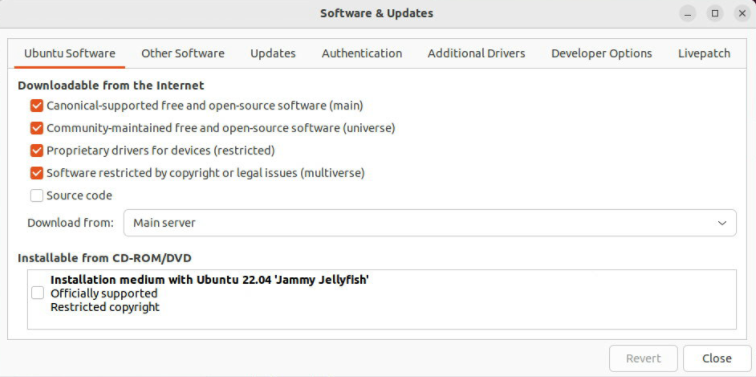
In the Software & Updates GUI, make sure to download from Main server, as shown below:
Upgrade the Ubuntu host software to the latest version:
# Upgrade Ubuntu software
# Generic host kernel installed from Ubuntu may be incompatible with board
# Therefore after upgrade, continue to install host kernel and firmware before rebooting
sudo apt -y update
sudo apt -y upgrade
Setup custom Intel kernel on Ubuntu Host#
Kernel Setup prerequisites#
MultiOS virtualization scripts, obtained from Your Intel Representative.
kernel-config-6_12.zip (included in the package above)
Build custom Intel Kernel#
Create a working directory:
# Create a working directory
mkdir <work directory>
cd <work directory>
Extract files:
# Extract files
unzip -jo virtualization.multios.kvm.scripts-rpls_sriov_kvm_multios_emt-3.1_ww2525.zip
unzip -jo kernel-config-6_12.zip
Build the Kernel debian files and package them:
# build kernel debs
./sriov_prepare_kernel.sh

# package deb files
cd sriov_build
find . -name "*.deb"
./linux-headers-6.12.xx-lts2024-iotg_xxxx_amd64.deb
./linux-image-6.12.xx-lts2024-iotg-dbg_amd64.deb
./linux-image-6.12.xx-lts2024-iotg_xxxx_amd64.deb
./linux-libc-dev_6.12.xx-xxxx_amd64.deb
Create the lts2024-iotg-kernel-rel.tar.gz package and copy it to the working directory:
# Create lts2024-iotg-kernel-rel.tar.gz
tar czvf lts2024-iotg-kernel-rel.tar.gz *.deb

# copy to working dir
cd -
cp sriov_build/lts2024-iotg-kernel-rel.tar.gz .
Install custom Intel kernel on Ubuntu SR-IOV host#
Boot into the Ubuntu Host OS and navigate to the work directory:”
# Change to work directory
cd ~
Copy the source files:
# Copy files
cp <source path>/lts2024-iotg-kernel-rel.tar.gz .
cp <source path>/virtualization.multios.kvm.scripts-rpls_sriov_kvm_multios_emt-3.1_ww2525.zip .
Extract the script files:
# Extract script files
unzip -jo virtualization.multios.kvm.scripts-rpls_sriov_kvm_multios_emt-3.1_ww2525.zip
Perform the kernel setup and reboot the Ubuntu host:
# Perform the kernel setup
# This will install the kernel and firmware, and update grub
sudo ./sriov_setup_kernel.sh

# Reboot the Ubuntu host
sudo reboot
Setup Ubuntu host for SR-IOV#
Boot into the Ubuntu Host OS and navigate to the work directory:
# Go to the work directory
cd ~
Extract files from
sriov_patches.zip(included invirtualization.multios.kvm.scripts-rpls_sriov_kvm_multios_emt-3.1_ww2525.zip)# Extract files unzip sriov_patches.zip
Update the host with extracted patches and reboot the host:
# Update the host
sudo ./sriov_setup_ubuntu.sh

# Reboot the host
sudo reboot
Note: If you need to run any benchmarks or reliability tests on the host, make sure to disable auto suspend and hibernation by running the following commands:
# Disable the suspend and hibernate services
sudo systemctl mask sleep.target suspend.target hibernate.target hybrid-sleep.target
# Reboot the Ubuntu host
sudo reboot now
OPTIONAL: Generate guest VM installation files#
You can generate guest VM installation files by either running an initial full setup on an Ubuntu 22.04 host with SR-IOV installed, or by generating the files in an Ubuntu 22.04 docker container.
Option 1: Initial full setup of Ubuntu 22.04 SRIOV host#
Once you have performed a full initial setup of the first host OS, (meaning
installation of Intel custom host kernel and SR-IOV on Ubuntu) you should see
packages and sriov_install directories with install files.
Copy these directories to use in future setups of the second or subsequent hosts.
# Copy the directories containing the install files
cp -r packages <target path>
cp -r sriov_install <target path>
Option 2: Ubuntu 22.04 Docker container#
Alternatively, the install files can be generated in an Ubuntu docker container by performing the following steps:
# Update and upgrade Ubuntu docker container
sudo apt -y update
sudo apt -y upgrade

# Copy the script files
cp <source path>/virtualization.multios.kvm.scripts-rpls_sriov_kvm_multios_emt-3.1_ww2525.zip .

# Extract files
unzip -jo virtualization.multios.kvm.scripts-rpls_sriov_kvm_multios_emt-3.1_ww2525.zip
unzip sriov_patches.zip

# Prepare and create install files
sudo ./sriov_prepare_projects.sh
sudo ./sriov_install_projects.sh

# Copy the directories containing the install files
cp -r packages <target path>
cp -r sriov_install <target path>