Get Started#
This guide walks you through installing dependencies, configuring defaults, and running the application.
Step 1: Install Dependencies#
To install dependencies, do the following:
A. Install FFmpeg (required for audio processing)#
Download from https://ffmpeg.org/download.html, and add the ffmpeg/bin folder to your system PATH.
B. Install DL Streamer#
Download the installer from DL Streamer assets on GitHub. For details, refer to the Install Guide.
Note
DL Streamer 2026.1.0 is lastest verified version, please also update your NPU driver to latest for compatability.
Run your shell with admin privileges before starting the application
C. Clone Repository#
Go to the target directory of your choice and clone the suite.
If you want to clone a specific release branch, replace main with the desired tag.
To learn more on partial cloning, check the Repository Cloning guide.
  git clone --filter=blob:none --sparse --branch main https://github.com/open-edge-platform/edge-ai-suites.git
  cd edge-ai-suites
  git sparse-checkout set education-ai-suite
  cd education-ai-suite
D. Install Python dependencies#
It’s recommended to create a dedicated Python virtual environment for the base dependencies.
python -m venv smartclassroom
smartclassroom\Scripts\activate

# Use Python 3.12.x before running pip.
cd smart-classroom
python.exe -m pip install --upgrade pip
pip install --upgrade -r requirements.txt
E. Install LibreOffice (optional, feature-dependent)#
LibreOffice (the soffice executable) is an optional dependency used by two features. Install it only if you enable a feature that needs it:
report— PDF report export: The class report is generated as a.docxfile. When you download it as PDF, the server converts the.docxusing LibreOffice in headless mode (soffice --convert-to pdf). If LibreOffice is not installed,.docxdownload still works normally and only the PDF download returns501 (PDF export unavailable).content_search— legacy document parsing: Ingesting legacy Office formats (.doc,.ppt,.xls) requires LibreOffice to convert them. Modern formats (.docx,.pptx,.xlsx) do not need it. If LibreOffice is missing, uploading a legacy format is rejected with a message asking you to install it or convert to a modern format.
If you enable either use case, download and install LibreOffice from https://www.libreoffice.org/download/, then make sure the soffice executable is available on your system PATH.
Verify the executable is discoverable:
import shutil
shutil.which("soffice") is not None   # should return True
Step 2: Configuration#
A. Enable Feature Configuration#
The application is built using a modular feature architecture, allowing users to enable or disable individual features through the features: block in smart-classroom/config.yaml. Only enabled features are initialized at startup—they load their required models, register their API routes, and start their associated services.
features:
  asr:                { enabled: true }   # Speech-to-text transcription
  summary:            { enabled: true }   # AI class summary / report
  mindmap:            { enabled: true }   # Mind map generation
  topic_segmentation: { enabled: true }
  video_analytics:    { enabled: true }   # Video ingestion / analytics
  board_ocr:          { enabled: true }   # OCR of the teacher's display (IFPD)
  content_search:     { enabled: true }   # Multimodal search + RAG service (port 9011)
  qa:                 { enabled: true }   # RAG-based Q&A over uploaded materials
Important
After updating the configuration, reload the application for changes to take effect.
B. Default Configuration#
By default, the project uses Whisper for transcription, and summarization runs on the shared OpenVINO™ vision-language model configured under models.text_gen. You can modify these settings in the configuration file (smart-classroom/config.yaml):
asr:
  provider: openai            # Supported: openvino, openai, funasr
  name: whisper-small          # Options: whisper-tiny, whisper-small, paraformer-zh etc.
  device: CPU                 # Whisper currently supports only CPU
  temperature: 0.0

summarizer:
  mode: dialog                # Supported: dialog, teacher, hybrid

text_gen:                     # Shared by summary, mindmap, segmentation and Q&A
  provider: vlm
  vlm_name: Qwen/Qwen3-VL-8B-Instruct
  device: GPU                 # Options: GPU or CPU
  weight_format: int4         # Supported: fp16, int4, int8
  max_new_tokens: 5120        # Maximum tokens to generate
C. Chinese Audio Transcription#
For Chinese audio transcription, switch to funASR with Paraformer in your config (smart-classroom/config.yaml):
asr:
  provider: funasr
  name: paraformer-zh
Please also set the language to Chinese at the app level:
app:
  language: zh
D. Content Search Configuration#
Upload Size Limits can be adjusted under the content_search section:
content_search:
  storage:
    document_max_mb: 100    # maximum upload size for documents (MB)
    video_max_mb: 1024      # maximum upload size for videos (MB)
Document OCR To also extract text from images embedded in uploaded documents, turn on OCR for content search:
content_search:
  ocr_enabled: true
Note
This only affects document ingestion. Board OCR has its own OCR usage and is unaffected by this flag.
E. Board OCR Configuration#
Board OCR extracts text from the teacher’s interactive display (IFPD) during a session, feeding the board summary and class report. It has below configurations:
board_ocr:
  frame_rate: "1/3"    # frames per second sampled from the board video
  debug: false         # keep the uncleaned board_ocr_raw.txt alongside the output
Note
When Board OCR is enabled, the AI-generated class summary automatically gains an extra “Board / IFPD Content” section that summarizes the text captured from the display, in addition to the sections derived from the audio transcript.
F. Speaker Diarization Setup (Optional)#
Speaker diarization labels each transcript line with the speaker who said it. Two backends are available:
Backend |
Gated access |
Speed (CPU) |
Notes |
|---|---|---|---|
|
Yes, Hugging Face token required |
~0.43x realtime |
Detects overlapping speech |
|
No |
~0.01x realtime |
FunASR VAD + CAM++, requires the funASR setup from section C |
Steps a-c below set up the default pyannote backend. Skip to step d for CAM++.
a. Request Model Access on Hugging Face#
Pyannote diarization models require gated access.
Request access here:
Pyannote Speaker Diarization Community v1
Click “Request Access” on the model page and wait for approval.
b. Create a Hugging Face Access Token#
After approval:
Go to the Hugging Face Access Token page.
Create a Read access token
Copy the generated token
c. Configure Hugging Face Token in Project Config#
Open smart-classroom/config.yaml and set diarization: true under models.asr, then add your Hugging Face token:
models:
  asr:
    diarization: true
    hf_token: "hf_your_access_token_here"
Note
The diarization model downloads automatically on next startup once diarization: true is set.
d. CAM++ Backend (funASR only)#
campplus needs no token and no gated access, but it requires provider: funasr and
name: paraformer-zh from section C. Its speaker and VAD models are downloaded from ModelScope
on first use and reused offline afterwards.
models:
  asr:
    diarization: true
  diarization:
    backend: campplus
e. Whole-File Processing (funASR only)#
By default audio is transcribed and diarized in chunks, which streams results to the UI while
the recording is still being processed. Setting chunking: false processes the whole recording
in a single pass instead: speaker clustering sees all the speech at once, at the cost of no
intermediate results. It also requires provider: funasr and name: paraformer-zh, and is
ignored for microphone capture, where the recording is not available up front.
audio_preprocessing:
  chunking: false
Important
After updating the configuration, reload the application for changes to take effect.
Step 3: Run the Application#
Run the backend:
python main.py
You should see backend logs similar to this:
pipeline initialized
[INFO] __main__: App started, Starting Server...
INFO:     Started server process [21616]
INFO:     Waiting for application startup.
INFO:     Application startup complete.
INFO:     Uvicorn running on http://0.0.0.0:8000 (Press CTRL+C to quit)
This means your pipeline server has started successfully and is ready to accept requests.
Step 4: Set Up Content Search#
Content Search provides multimodal semantic search, AI-driven video summarization, and RAG-based Q&A over uploaded educational materials.
A. Content Search Dependencies#
Content Search runs in the same smartclassroom environment as the backend.
Note
When the content_search feature is enabled in config.yaml, the backend (main.py) automatically launches the Content Search services on startup and shuts them down when it exits.
When all services are ready:
[launcher] All 4 services are ready. (startup took XXs)
[launcher] You can use Ctrl+C to stop all services.
Verify the service status:
Invoke-RestMethod -Uri "http://127.0.0.1:9011/api/v1/system/health"
This endpoint aggregates every service the launcher starts (ChromaDB, video
preprocess, file ingest, and the Content Search API itself). It answers 200
with status: "ok" only when all of them are ready, and 503 with
status: "degraded" until then - the services map in the body names what is
still missing. Invoke-RestMethod throws on the 503, so use
try { ... } catch { $_.ErrorDetails.Message } to read the detail while
services are still coming up.
Note
First-time execution may take several minutes as AI models (CLIP, BGE, Qwen VLM) are downloaded.
B. Network Requirements for Content Search#
Proxy: If behind a proxy, ensure
HTTP_PROXYandHTTPS_PROXYenvironment variables are configured.Model Downloads: Stable access to
huggingface.cois required for downloading pre-trained models.Windows Long Paths: Move the project to a shallow directory (e.g.,
C:\User\CS) or enable long paths:New-ItemProperty -Path "HKLM:\System\CurrentControlSet\Control\FileSystem" ` -Name "LongPathsEnabled" -Value 1 -PropertyType DWORD -Force
Step 5: Set Up Grading (Optional)#
Note
Skip this step if grading.enabled: false in config.yaml.
Smart Grading uses a layout detection model that requires a one-time conversion from Paddle format to OpenVINO™ IR. This step creates a dedicated conversion environment.
A. Create the Model Conversion Environment#
cd smart-classroom\components\grading\providers\layout_detection_service
python -m venv venv_convert
.\venv_convert\Scripts\pip install -r requirements_convert.txt
B. Convert and Download the Layout Detection Model#
.\venv_convert\Scripts\python ensure_layout_model.py
Note
This downloads PP-DocLayoutV2 (~200 MB) and converts it to OpenVINO™ IR. Subsequent runs detect the existing model and skip this step automatically.
C. Launch Grading Services#
Open two new terminal windows (the Backend terminal must remain running):
Terminal — Layout Detection (port 9902):
cd smart-classroom\components\grading\providers
python .\layout_detection_service\layout_detection_server.py
Terminal — Grading Service (port 9012):
cd smart-classroom\components\grading
python grading_service.py
Step 6: Bring Up the Frontend#
Note
Open a new Command Prompt / terminal window for the frontend. The backend and Content Search terminals stay busy serving requests.
cd <path-to>\edge-ai-suites\education-ai-suite\smart-classroom\ui
npm install
npm run dev -- --host 0.0.0.0 --port 5173
Optional: Run as an Electron Desktop App#
The UI can run as a Windows desktop app instead of a browser tab. This is an additive layer: it connects to the same backend services, so those must be running as in the previous steps.
cd <path-to>\edge-ai-suites\education-ai-suite\smart-classroom\ui
npm install

# Development: opens the desktop window and starts the dev server on 5173
npm run electron:dev

# Production preview: builds the UI and runs the packaged launch path, no dev server.
npm run electron:preview

# Package a standalone Windows portable executable:
#   release\SmartClassroom-<version>-portable.exe
npm run electron:build
Note
The Electron runtime binary is fetched lazily the first time Electron runs
(npm run electron:dev / electron:preview). Behind a proxy, the first launch
needs the proxy variables ELECTRON_GET_USE_PROXY=true and
GLOBAL_AGENT_HTTPS_PROXY=<proxy> in addition to the usual
HTTP_PROXY / HTTPS_PROXY. The npm run electron:build downloads
its own copy via electron-builder and honors the standard HTTPS_PROXY.
Step 6: Access the UI#
After starting the frontend you can open the Smart Classroom UI in a browser
(or, if you used npm run electron:dev, in the Electron desktop window
that opens automatically):
Local machine:
http://localhost:5173http://127.0.0.1:5173
From another device on the same network (replace <HOST_IP> with your computer’s IP):
http://<HOST_IP>:5173
Find your IP (Windows PowerShell):
ipconfig
Use the IPv4 Address from your active network adapter.
If you changed the port, adjust the URL accordingly.
Troubleshooting#
Frontend not opening: Ensure you ran
npm run devin a second terminal after startingpython main.py.Backend not ready: Wait until Uvicorn shows “Application startup complete” and is listening on port 8000.
URL fails from another device: Confirm you used
--host 0.0.0.0and replaced<HOST_IP>correctly.Nothing at http://localhost:5173: Check that the frontend terminal shows the Vite server running and no port conflict.
Firewall blocks access: Allow inbound traffic on ports 5173 (frontend) and 8000 (backend) on Windows.
Auto reload not happening: Refresh manually if the backend was restarted after initial UI load.
Error:
Port for tensor name cache_position was not found.This means the models were not configured correctly. To fix this:Delete the models directory:
edge-ai-suites/education-ai-suite/smart-classroom/models
Rerun only Step 1, option D. If the virtual environment already exists, rerun the required pip commands.
Application crash during bring-up on Intel® Core™ Ultra Series 3 and Intel® Core™ Series 3 (WCL) processors without any error indication: Sometimes OpenVINO™ GenAI models may crash on newer hardware. Try running the model on CPU by setting
device: CPUundermodels.text_geninconfig.yaml.Tokenizer load issue:
If you see this error:
Either openvino_tokenizer.xml was not provided or it was not loaded correctly. Tokenizer::encode is not available
Delete the models folder from
edge-ai-suites/education-ai-suite/smart-classroom/modelsand try again.If you see below error while running dls setup script,
.\setup_dls_env.ps1
  CategoryInfo          : SecurityError: (:) [], PSSecurityException
  FullyQualifiedErrorId : UnauthorizedAccess
Run the command:
Set-ExecutionPolicy -Scope Process -ExecutionPolicy Bypass
Error:
CL_OUT_OF_RESOURCESduring summarization of longer audio inputs Summarization of longer transcripts may require additional GPU memory. If this error occurs, increase the GPU memory allocation in the Intel® Graphics Software application under the Graphics tab before rerunning the workflow.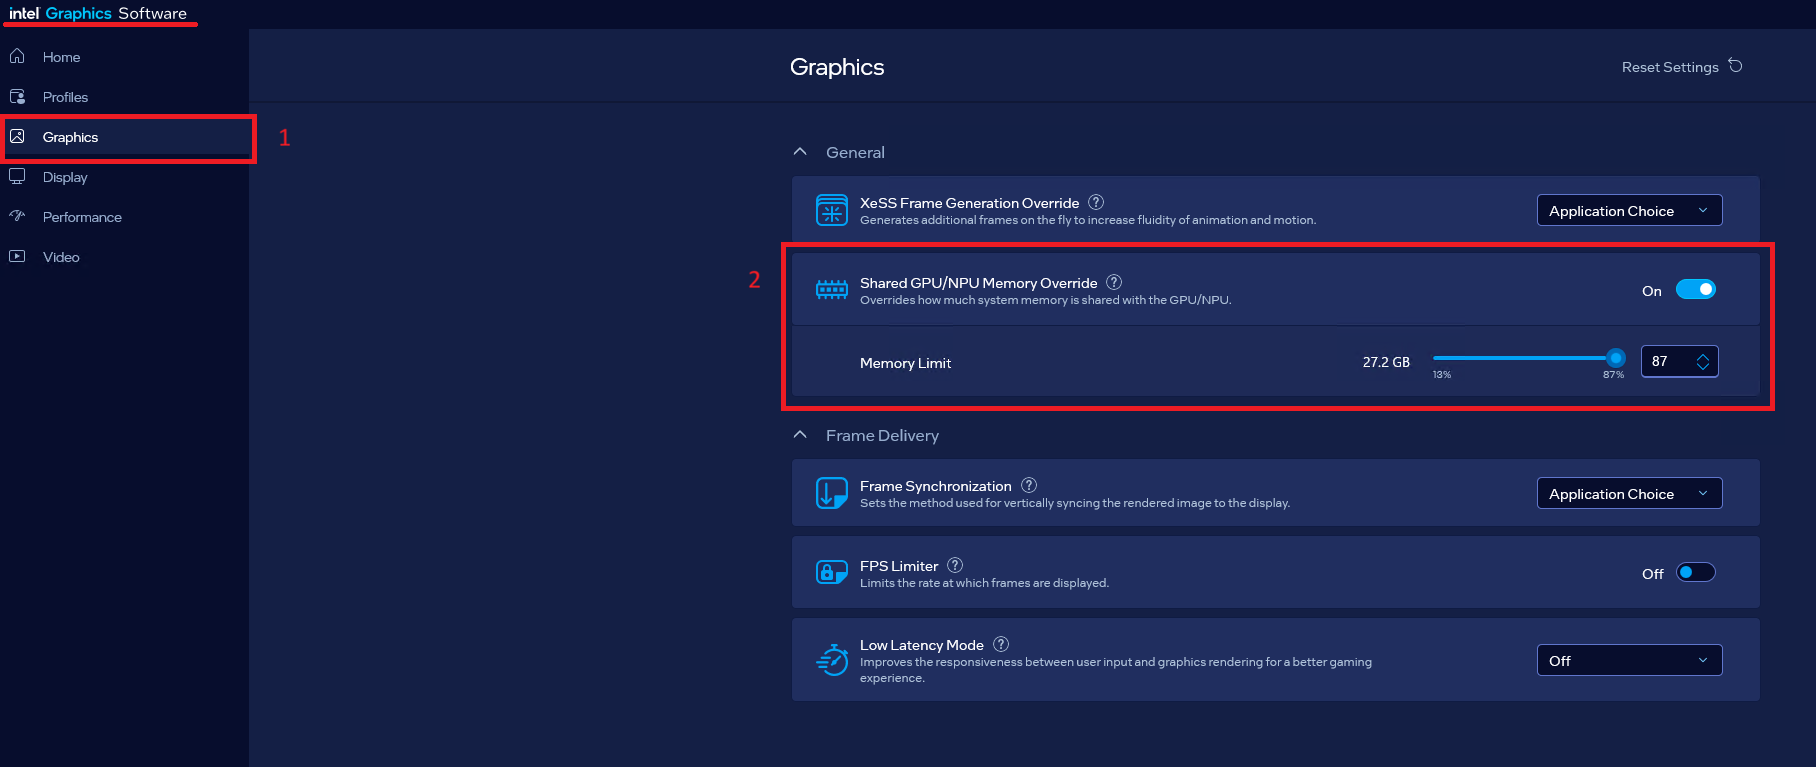
Known Issues#
Manual Video File Path Input: In web browser, users are required to manually specify the path to video files from their local system in the base directory input. It is recommended to use Electron desktop app for seamless operation.
Live Video Monitoring Timeout: Live video monitoring sessions will automatically stop after 45 minutes if the user does not reload the page to start a new session.
Stream End Notification: Once the video streaming ends, the user will see a “Stream not found” message on the screen, indicating that the stream has concluded.
Do Not Reload During Active Streaming: Users should not reload the page while the stream is active. Reloading the page will terminate the session, and the user will lose the current stream. Wait until the “Stream not found” notification appears on the screen before reloading.
Video Ready Notification: If the URL is configured in the settings, the notification will display “Video Ready” unless the screen is reloaded. Reloading the screen will reset the session and the notification.
Uninstall the Application#
To uninstall the application, follow these steps:
Delete the Python virtual environment folder:
Navigate to the directory and remove
education-ai-suite/smartclassroom.
For grading model conversion environment (if created): education-ai-suite/smart-classroom/components/grading/providers/layout_detection_service/venv_convert.Remove the models directory: Remove the models folder located under education-ai-suite/smart-classroom.
Remove the content search database: Remove uploaded files, vector database and upload record at education-ai-suite/smart-classroom/content_search/data.
Learn More#
System Requirements: Hardware, software, supported models, and weight formats.
Get Started: Quick installation and setup instructions.
Application Flow: End-to-end application flow.
Content Search Flow: The flow of the content search functionality.