Get Started#
The Image-Based Video Search is a sample application that demonstrates how developers can leverage edge AI technologies to solve real-world challenges. It enables efficient processing and searching of video data to identify objects of interest, providing actionable insights in real-time.
This application showcases searching through video data generated by cameras around a city to find the closest match to the user-provided image.
By following this guide, you will learn how to:
Set up the sample application: Use Docker Compose to quickly deploy the application in your environment.
Run a predefined pipeline: Execute a sample pipeline to see real-time traffic monitoring and object detection in action.
Modify application parameters: Customize settings like input sources and detection thresholds to adapt the application to your specific requirements.
Prerequisites#
Verify that your system meets the minimum requirements.
Install Docker: Installation Guide.
Set up and First Use#
Clone the Repository and update
.envfile:Create and navigate to directory:
  git clone https://github.com/open-edge-platform/edge-ai-suites.git -b release-1.2.0
  cd edge-ai-suites/metro-ai-suite/image-based-video-search
Note: The below step is required for deployment with certain pre-release images
Update
DOCKER_REGISTRYvariable in.envfile present atedge-ai-suites/metro-ai-suite/image-based-video-search. The recommended setting to use pre-release images is:DOCKER_REGISTRY=docker.io/Please remember to include/at the end.
Build from Source (Optional):
Run the below command to build the images from source
docker compose build
Note: You can skip this optional step since
docker compose up -dthat is run later in this document automatically pulls the required images.Download the Models:
Download the models
Linux Instructions
cd src/dlstreamer-pipeline-server

# Define a generic directory for storing models
MODELS_PATH="$(pwd)/models"

# Create the directory if it doesn't exist
mkdir -p "$MODELS_PATH"

# Download and convert the ResNet-50 model
docker run --rm \
    --user=root \
    -e http_proxy -e https_proxy -e no_proxy \
    -v "$MODELS_PATH:/output" \
    openvino/ubuntu22_dev:2024.6.0 bash -c \
    "omz_downloader --name resnet-50-pytorch --output_dir models && \
    omz_converter --name resnet-50-pytorch --download_dir models --output_dir models && \
    cp -r ./models/public/resnet-50-pytorch /output && \
    chown -R $(id -u):$(id -g) /output"

# Download and convert the Person-Vehicle-Bike Detection model
docker run --rm \
    --user=root \
    -e http_proxy -e https_proxy -e no_proxy \
    -v "$MODELS_PATH:/output" \
    openvino/ubuntu22_dev:2024.6.0 bash -c \
    "omz_downloader --name person-vehicle-bike-detection-2004 --output_dir models && \
    omz_converter --name person-vehicle-bike-detection-2004 --download_dir models --output_dir models && \
    cp -r ./models/intel/person-vehicle-bike-detection-2004 /output && \
    chown -R $(id -u):$(id -g) /output"
Windows Instructions
cd src/dlstreamer-pipeline-server

docker pull openvino/ubuntu22_dev:2024.6.0
$MODELS_PATH="$PWD\models"

docker run --rm `
    -e http_proxy -e https_proxy -e no_proxy \
    -v ${MODELS_PATH}:/output `
    openvino/ubuntu22_dev:2024.6.0 bash -c `
    "omz_downloader --name resnet-50-pytorch --output_dir models && `
    omz_converter --name resnet-50-pytorch --download_dir models --output_dir models && `
    cp -r ./models/public/resnet-50-pytorch /output"

docker run --rm `
    -e http_proxy -e https_proxy -e no_proxy \
    -v ${MODELS_PATH}:/output `
    openvino/ubuntu22_dev:2024.6.0 bash -c `
    "omz_downloader --name person-vehicle-bike-detection-2004 --output_dir models && `
    omz_converter --name person-vehicle-bike-detection-2004 --download_dir models --output_dir models && `
    cp -r ./models/intel/person-vehicle-bike-detection-2004 /output"
      ```

</details>
Start the Application:
Go back to the folder of compose.yml and run the application using Docker Compose:
cd ../..
docker compose up -d
Verify the Application:
Check that the application is running:
docker compose ps
Access the Application:
Open a browser and go to the following endpoints to access the application:
App UI:
http://localhost:3000Search UI:
http://localhost:9000/docsMilvusDB UI:
http://localhost:8000/Stream UI:
http://localhost:8889/stream. To access this stream remotely, open this urlrtsp://<ip-addr>:8554/stream. Replace<ip-addr>with your system IP address
Note: To access
App UI,Search UIandMilvusDB UIurls remotely, replace thelocalhostwith your system IP address.Run the Application:
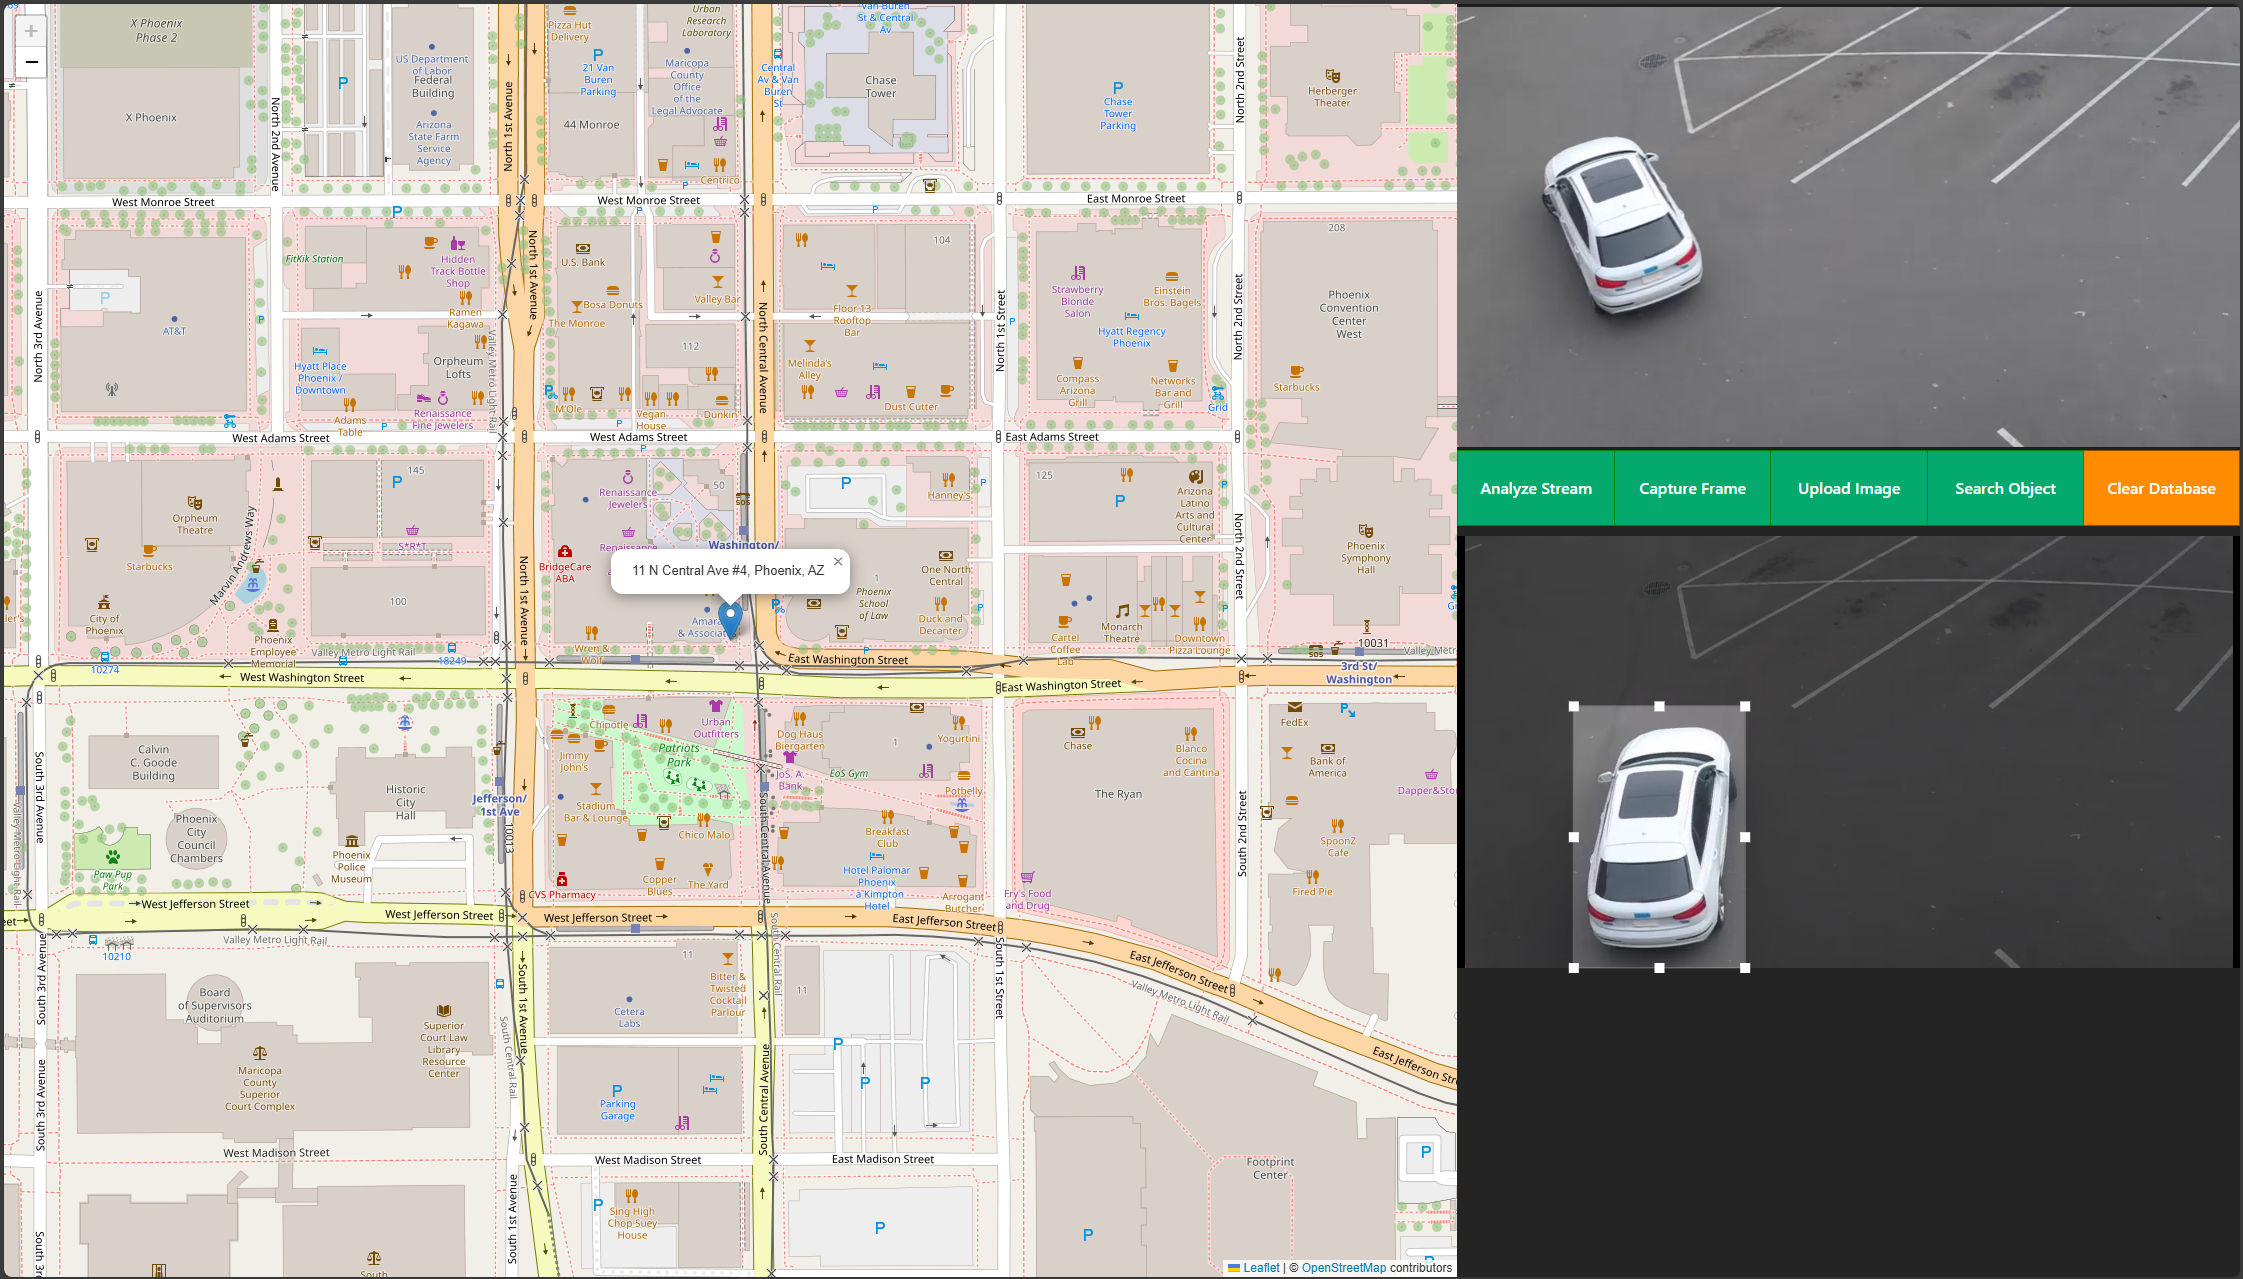
Analyze Stream: Use the predefined video and click Analyze Stream to start processing the video stream.
Video Search: Click the Upload Image button to upload your own images for search or click the Capture Frame button to capture and adjust frames from the video stream. Click the Search Object button.
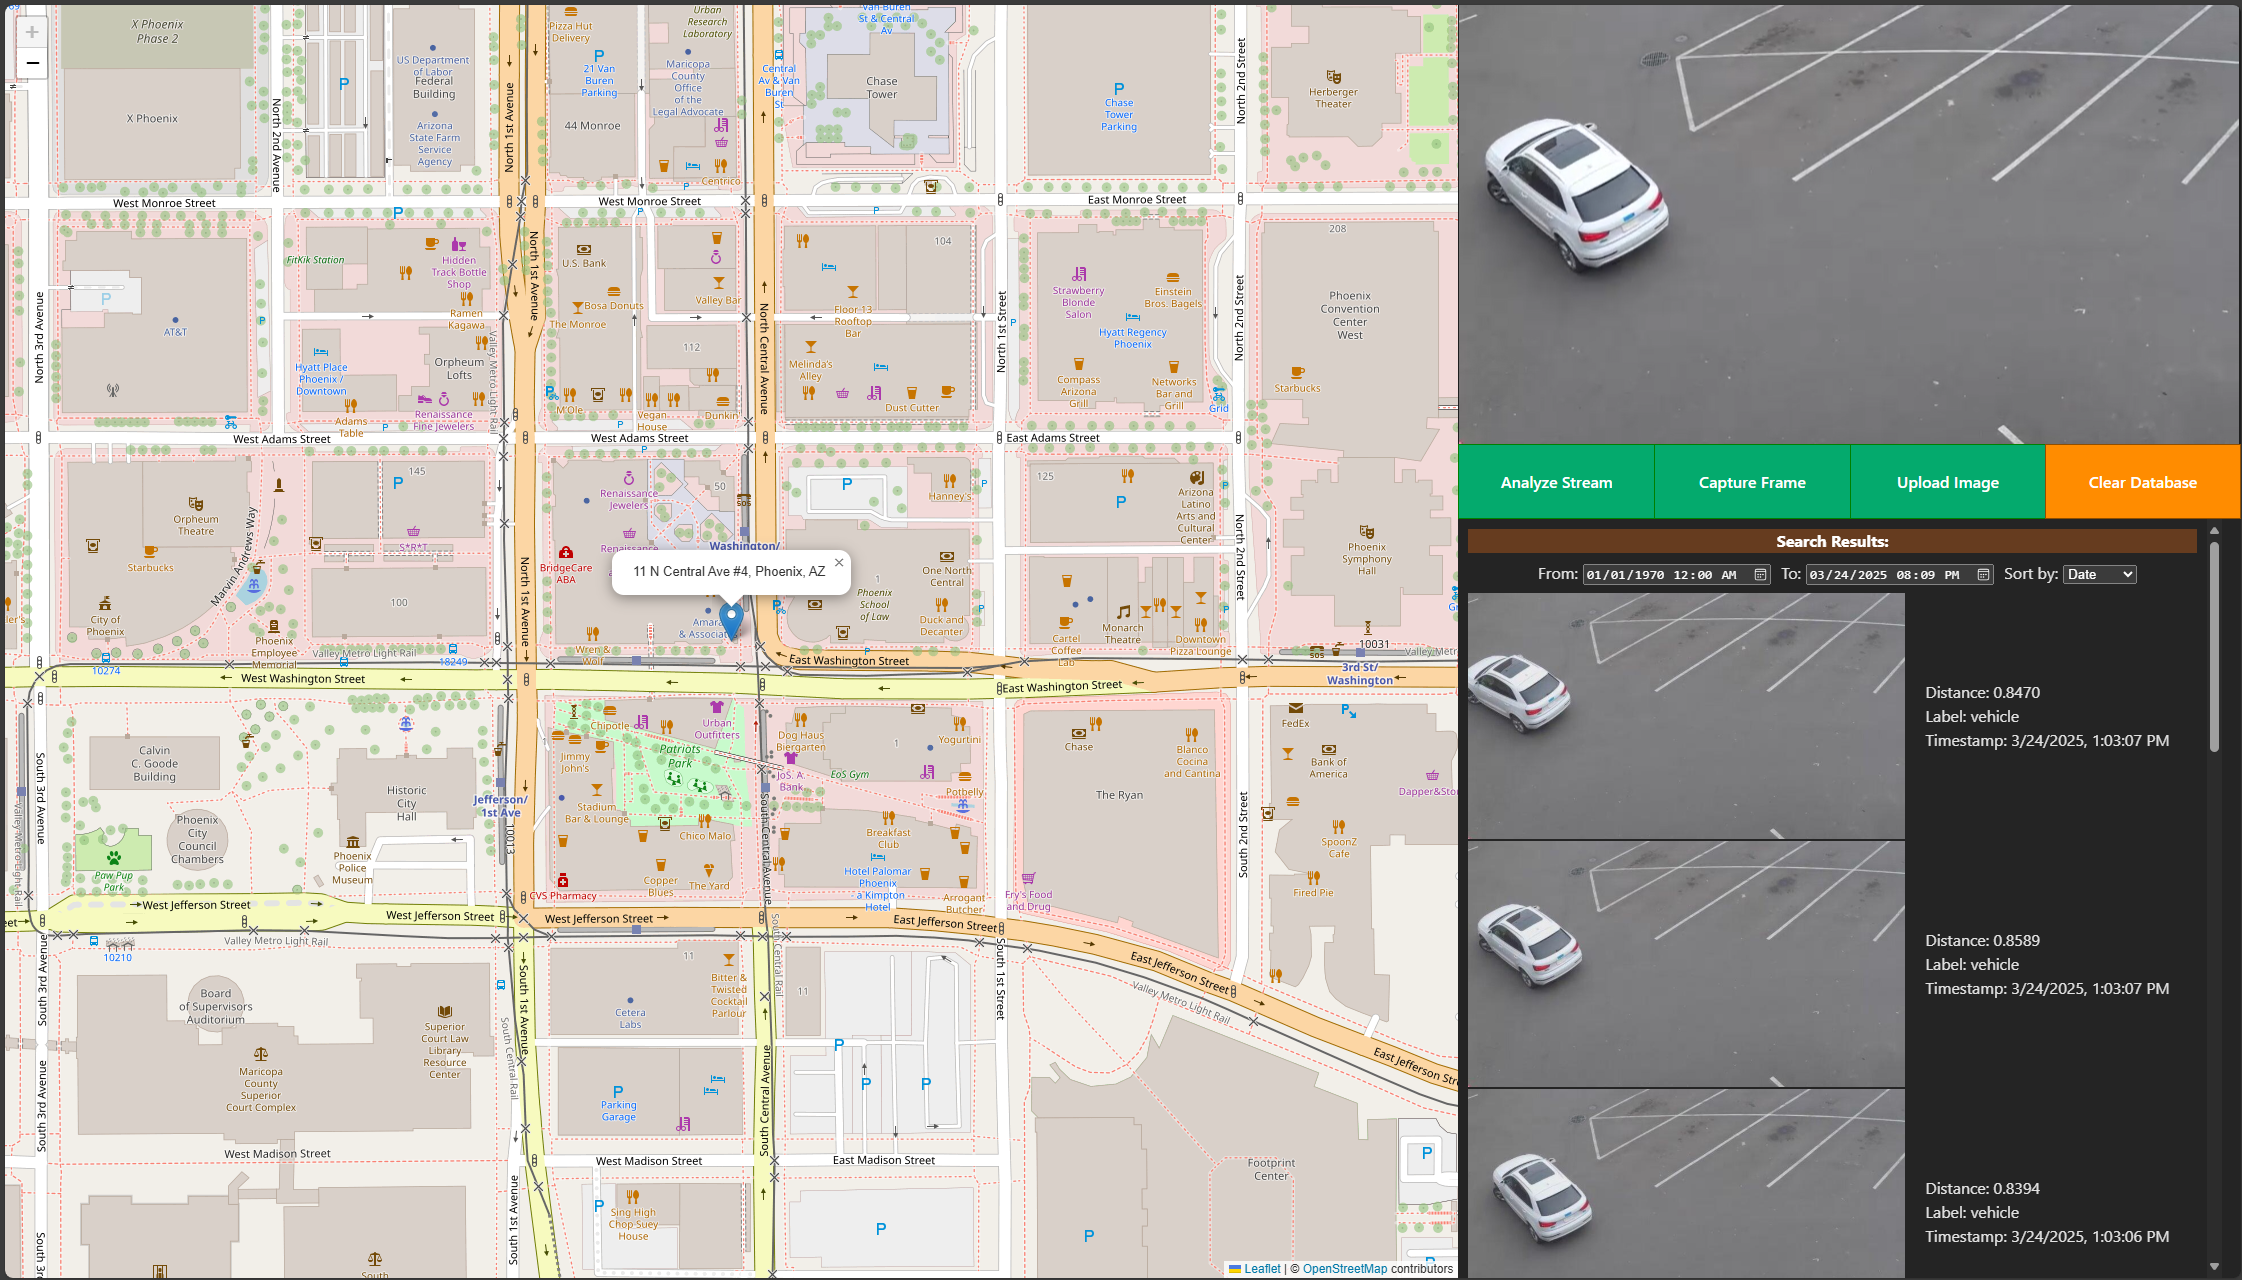
Expected Results:
Matched search results, including metadata, timestamps, distance to show the confidence rate of the prediction, and frames that include detected objects (e.g., vehicles, pedestrians, bikes).
Make Changes#
Change Object Detection and Object Classification Models
To use your own models instead of the default models, follow these steps:
Open the
config.cpu.jsonfile present at the pathedge-ai-suites/metro-ai-suite/image-based-video-search/src/dlstreamer-pipeline-server/configs/filter-pipeline/.Change the paths in the
pipelinesection to point to your own models. Replace the paths forgvadetectandgvaclassifywith the paths to your models:{ "config": { "logging": { "C_LOG_LEVEL": "INFO", "PY_LOG_LEVEL": "INFO" }, "pipelines": [ { "name": "filter-pipeline", "source": "gstreamer", "queue_maxsize": 50, "pipeline": "{auto_source} name=source ! decodebin ! video/x-raw ! videoconvert ! gvadetect model=/models/your-detection-model/FP32/your-detection-model.xml model-proc=/models/your-detection-model/your-detection-model.json inference-interval=3 threshold=0.4 model-instance-id=detect1 device=CPU ! queue ! gvainference model=/models/your-classification-model/FP32/your-classification-model.xml inference-region=1 name=classification model-instance-id=infer1 device=CPU ! queue ! videoconvertscale ! gvametaconvert add-tensor-data=true name=metaconvert ! jpegenc ! appsink name=destination", "auto_start": false, "mqtt_publisher": { "publish_frame": true, "topic": "edge_video_analytics_results" } }, { "name": "search_image", "source": "image_ingestor", "queue_maxsize": 50, "pipeline": "appsrc name=source ! decodebin ! videoconvert ! gvainference model=/models/your-classification-model/FP32/your-classification-model.xml model-instance-id=infer2 device=CPU ! gvametaconvert add-tensor-data=true ! appsink name=destination" } ] } }
Change Input Video:
To use your own video instead of the default sample video, follow these steps:
Open the
compose.ymlfile and locate thestreaming-pipelineservice.Change the URL in the
commandsection to point to your own video file. Replacehttps://github.com/intel-iot-devkit/sample-videos/raw/master/person-bicycle-car-detection.mp4with the URL of your video file:services: streaming-pipeline: ... command: > bash -c " wget -O file.mp4 <your-video-url> && \ gst-launch-1.0 filesrc location=file.mp4 ! qtdemux name=mdemux ! h264parse ! video/x-h264,stream-format=byte-stream ! mpegtsmux name=mux ! filesink location=file.ts && \ gst-launch-1.0 multifilesrc location=file.ts loop=true ! tsdemux ! h264parse ! rtspclientsink protocols=tcp location=rtsp://rtsp-server:8554/stream " ...
Adjust Feature Matching Confidence:
Open the compose.yml file and locate the
feature-matchingservice.Change the
CONFIDENCE_THRESHOLDto adjust the confidence level for feature matching:services: feature-matching: ... environment: ... CONFIDENCE_THRESHOLD: 0.7 ...
Effect: Increasing the
CONFIDENCE_THRESHOLDwill make the feature matching more stringent, reducing false positives but potentially missing some true positives. Decreasing it will make the matching more lenient, increasing the chances of detecting true positives but also increasing false positives.
Save Changes and Restart:
Save the file and restart the application:
docker compose restart
Verify Updates:
Expected Results:
The application processes data from the updated input source.
Detection results align with the changed models
Confirm changes through:
Logs:
docker compose logs
Troubleshooting#
Containers Not Starting:
Check the Docker logs for errors:
docker compose logs
Port Conflicts:
Update the
portssection in the Compose file to resolve conflicts.
ibvs-milvusdb container is unhealthy:
Currently, milvusdb does not work with proxy servers. Make sure that the proxies
http_proxy,https_proxyandno_proxyare set to empty string incompose.ymlfile
Empty search results after clicking on
Search Object:Make sure the models are able to detect the objects in the stream correctly
Make sure you have analysed the stream first to capture the video frames into milvus database
Make sure you are using the right frame to search the object
Increase the ‘To’ timestamp in the search results to accommodate the latest results