Modular vPro Workflow Deployment#
This modular workflow provides a simplified, end-to-end process for activating and managing devices by using Intel® vPro™ Active Management Technology (AMT) and Intel® Standard Manageability (ISM). It uses lightweight, modular components that run on both the control plane and edge node to deliver out-of-band (OOB) management capabilities.
This design makes Intel® OOB management features easy for partners to adopt:
Partners can directly integrate these modular components into their own edge-management platforms.
This integration provides built-in support for Intel® vPro™ OOB capabilities without requiring deployment or maintenance of the full Edge Management Framework (EMF).
The workflow eliminates the complexity of extracting only OOB components from EMF. Instead of dealing with the overhead of the complete EMF stack, partners can consume focused, modular components for vPro™ AMT/ISM activation and OOB device control.
By delivering these capabilities as self-contained modules, Intel enables partners to accelerate integration timelines, reduce development effort, and deliver OOB device-management functionality to customers quickly and reliably.
Partner Responsibilities#
When evaluating this workflow, partners are responsible for the following areas:
Device OS provisioning
Device onboarding
Firmware and software upgrades
Cluster management
Application lifecycle management
Observability and telemetry management
Workflow Capabilities#
The modular vPro workflow provides the following capabilities:
Automated vPro software Provisioning#
An installer package automates the provisioning of vPro control-plane and edge-node software, reducing manual setup and configuration effort.
Automated vPro Activation#
Typically, vPro activation requires a field engineer to install agents and credentials to activate vPro AMT or ISM on the edge device. This workflow automates the activation process, enabling devices to be activated without user interaction and reducing operating expenses (OpEx).
Intel® vPro™ technology is activated automatically in one of two modes:
Client Control Mode (CCM) — Provides a subset of management features with user consent.
Admin Control Mode (ACM) — Enables full remote management capabilities without user interaction.
Out-of-Band Power Management#
Remote power operations are available independent of the operating system state:
Power On — Remotely start a powered-off device.
Power Off — Remotely shut down a running device.
Power Cycle — Restart a device through a full power-off and power-on sequence.
Power Status Retrieval — Query the current power state of a device.
System Requirements#
The modular vPro workflow has control plane and edge node environments. Here are the minimum requirements for these two environment.
Control Plane Requirements#
Linux-based operating system (Ubuntu 24.04 LTS)
Kubernetes cluster (for container orchestration)
Network connectivity to edge nodes
Edge Node Requirements#
Intel® vPro™ platform with AMT or ISM support
Network connectivity to the control plane
Compatible operating system (Ubuntu 24.04 LTS)
Evaluation Deployment Instructions#
Install control-plane#
Update the onprem.env file with the required deployment configuration
before starting the Edge Orchestrator installation.
Modify the following parameters as needed:
# Installer profile for vPro-only deployment
export ORCH_INSTALLER_PROFILE=onprem-vpro

# Deployment version
export DEPLOY_VERSION='2026.0.0'
# Repository branch
export DEPLOY_REPO_BRANCH='2026.0.0'

# Load balancer IPs
export ARGO_IP=''
export TRAEFIK_IP=''
export HAPROXY_IP=''

# Proxy configuration (optional) — set if Orchestrator or edge nodes sit
# behind an HTTP/HTTPS proxy. Example: export ORCH_HTTP_PROXY="http://proxy:3128"
export ORCH_HTTP_PROXY=""
export ORCH_HTTPS_PROXY=""
export ORCH_NO_PROXY=""
# Edge-node proxy variables
export EN_HTTP_PROXY=""
export EN_HTTPS_PROXY=""
export EN_FTP_PROXY=""
export EN_SOCKS_PROXY=""
export EN_NO_PROXY=""
Run the installer:
./onprem_installer.sh
After the deployment completes, verify all Helm releases are healthy before proceeding:
cd post-orch
./post-orch-deploy.sh list
Create project and user#
After the control plane is healthy, create your organization, project, and users using the Orch CLI. See the Orch CLI User Guide for detailed commands and examples:
Note
See Orch CLI User Guide.
Follow the Orch CLI User Guide for creating multi-tenancy organizations, projects, users.
Orch CLI host registration#
Use the following commands as a quick setup and verification flow for the Orch CLI. Adjust CLUSTER_FQDN, PROJECT_NAME, and other values as needed.
export CLUSTER_FQDN=cluster.onprem
export EP=https://api.$CLUSTER_FQDN
export PROJECT_NAME=<project-name>
export ORCH_DEFAULT_PASSWORD="password-for-edgeinfra-api-user"
export ORCH_DEFAULT_USER="username-foredgeinfra-api-user"

orch-cli logout
orch-cli login $ORCH_DEFAULT_USER $ORCH_DEFAULT_PASSWORD \
  --keycloak https://keycloak.$CLUSTER_FQDN/realms/master

orch-cli config set project $PROJECT_NAME
orch-cli config set api-endpoint $EP

# Show enabled features on the Orchestrator
orch-cli list feature

# Regster host example (adjust parameters as needed):

orch-cli create host -i host-config.csv
orch-cli list hosts
host-config.csv template#
Use this CSV template with orch-cli create host -i <file>; adapt columns to your environment. The header row is required.
Serial,UUID,OSProfile,Site,Secure,RemoteUser,Metadata,LVMSize,CloudInitMeta,K8sEnable,K8sClusterTemplate,K8sConfig,Error - do not fill
EDGENODE1_SERIALNO,,,,,,,,,,,,
EDGENODE2_SERIALNO,,,,,,,,,,,,
Note
Replace EDGENODE1_SERIALNO (and EDGENODE2_SERIALNO) with the actual serial number(s) of your edge node(s). If you have multiple edge nodes, add one row per device in this CSV and use orch-cli create host -i <file> to perform bulk registration.
Install edge node components#
Download the installer
On the vPro-enabled edge node, download the installer and make it executable. Replace
<cluster.example.com>with your cluster DNS domain.export CLUSTER_FQDN=<cluster.example.com> wget https://tinkerbell-haproxy.${CLUSTER_FQDN}/tink-stack/Installer \ --no-check-certificate --no-proxy chmod +x Installer .. note:: The edge node (EN) must have SSH access.
Run the installer
Run the installer with sudo privileges:
sudo ./InstallerThe installer automatically configures:
Ubuntu system updates
System configuration
Device discovery agent
LMS and RPC service for AMT operations
Node agent
Platform Manageability Agent (PMA)
Verify agent status
Verify that the agents are running.
Check service status:
sudo systemctl status device-discovery-agent
sudo systemctl status node-agent
sudo systemctl status platform-manageability-agent
Monitor agent logs in real-time:
sudo journalctl -u device-discovery-agent -f
sudo journalctl -u node-agent -f
sudo journalctl -u platform-manageability-agent -f
Verify edge node on the control-plane#
Because UI is disabled in the onprem-vpro profile, verify registration and
state via orch-cli.
Activate vPro on the edge node#
Because UI is disabled, provisioning and power management of Intel® vPro
devices must be performed via orch-cli.
Set the required environment variables:
export HOST_ID=<edgenode-host-id>
Provision a vPro device:
orch-cli set host ${HOST_ID} \
  --project ${PROJECT_NAME} \
  --api-endpoint https://api.${CLUSTER_FQDN} \
  --amt-state provisioned
Activate vPro In ACM mode#
-
ACM (Admin Control Mode) activation requires a provisioning certificate issued by a trusted Certificate Authority (CA). This certificate must be rooted in one of the trusted CAs embedded in the Intel AMT firmware (e.g., Comodo, DigiCert, GoDaddy, or VeriSign).
To obtain and prepare the certificate:
- Purchase a provisioning certificate from a CA whose root certificate hash is listed in Intel AMT’s trusted root store.
The certificate must match the domain suffix configured in the AMT BIOS (MEBx) settings.
Export the certificate in PFX/PKCS#12 format, including the full certificate chain and private key.
Note the certificate password — it will be required when creating the AMT domain profile via
orch-cli.Note
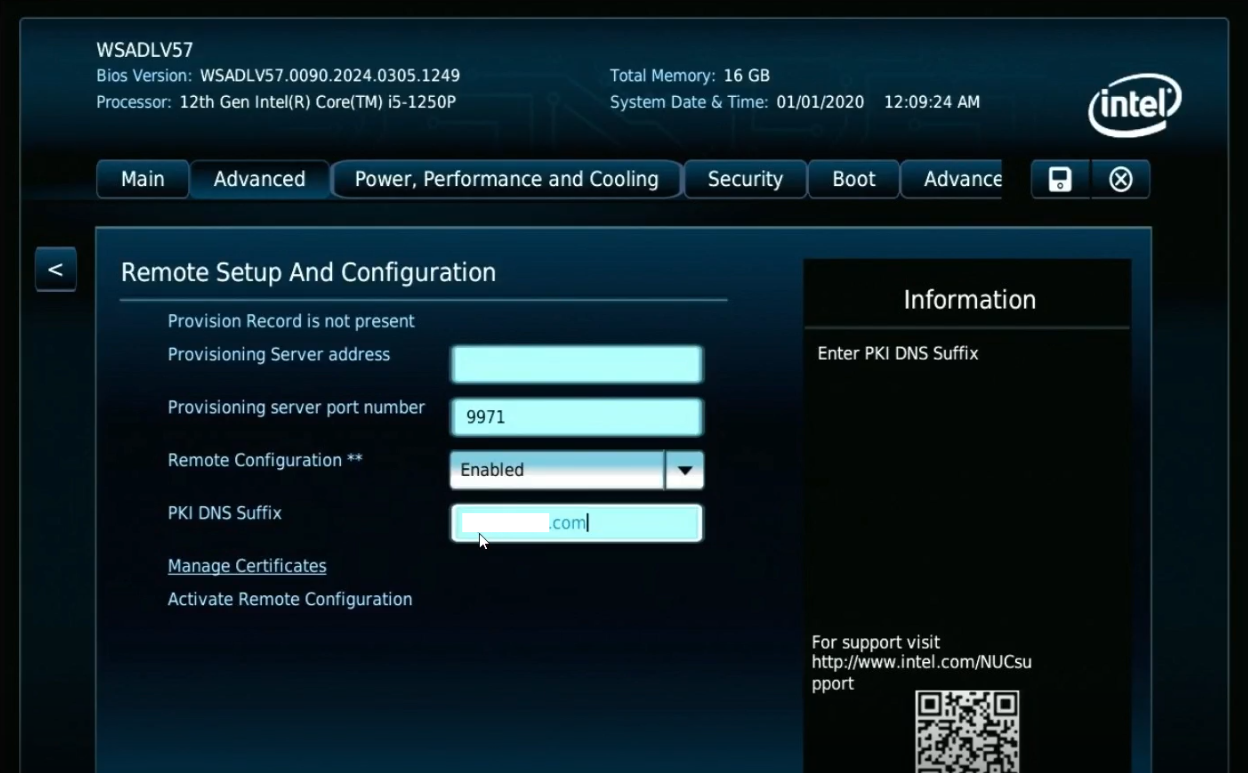
The domain suffix in the certificate’s Common Name (CN) or Subject Alternative Name (SAN) must match the PKI DNS suffix configured in the edge node’s MEBx settings.
BIOS configuration for ACM mode
Ensure the edge node’s BIOS is configured for ACM mode with Domain suffix in Remote configuration settings.
Advanced > MEBx > {Enter MEBx Password- default is “admin”} > Intel AMT Configuration > Network Access State > Full Unprovision Advanced > MEBx > {Enter MEBx Password- default is “admin”} > Intel AMT Configuration > Remote Setup and Configuration > PKI DNS Suffix > Set to your domain suffix (e.g., “example.com”)
Domain creation
orch-cli create amtprofile <domain_name> \
  --project ${PROJECT_NAME} \
  --cert 'Domain-certificate.pfx' \
  --cert-pass cert-password \
  --cert-format string \
  --domain-suffix <Domain-suffix> \
  --api-endpoint https://api.${CLUSTER_FQDN}
ACM Activation command
orch-cli set host ${HOST_ID} \
  --project ${PROJECT_NAME} \
  --api-endpoint https://api.${CLUSTER_FQDN} \
  --amt-state provisioned \
  --control-mode admin
ACM mode Deactivation - Once the operation is complete, you can deactivate ACM mode using the following command:
orch-cli set host ${HOST_ID} \
  --project ${PROJECT_NAME} \
  --api-endpoint https://api.${CLUSTER_FQDN} \
  --amt-state unprovisioned
Note
Ensure that deactivation completes successfully. If it does not, the host may enter a limbo state and cannot be reactivated. In that case, you must clear the system CMOS to reset the Intel® vPro® state before activating again.
Verify vPro activation on the control plane#
Because UI is disabled, verify activation state via orch-cli.
orch-cli get host ${HOST_ID} \
  --project ${PROJECT_NAME} \
  --api-endpoint https://api.${CLUSTER_FQDN}
Perform out-of-band power management operations#
Power Off:
orch-cli set host ${HOST_ID} \
  --project ${PROJECT_NAME} \
  --api-endpoint https://api.${CLUSTER_FQDN} \
  --power off
Power On:
orch-cli set host ${HOST_ID} \
  --project ${PROJECT_NAME} \
  --api-endpoint https://api.${CLUSTER_FQDN} \
  --power on
Power Reset:
orch-cli set host ${HOST_ID} \
  --project ${PROJECT_NAME} \
  --api-endpoint https://api.${CLUSTER_FQDN} \
  --power reset
Note
Ensure secure API access and proper credentials management when operating in production environments.
Uninstall edge node components#
Delete host from orchestration
orch-cli delete host <host-id> --project <project-name> \
  --api-endpoint https://api.<cluster.example.com>
Clean up edge node
wget https://tinkerbell-haproxy.${CLUSTER_FQDN}/tink-stack/uninstall.sh \
  --no-check-certificate --no-proxy
chmod +x uninstall.sh
./uninstall.sh
Proceed with your standard edge-node uninstallation flow.