OXM Deployment Profile#
The Edge Manageability Framework (EMF) serves a wide range of customers, including equipment manufacturers, system integrators, software vendors, and organizations managing edge deployments. To address scenarios where customers need to provision multiple edge nodes with both an operating system and Kubernetes, EMF offers support for the OXM profile.
When operating in OXM profile mode, EMF acts as a dedicated provisioning solution stack—focusing exclusively on initial system deployment and intentionally omitting the activation of edge node agents for device lifecycle management. This approach provides a scalable provisioning solution, building upon the foundations of the single standalone edge node deployment model.
The OXM deployment profile is an On-Premises Edge Orchestrator’s profile that only deploys a subset of Edge Orchestrator to support Edge Nodes provisioning at scale in the OXM warehouse or any site where Edge Nodes are firstly prepared to be sent to target location and operate in the field.
The OXM deployment profile consists of Edge Infrastructure Manager (EIM) and all required platform-level services.
This guide explains how to customize the installation steps to set up the OXM profile of Edge Orchestrator. The guide is based on the Install Edge Orchestrator guide.
Network Topology#
The OXM profile is intended to be deployed in environments where Edge Nodes do not have direct Internet access, as explained in Edge Orchestrator for Edge Nodes without Direct Internet Access.
A sample network topology is presented in the diagram below:
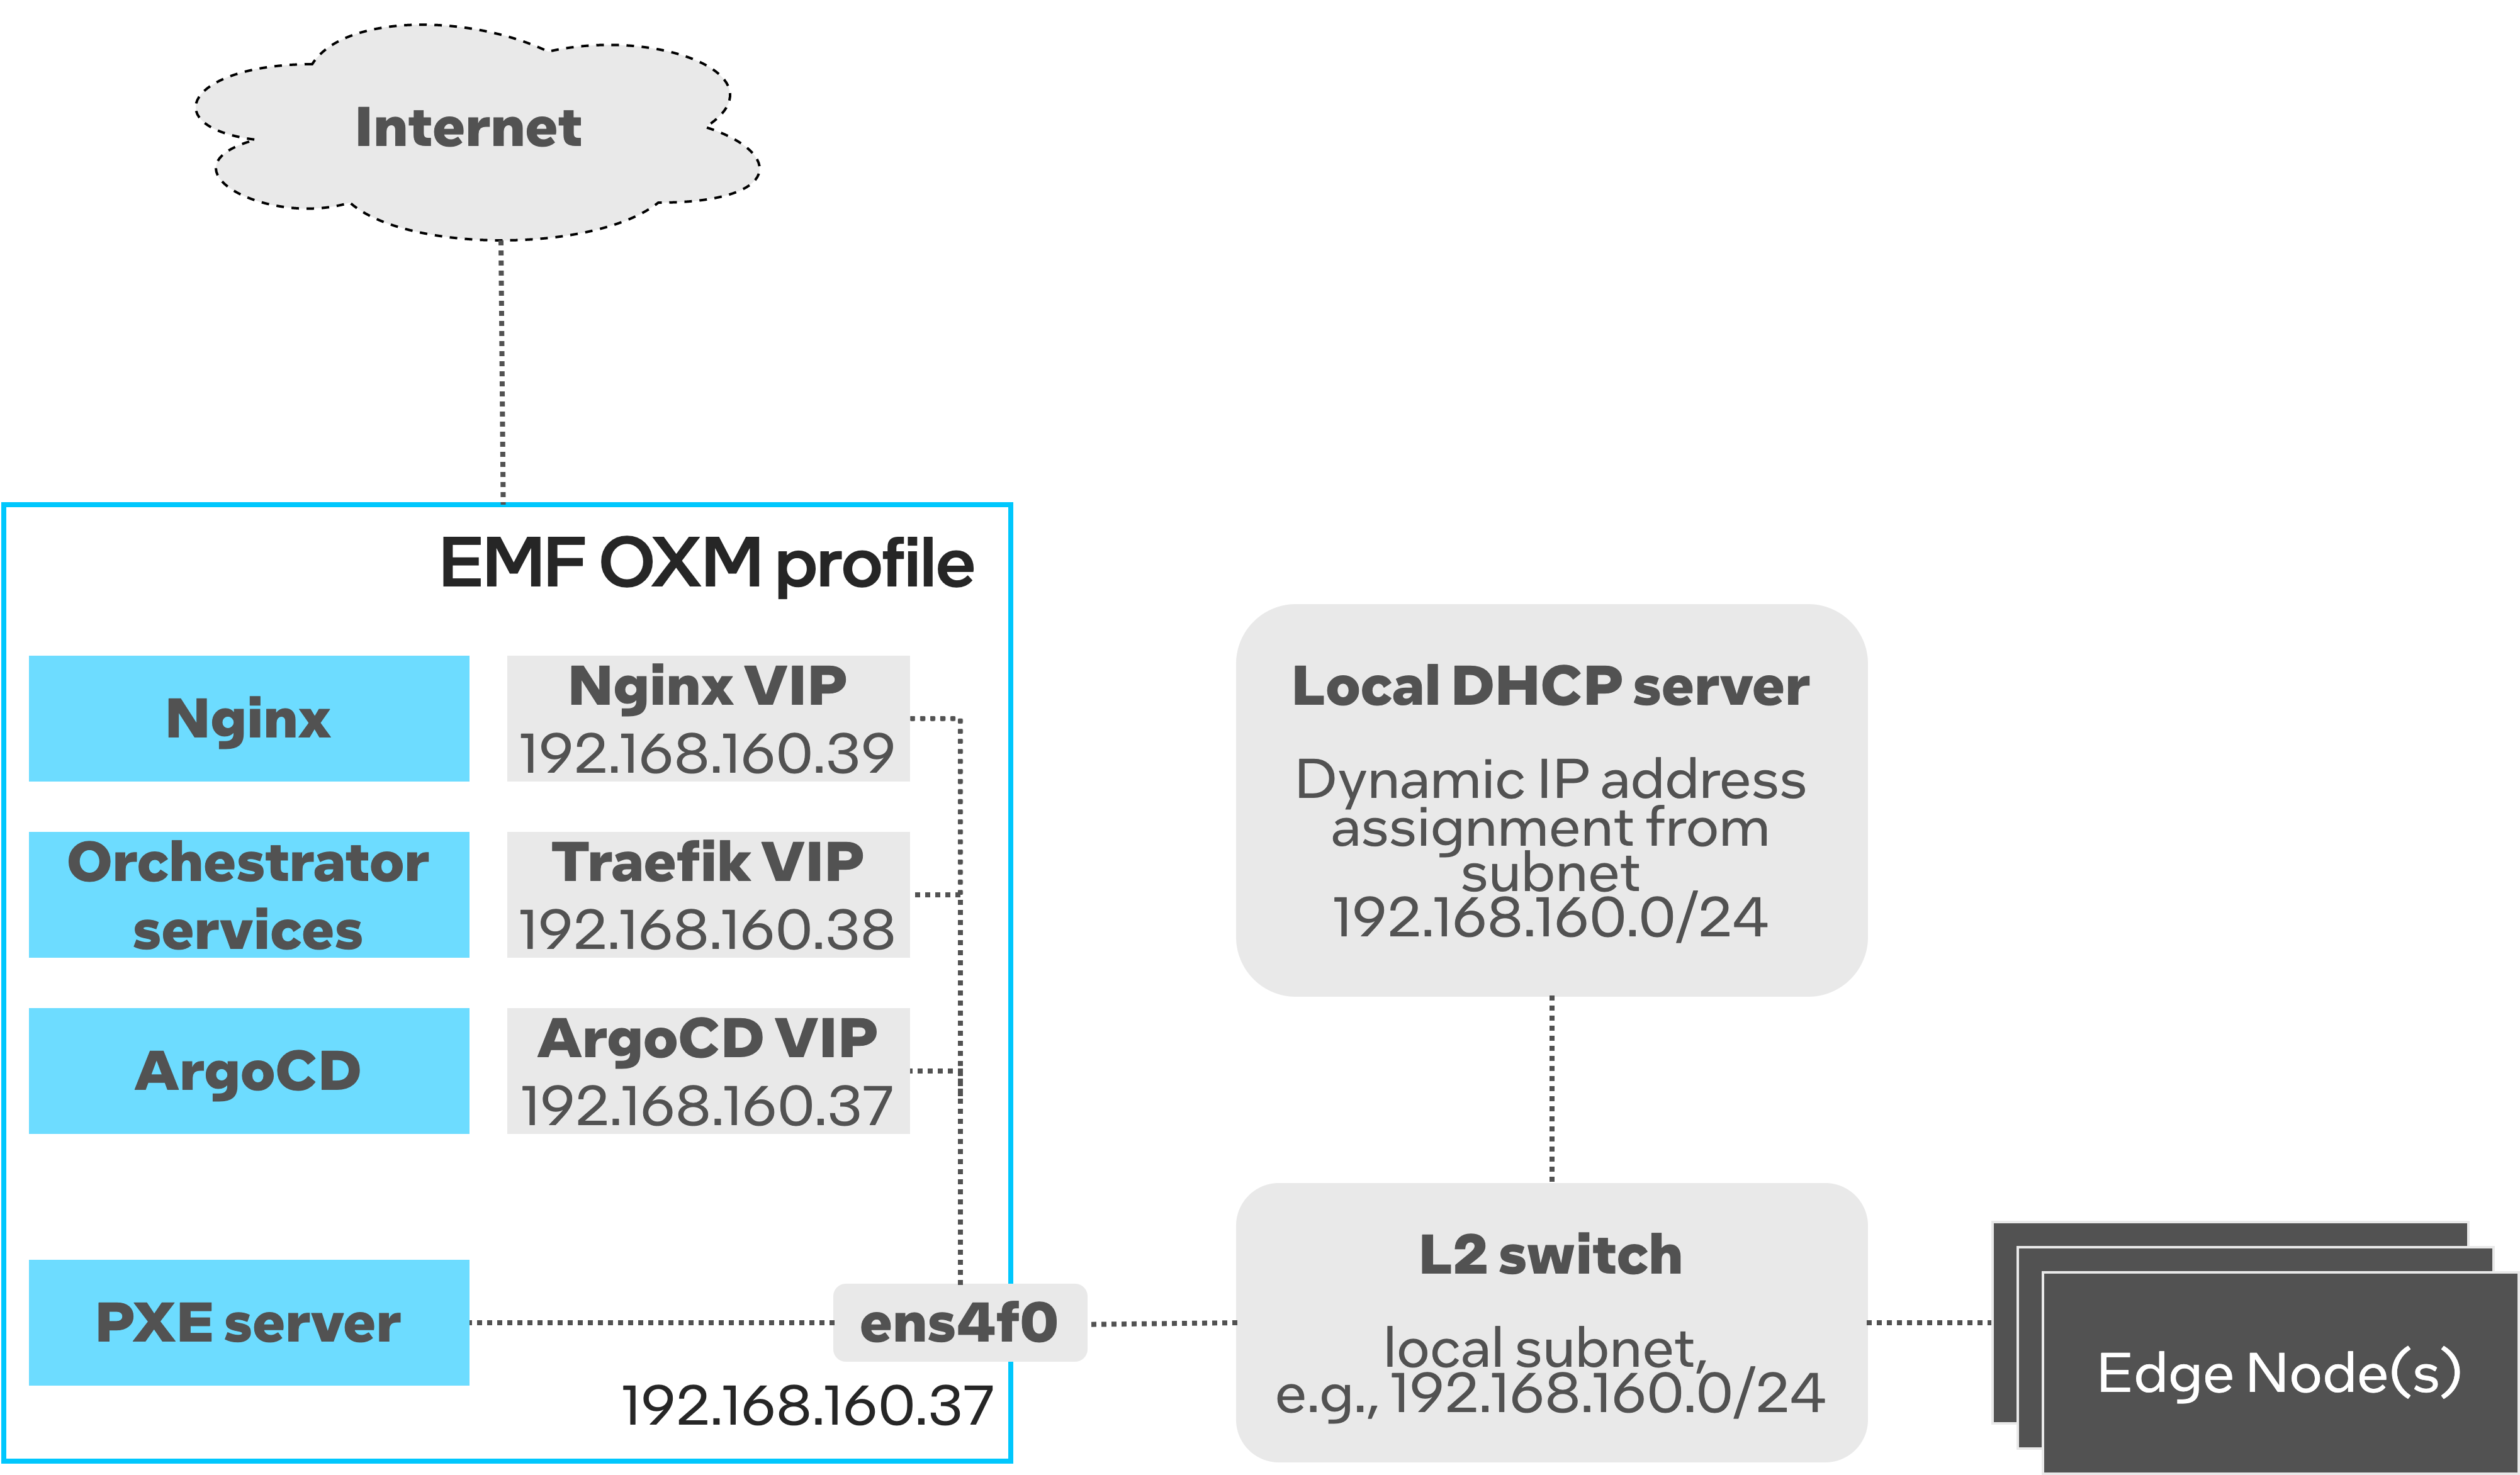
Both Edge Orchestrator and all Edge Nodes to be provisioned are connected to the same subnet (192.168.160.0/24 in this case).
Edge Nodes do not have direct Internet access, while Edge Orchestrator can reach Internet via a separate network interface.
Edge Nodes use the Edge Orchestrator as a proxy to access Internet.
The local L2 network must provide the DHCP server for dynamic IP address assignment.
The Edge Orchestrator deploys another DHCP server (as part of PXE server) that runs in the Proxy-DHCP mode.
The Proxy-DHCP mode should be enabled by DHCP guarding/snooping/filtering rules.
All Edge Orchestrator services are deployed on top of Kubernetes as microservices.
Most of Edge Orchestrator services are accessible via
TRAEFIK_IP, a Virtual IP reserved in the local subnet.The Edge Orchestrator must be configured with two more Virtual IPs that are reserved in the local subnet.
ARGO_IPis used to access ArgoCD server, whileNGINX_IPexposes installation artifacts that are downloaded by Edge Nodes during OS provisioning.Note that one of
TRAEFIK_IP,NGINX_IPandARGO_IPcan be same as the physical interface’s IP address (ARGO_IPin the example).Only the PXE server is attached to the host networking and binds to the IP address of the physical network interface to listen to DHCP requests.
Prerequisites#
Make sure you familiarize yourself with the following documentation pages:
Installation steps#
First, Download the Installation Script.
Then, you must explicitly define the onprem-oxm deployment profile and start the installation:
Note
You may also want to set CLUSTER_DOMAIN to a domain name of your choice. By default, it’s set to “cluster.onprem”.
export ORCH_INSTALLER_PROFILE=onprem-oxm
./onprem_installer.sh
The above script will start the installation process. You will be prompted for network settings. Refer to Network Topology and Installer Prompts and Deployment Configuration for instructions on how to configure IP addresses.
At some point the script will stop waiting for user inputs:
Edit config values.yaml files with custom configurations if necessary!!!
The files are located at:
[path_to_untarred_repo]/orch-configs/profiles/<profile>.yaml
[path_to_untarred_repo]/orch-configs/clusters/onprem-oxm.yaml
Enter 'yes' to confirm that configuration is done in order to progress with installation
('no' will exit the script) !!!

Ready to proceed with installation?
Customize deployment profile#
Open a new terminal (do not close the previous one) and navigate [path_to_untarred_repo]/orch-configs/profiles/profile-oxm.yaml.
This file contains main customization settings for OXM profile.
If needed, change
defaultUser,defaultOrganizationanddefaultTenant. By default, they are all set tolocal-admin.You must properly set network configuration for PXE server. Given Network Topology the PXE server config must be set as follows:
interfacemust be set to the name of the network interface that is connected to the L2 subnet (ens4f0in the Network Topology example).bootServerIPmust be set to the IP address assigned to theinterface(192.168.160.37in the Network Topology example).Note
The
bootServerIPmust not be a Virtual IP address. The IP address must be assigned to the physical interface.subnetAddressmust be set to the IP subnet address. For example, the IP subnet address of192.168.160.0/24is192.168.160.0.
Do not change any other parameters defined in the
profile-oxm.yaml.Modify proxy settings in
[path_to_untarred_repo]/orch-configs/profiles/proxy-none.yaml.If Edge Orchestrator requires a proxy to access the Internet, configure the following proxy settings.
argo:
  proxy:
    httpProxy: [HTTP proxy URL]
    httpsProxy: [HTTPS proxy URL]
    noProxy: [Comma separated list of hosts and domains for which proxy settings should be bypassed]
  git:
    gitProxy: [HTTPS proxy URL]
In the OXM profile, Edge Nodes without direct Internet access will use the Edge Orchestrator as a proxy to access Internet. You must configure the Edge Node proxy settings as follows:
enHttpProxy: http://<Traefik-IP-endpoint>:8080
enHttpsProxy: http://< Traefik-IP-endpoint>:8080
enNoProxy: localhost,127.0.0.1,<Traefik-IP-endpoint-or-subnet-of-Edge-Orchestrator>,.internal,.cluster.local,<domain-of-orchestrator>
Once all modifications are done, type yes and press the Enter key to complete the installation. It will usually take around 15-20 minutes to complete.
In the meantime, you can observe the installation progress, see View Application Deployment.
Post-installation steps#
Configure DNS settings as described in the Network Topology guide.
Make sure you run
generate_fqdnand copy the output to/etc/hosts.For the OXM profile it is enough to add the following DNS records to your local DNS server.
address=/[on.prem.domain.name]/[traefik-external-ip]
address=/tinkerbell-nginx.[on.prem.domain.name]/[ingress-nginx-external-ip]
Retrieve the self-signed Edge Orchestrator certificate and install it to the trust store.
kubectl get secret -n orch-gateway tls-orch -o jsonpath='{.data.ca\.crt}' | base64 --decode > orch.crt
sudo mv orch.crt /usr/local/share/ca-certificates
sudo update-ca-certificates
Retrieve the default orchestrator password.
ORCH_PASSWORD="$(kubectl -n orch-platform get secret platform-keycloak -o jsonpath='{.data.admin-password}' | base64 -d)"
Save the password. It will be used for all interactions via API/CLI.