Get Started#
Time to Complete: 45–60 minutes
Programming Language: Python 3
Prerequisites#
Configure Docker#
To configure Docker:
Run Docker as Non-Root: Follow the steps in Manage Docker as a non-root user.
Note
Run all commands as a regular (non-root) user, without using
sudo.Configure Proxy (if required):
Set up proxy settings for Docker client and containers as described in Docker Proxy Configuration.
Example
~/.docker/config.json:{ "proxies": { "default": { "httpProxy": "http://<proxy_server>:<proxy_port>", "httpsProxy": "http://<proxy_server>:<proxy_port>", "noProxy": "127.0.0.1,localhost" } } }
Enable Log Rotation:
Add the following configuration to
/etc/docker/daemon.json:{ "log-driver": "json-file", "log-opts": { "max-size": "10m", "max-file": "5" } }
Reload and restart Docker:
sudo systemctl daemon-reload
sudo systemctl restart docker
Step 1: Clone the Repository#
git clone -b release-2026.3.0 https://github.com/intel-retail/digital-signage
cd digital-signage
Step 2: Build Docker Images#
make build
Step 3: Download AI Models#
Digital Signage uses the reusable Model Download microservice to download models and optimize it to run well with OpenVINO. Download models before deployment with make download_models; then start the app with make up.
Note
Please review the YOLO11s license and the SDXL-Turbo license before downloading.
make download_models
Uses the pinned
intel/model-downloadimage and downloads the model helper files from pinned jsDelivr mirrors.Downloads and quantizes YOLO11s for PID
Downloads SDXL-Turbo (OpenVINO™ INT8) and all-MiniLM-L12-v2 for AIG
Maps the downloaded artifacts to the paths already used by Digital Signage:
./configs/pid/models/object_detection/yolo11s./aig/models/sdxl_turbo_ov/int8./aig/models/all-MiniLM-L12-v2
Note
If the objects are not getting detected in the pretrained YOLO11s model, use a custom object-detection model instead. See Use Intel® Geti™ Exported Model for model training and export guidance.
Download SDXL-Turbo and MiniLM Models (for AIG)#
Please review the SDXL-Turbo license before downloading.
make download_models (via scripts/download_models.sh) already exports both of these for you, via the Model Download microservice. See scripts/download_models.sh if you need to reproduce the equivalent optimum-cli/hf download commands standalone (e.g. outside Docker).
Models are downloaded to ./aig/models/.
Download LTX-Video Model (optional, for trigger_video_ad)#
Please review the LTX-Video license before downloading. This model is only needed if you want
trigger_video_adto generate dynamic videos when no predefined video is provisioned for an item; the rest of the application works without it.
make download_models also exports this automatically (see the LTX-Video section of scripts/download_models.sh). It’s skipped by default in CI (SKIP_LTX_VIDEO_EXPORT) since the export is long-running; for local/manual use it runs by default. To run it standalone instead, see the script for the exact optimum-cli command.
Set AIG_VIDEO_MODEL_PATH in .env to match (defaults to /opt/models/ltx_video_ov/int8, matching this path). AIG_VIDEO_INFERENCE_DEVICE selects the device for this model independently of AIG_INFERENCE_DEVICE (see Change Inference Device).
Step 4: Configure Environment#
Edit the .env file in the repository root and set the following required variables:
Note
On Ubuntu 26.04, set DLSTREAMER_PIPELINE_SERVER_IMAGE in .env to
intel/dlstreamer-pipeline-server:2026.3.0-ubuntu26-rc1 before deployment.
The default image targets Ubuntu 24.04.
Variable |
Description |
|---|---|
|
Defaults to |
|
WebRTC ICE server username (minimum 5 alphabetic characters) |
|
WebRTC ICE server password (minimum 8 alphanumeric characters, at least one digit) |
Optional variables:
RTSP_CAMERA_IPand related RTSP settings for live camera input.AIG_INFERENCE_DEVICEto set the inference device for AIG (CPUorGPU).AIG_VIDEO_MODEL_PATHandAIG_VIDEO_INFERENCE_DEVICEto enable and configure dynamic video ad generation (trigger_video_ad).AIG_VIDEO_PRECISIONandAIG_PRELOAD_VIDEO_MODELto tune video generation speed and first-request latency (see Change Inference Device).AIG_*andASE_*variables for advanced AIG and ASe tuning.OBJECT_CONFIDENCE_THRESHOLDandOBJECT_RECENCY_FRAME_COUNTfor detection filtering.TIME_TO_DISPLAY_AD_SECONDSfor controlling ad rotation frequency.
To enable predefined advertisements (optional), update:
web-ui/ProductAssociations.csv— product, pricing, promo text, slogan, and optional image filename.web-ui/pre-defined-ads/— JPEG/JPG image assets referenced by the CSV.
Step 5: Deploy with Docker Compose#
make up
This command validates your environment configuration and checks that the required models from Step 3 are present, then stops any previous stack and starts all services.
Warning
By default, make up runs make down, which removes the Compose named volumes as well as the containers. This deletes persisted data such as manually provisioned Qdrant ads and pipeline cache. Back up any data you need before redeploying. To skip this teardown, run make up UP_SKIP_DOWN=true.
Step 6: Access the Web UI#
Open Google Chrome and navigate to:
https://<HOST_IP>:5000
Note
Replace <HOST_IP> with the HOST_IP value in .env, which defaults to 127.0.0.1 for access from the host only. For remote access, set HOST_IP to the host’s reachable IPv4 address and recreate the containers. localhost is not a valid value for HOST_IP.
You should see the live video stream and dynamic advertisements.
Note
For local systems with limited compute resources, launch Chrome with GPU acceleration disabled:
google-chrome --process-per-site --disable-plugins --disable-gpu 'https://<HOST_IP>:5000'
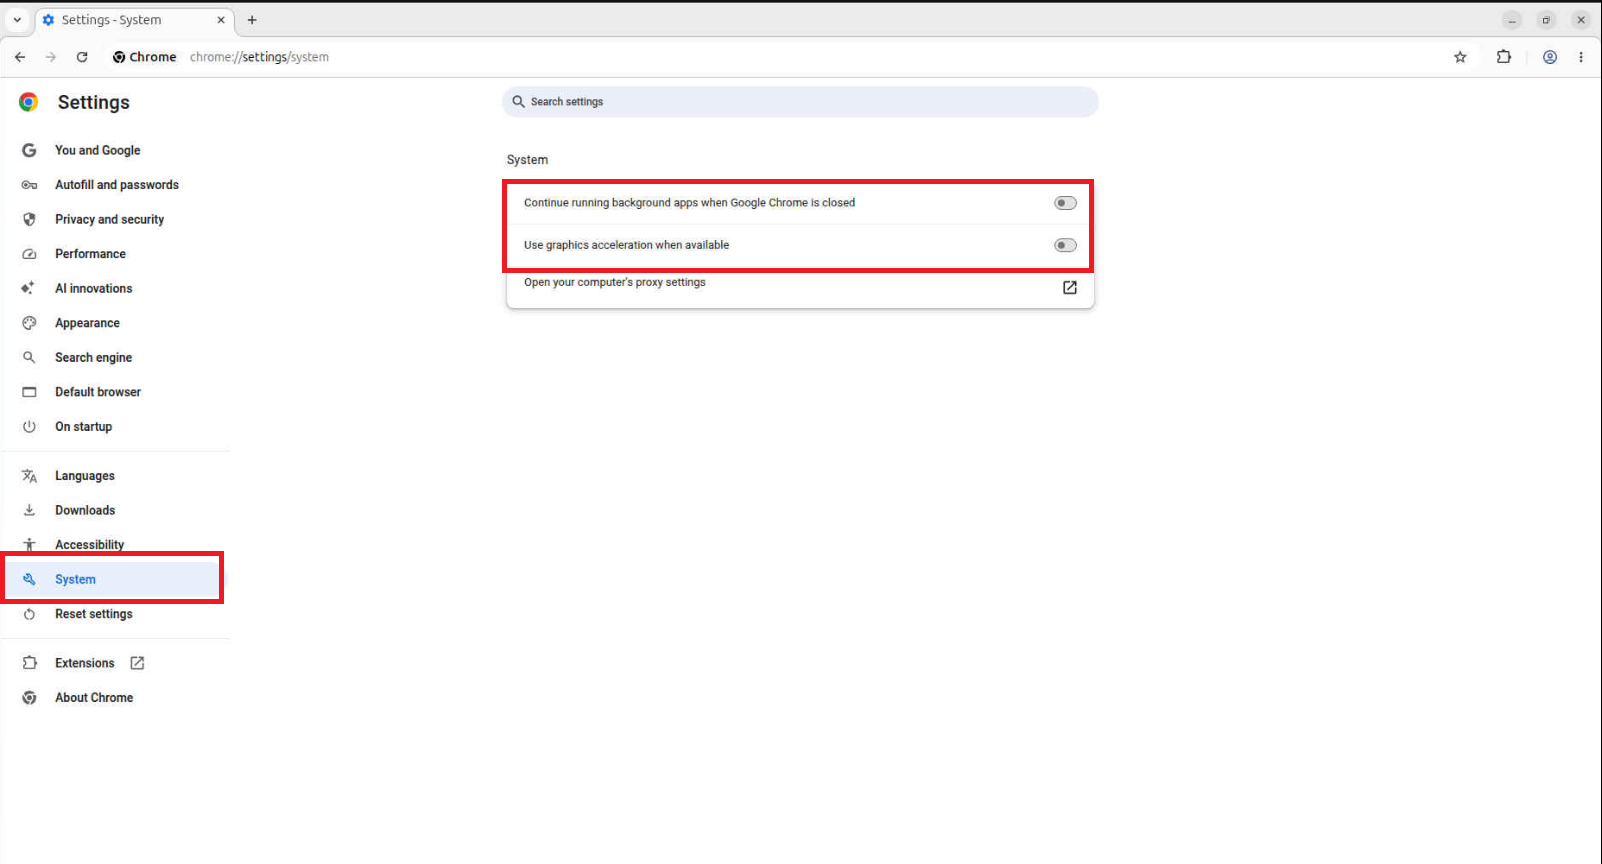
Alternatively, in Chrome go to Settings → System and disable Use graphics acceleration when available, then relaunch Chrome.
Click to see Chrome System settings screenshot
Step 7: Verify Output#
Check that all containers are running:
docker ps
If any container restarts, inspect its logs:
docker logs -f <container_name>
Undeploy#
To stop and remove all containers and named volumes (including persisted data):
make down