Tutorial#
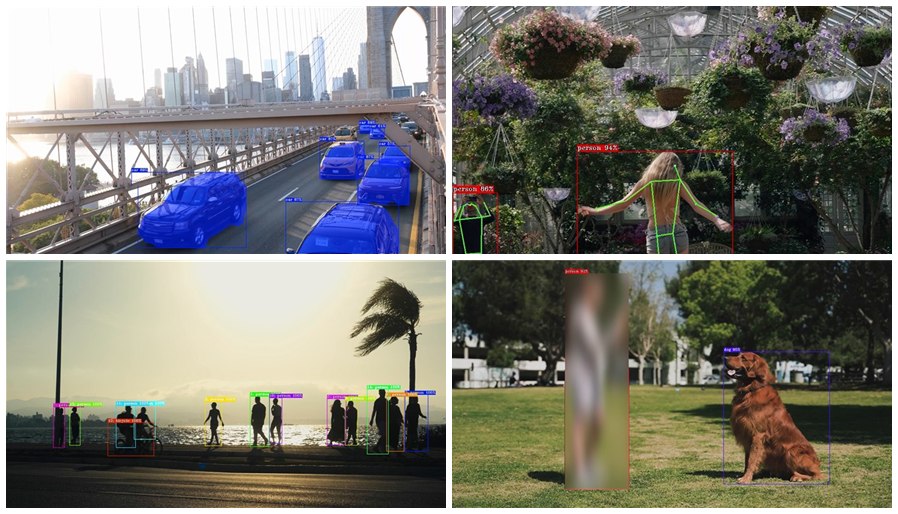
Welcome! This tutorial takes you from a clean Ubuntu* 24.04 machine to running real, hardware-accelerated video analytics with Deep Learning Streamer (DL Streamer) — using nothing but copy/paste. No prior experience with DL Streamer, GStreamer*, or AI is required.
By the end you will have detected objects, segmented them pixel-by-pixel, estimated human body poses, tracked and anonymized people, and even searched a video for a specific object using plain English — each with a single command.
What is DL Streamer?#
DL Streamer is an open-source framework for building video and audio analytics applications. It lets you take a video — from a file, a camera, or a network stream — run AI models on every frame, and do something useful with the results: draw boxes on screen, count people, anonymize faces, save data to a file, or send alerts — all without writing any code.
It runs on Intel® CPUs, GPUs, and NPUs, automatically taking advantage of your hardware to run fast. The same command works on any of these devices — you just change one word.
In short: DL Streamer turns “I want AI on my video” into a single command you can copy, paste, and run.
What is a pipeline?#
A pipeline is a chain of small building blocks called elements. Each
element does one job and passes its result to the next, like an assembly line.
You connect elements with an exclamation mark !.
A typical video AI pipeline looks like this:
        flowchart LR
    A["Read video (filesrc)"] --> B["Decode frames (decodebin3)"]
    B --> C["Run AI model (gvadetect)"]
    C --> D["Draw results (gvawatermark)"]
    D --> E["Show on screen (autovideosink)"]
Written as a DL Streamer command, that same idea becomes:
gst-launch-1.0 filesrc ! decodebin3 ! gvadetect ! gvawatermark ! autovideosink
This is still a concept, not a runnable command — each element needs its
properties to do real work. Properties are written as key=value right after
the element name, for example filesrc location=<video> and
gvadetect model=<model.xml> device=<GPU|NPU|CPU>. You’ll see complete,
ready-to-run commands with all properties filled in starting in
Step 3.
The elements that start with gva (like gvadetect, gvaclassify,
gvatrack, gvawatermark) are the AI-powered elements provided by DL Streamer.
Everything else comes from GStreamer, the proven multimedia framework DL Streamer
is built on.
Pipelines vs. ready-made samples: In this tutorial we mostly build pipelines by hand so you learn the building blocks. DL Streamer also ships 30+ ready-to-run sample scripts for common use cases — we use one of them in Step 4.3. Once you understand the pieces, the samples are a great shortcut.
That’s the whole concept. Now let’s see it in action.
Step 1 - Install DL Streamer on Ubuntu 24.04#
Open a terminal and copy/paste each block.
1.1 Install the hardware drivers (GPU & NPU)#
This script detects your Intel® hardware and installs the right GPU and NPU
drivers — needed to accelerate inference on device=GPU and device=NPU. The
--reinstall-npu-driver=yes flag makes sure the Intel® NPU driver is
installed so you can use device=NPU later. We’ll keep everything for this
tutorial in a single folder, ~/dlstreamer_demo.
First, make sure git, wget, Python venv and VLC Media Player* are up to date:
sudo apt update
sudo apt install -y git wget python3.12-venv vlc
Then download and run the prerequisites script:
mkdir -p ~/dlstreamer_demo
cd ~/dlstreamer_demo
wget -O DLS_install_prerequisites.sh https://raw.githubusercontent.com/open-edge-platform/dlstreamer/v2026.2.0/scripts/DLS_install_prerequisites.sh
chmod +x DLS_install_prerequisites.sh
./DLS_install_prerequisites.sh --reinstall-npu-driver=yes
Important: The NPU driver installation requires a log out and log back in (or a reboot) before the NPU is accessible. Do that now before continuing.
1.2 Add the DL Streamer software repository#
This imports Intel’s signing keys and registers the DL Streamer and OpenVINO™
APT repositories, so apt can find and verify the intel-dlstreamer package
installed in the next step:
sudo -E wget -O- https://apt.repos.intel.com/intel-gpg-keys/GPG-PUB-KEY-INTEL-SW-PRODUCTS.PUB | gpg --dearmor | sudo tee /usr/share/keyrings/intel-gpg-archive-keyring.gpg > /dev/null
sudo -E wget -O- https://apt.repos.intel.com/edgeai/dlstreamer/GPG-PUB-KEY-INTEL-DLS.gpg | sudo tee /usr/share/keyrings/dls-archive-keyring.gpg > /dev/null
echo "deb [signed-by=/usr/share/keyrings/dls-archive-keyring.gpg] https://apt.repos.intel.com/edgeai/dlstreamer/ubuntu24 ubuntu24 main" | sudo tee /etc/apt/sources.list.d/intel-dlstreamer.list
sudo bash -c 'echo "deb [signed-by=/usr/share/keyrings/intel-gpg-archive-keyring.gpg] https://apt.repos.intel.com/openvino ubuntu24 main" | sudo tee /etc/apt/sources.list.d/intel-openvino.list'
1.3 Install DL Streamer#
sudo apt update
sudo apt-get install -y intel-dlstreamer
That’s it — DL Streamer is installed! This single package also pulls in everything it needs, including the OpenVINO™ toolkit and GStreamer.
Other systems? For Windows*, WSL2*, Docker*, or Ubuntu 22.04, see the full Install Guide. (Docker is also covered in Step 5 of this tutorial.)
Step 2 - Prepare your environment#
2.1 Activate DL Streamer in your terminal#
Create the video and model folders once:
mkdir -p ~/dlstreamer_demo/videos ~/dlstreamer_demo/models
Then run this block every time you open a new terminal before running a pipeline. It activates DL Streamer and sets the paths used throughout this tutorial:
source /opt/intel/dlstreamer/scripts/setup_dls_env.sh
export VIDEOS_PATH="$HOME/dlstreamer_demo/videos"
export MODELS_PATH="$HOME/dlstreamer_demo/models"
2.2 Download the demo videos#
We’ll use five short, freely licensed clips from Pexels*, downloaded in Full HD (1080p). Copy/paste to download all five:
wget -O ${VIDEOS_PATH}/bridge.mp4     "https://www.pexels.com/download/video/34129177/?w=1920&h=1080"
wget -O ${VIDEOS_PATH}/skateboard.mp4 "https://www.pexels.com/download/video/34622113/?w=1920&h=1080"
wget -O ${VIDEOS_PATH}/dance.mp4      "https://www.pexels.com/download/video/37957592/?w=1080&h=1920"
wget -O ${VIDEOS_PATH}/beach.mp4      "https://www.pexels.com/download/video/32192786/?w=1920&h=1080"
wget -O ${VIDEOS_PATH}/girl_dog.mp4   "https://www.pexels.com/download/video/7516659/?w=1920&h=1080"
File |
Content |
Used for |
|---|---|---|
|
Cars crossing the Brooklyn Bridge |
Detection & segmentation |
|
A skateboarder (and a dog!) in an autumn park |
Prompt detection & JSON export |
|
A person dancing in a greenhouse |
Human pose estimation |
|
People walking along a sunset beach |
Object tracking |
|
A girl playing with her dog |
Privacy blur |
Credits: Videos by ubeyonroad, Rec Everywhere, Airam Dato-on, Igor Vieira, and RDNE Stock project on Pexels. Free to use under the Pexels License.
2.3 Download the AI models#
We’ll use three YOLO11 models from Ultralytics* and convert them to the OpenVINO™ format DL Streamer uses.
Good news — you don’t need to clone anything. The conversion scripts ship
with DL Streamer at /opt/intel/dlstreamer/scripts/download_models/. We just
need a small Python environment for the one-time conversion:
python3 -m venv ~/dlstreamer_demo/.dls-venv
source ~/dlstreamer_demo/.dls-venv/bin/activate
pip install --upgrade pip
pip install -r /opt/intel/dlstreamer/scripts/download_models/requirements_download_ultralytics_models.txt
Now download and convert the three models into ~/dlstreamer_demo/models. Each
--model reference is pinned with @v8.4.0, a released Ultralytics weights tag,
so the exact same weights are downloaded every time. The --outdir for each
model points directly at its precision-specific folder, since the script exports
into whatever directory you give it:
DL="/opt/intel/dlstreamer/scripts/download_models/download_ultralytics_models.py"
python3 $DL --model yolo11s.pt@v8.4.0          --outdir ${MODELS_PATH}/yolo11s/FP16 --half
python3 $DL --model yolo11s-seg.pt@v8.4.0      --outdir ${MODELS_PATH}/yolo11s-seg/FP16 --half
python3 $DL --model yolo11s-pose.pt@v8.4.0     --outdir ${MODELS_PATH}/yolo11s-pose/FP16 --half
python3 $DL --model yoloe-26s-seg.pt@v8.4.0 --classes "dog,person,backpack" --outdir ${MODELS_PATH}/public/yoloe-26s-seg/FP16 --half
When they’re done, leave the Python environment:
deactivate
You now have four ready-to-use models under ${MODELS_PATH}:
Model |
File |
What it does |
|---|---|---|
|
|
Detects objects (boxes + labels) |
|
|
Detects and outlines objects pixel-by-pixel |
|
|
Detects people and their body keypoints |
|
|
Open-vocabulary detection — class baked in at export via |
Step 3 - Run your first YOLO pipelines#
You’re ready for the fun part. Each example below is a single copy/paste command. A window will open showing the video with AI results drawn on top, and the live frames-per-second (FPS) will be printed in your terminal.
One device, one word. Every command uses
device=GPU. Want to use the NPU instead? Just change it todevice=NPU. Prefer the CPU? Usedevice=CPU. Same command, different hardware — the drivers you installed in Step 1.1 make this possible.
3.1 Object detection on the bridge video#
Detect and label cars, people, and more with yolo11s:
gst-launch-1.0 \
  filesrc location=${VIDEOS_PATH}/bridge.mp4 ! decodebin3 ! \
  gvadetect model=${MODELS_PATH}/yolo11s/FP16/yolo11s.xml device=GPU ! queue ! \
  gvawatermark ! gvafpscounter ! videoconvert ! autovideosink sync=false
What you’ll see: the bridge video with colored boxes and labels around each detected vehicle.
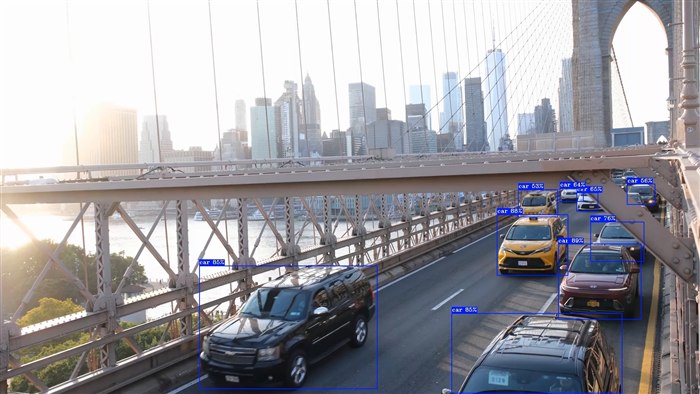
Object detection with yolo11s on the bridge video.
Here’s what each element in the pipeline does:
Element |
Job |
|---|---|
|
Reads the video file |
|
Decodes it into raw video frames |
|
Runs the YOLO model and finds objects |
|
Draws boxes and labels on the frames |
|
Prints the live FPS in the terminal |
|
Shows the result on your screen |
3.2 Instance segmentation on the bridge video#
Same video, but now outline each object precisely — just by swapping in the
yolo11s-seg model:
gst-launch-1.0 \
  filesrc location=${VIDEOS_PATH}/bridge.mp4 ! decodebin3 ! \
  gvadetect model=${MODELS_PATH}/yolo11s-seg/FP16/yolo11s-seg.xml device=GPU ! queue ! \
  gvawatermark ! gvafpscounter ! videoconvert ! autovideosink sync=false
What you’ll see: each vehicle covered by a colored mask that follows its exact shape — not just a rectangle.
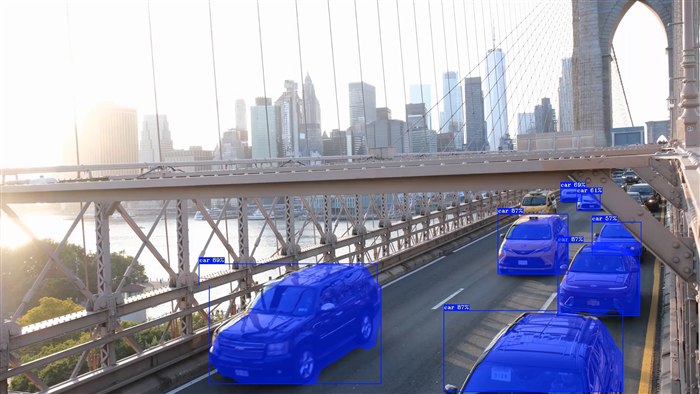
Instance segmentation with yolo11s-seg on the bridge video.
Notice how little changed? Only the model file. The same
gvadetectelement automatically handles detection, segmentation, and pose models. That’s the power of DL Streamer.
3.3 Human pose estimation on the dance video#
Now estimate body keypoints with yolo11s-pose:
gst-launch-1.0 \
  filesrc location=${VIDEOS_PATH}/dance.mp4 ! decodebin3 ! \
  gvadetect model=${MODELS_PATH}/yolo11s-pose/FP16/yolo11s-pose.xml device=GPU ! queue ! \
  gvawatermark ! gvafpscounter ! videoconvert ! autovideosink sync=false
What you’ll see: a live skeleton overlaid on the dancer, tracking arms, legs, and joints as they move.
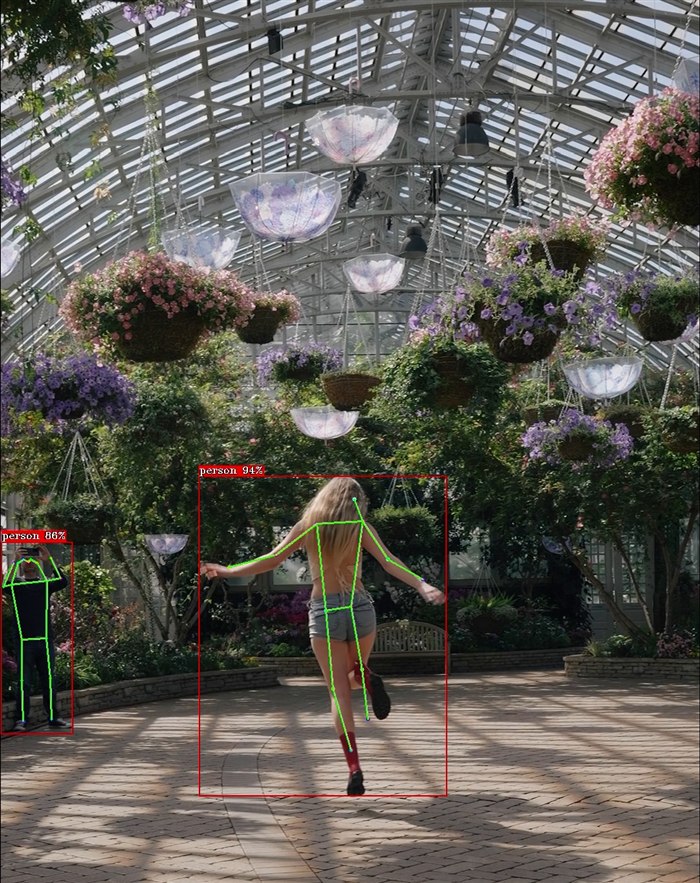
Human pose estimation with yolo11s-pose on the dance video.
Step 4 - Go further with DL Streamer#
You’ve run detection, segmentation, and pose estimation. Here are four more things DL Streamer makes easy.
4.1 Track objects across frames#
Detection finds objects in each frame independently. Tracking gives each object a stable ID so you can follow it through the video — and it boosts performance, because you don’t have to run the AI model on every single frame.
We add gvatrack and tell gvadetect to only run every 3rd frame with
inference-interval=3:
gst-launch-1.0 \
  filesrc location=${VIDEOS_PATH}/beach.mp4 ! decodebin3 ! \
  gvadetect model=${MODELS_PATH}/yolo11s/FP16/yolo11s.xml device=GPU inference-interval=3 ! queue ! \
  gvatrack tracking-type=short-term-imageless ! queue ! \
  gvawatermark ! gvafpscounter ! videoconvert ! autovideosink sync=false
What you’ll see: each person on the beach keeps the same ID as they move, and the FPS in your terminal goes up compared to detecting on every frame.
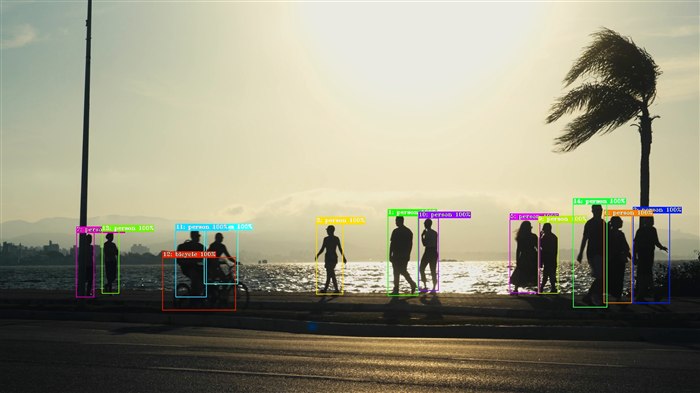
Object tracking with gvatrack on the beach video.
4.2 Anonymize people with a privacy blur#
Need to protect privacy? gvawatermark can blur detected objects — great for
anonymizing faces, people, or license plates. Here we blur every detected
person in the girl-and-dog video:
gst-launch-1.0 \
  filesrc location=${VIDEOS_PATH}/girl_dog.mp4 ! decodebin3 ! \
  gvadetect model=${MODELS_PATH}/yolo11s/FP16/yolo11s.xml device=GPU ! queue ! videoconvert ! \
  gvawatermark displ-cfg=enable-blur=true,show-blur-roi=person ! \
  gvafpscounter ! videoconvert ! autovideosink sync=false
What you’ll see: the girl is automatically blurred out for privacy, while her dog and everything else stay sharp — no manual editing required.
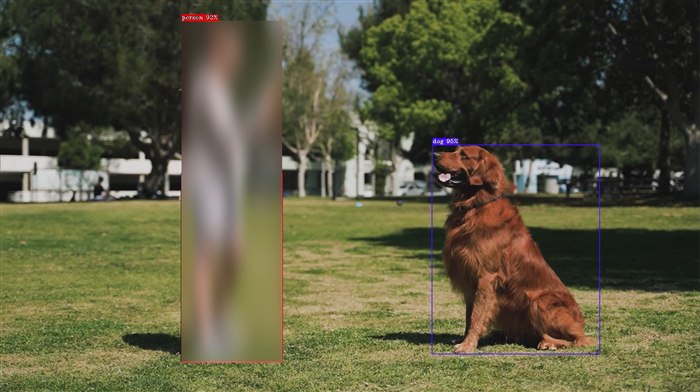
Privacy blur of every person with gvawatermark on the girl-and-dog video.
Note: The blur is applied by
gvawatermark. To blur everything instead of just people, drop theshow-blur-roi=personpart and usedispl-cfg=enable-blur=true.
4.3 Find anything with plain English (ready-made sample)#
This is where the ready-made samples shine. This step runs the prompt-based detection sample that ships with DL Streamer — it uses an open-vocabulary model with a built-in 4,585-class vocabulary: describe what to find in plain English and it detects only that. Our skateboard clip has a dog wandering in — let’s find it.
Now run the sample. MODELS_PATH is already set from Step 2.1,
so the sample finds the model automatically:
cd ~/dlstreamer_demo
python3 /opt/intel/dlstreamer/samples/gstreamer/python/prompted_detection/prompted_detection.py \
  --input ${VIDEOS_PATH}/skateboard.mp4 --prompt "dog" --device GPU --output file
What you’ll see: a new file skateboard_output.mp4 in ~/dlstreamer_demo,
with the dog boxed and labelled — and nothing else. Try other prompts like
"person" or "backpack" — all three classes were baked into the model at
the download step above.
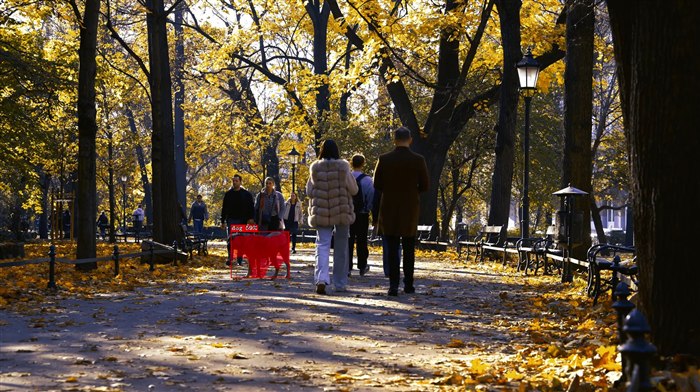
Prompt-based detection searching the skateboard video for "dog".
Why a sample here? Open-vocabulary detection needs a pre-exported model and a bit of Python glue to wire the prompt filter. The sample handles that for you — see its README for details.
4.4 Save results to a file instead of the screen#
AI results aren’t only for viewing — you can export them as structured JSON data to feed a database, dashboard, or alerting system. Here we replace the screen with a file writer:
gst-launch-1.0 \
  filesrc location=${VIDEOS_PATH}/skateboard.mp4 ! decodebin3 ! \
  gvadetect model=${MODELS_PATH}/yolo11s/FP16/yolo11s.xml device=GPU ! queue ! \
  gvametaconvert format=json ! \
  gvametapublish method=file file-path=${HOME}/dlstreamer_demo/results.json ! \
  fakesink sync=false
When it finishes, peek at the results:
head ${HOME}/dlstreamer_demo/results.json
What you’ll see: one JSON object per frame, listing every detected object with its label, confidence, and bounding box — ready for further processing.
Step 5 - Run in Docker (GPU/NPU passthrough)#
Prefer containers? DL Streamer ships a ready-made Docker image. The key trick is passing your Intel® GPU and NPU devices into the container so inference stays hardware-accelerated.
Run the container, mounting your models and videos and forwarding both devices.
We also set MODELS_PATH and VIDEOS_PATH right in the docker run command, so
they’re ready to use inside the container:
docker run -it --rm \
  -v ${MODELS_PATH}:/home/dlstreamer/models \
  -v ${VIDEOS_PATH}:/home/dlstreamer/videos \
  --env MODELS_PATH=/home/dlstreamer/models \
  --env VIDEOS_PATH=/home/dlstreamer/videos \
  --device /dev/dri \
  --group-add $(stat -c "%g" /dev/dri/render*) \
  --device /dev/accel \
  --group-add $(stat -c "%g" /dev/accel/accel*) \
  intel/dlstreamer:latest
What the GPU/NPU passthrough flags do:
Flag |
Purpose |
|---|---|
|
Gives the container access to the Intel® GPU |
|
Grants non-root permission to the GPU |
|
Gives the container access to the Intel® NPU |
|
Grants non-root permission to the NPU |
Now, inside the container, run a pipeline. Since a container is typically headless, we output to a file:
gst-launch-1.0 \
  filesrc location=${VIDEOS_PATH}/bridge.mp4 ! decodebin3 ! \
  gvadetect model=${MODELS_PATH}/yolo11s/FP16/yolo11s.xml device=GPU ! queue ! \
  gvawatermark ! gvafpscounter ! \
  vah264enc ! h264parse ! mp4mux ! filesink location=${VIDEOS_PATH}/bridge_detected_in_docker.mp4
What you’ll get: bridge_detected_in_docker.mp4 appears back on your host in
~/dlstreamer_demo/videos/ (thanks to the volume mount), annotated with detections —
proof that GPU acceleration worked inside the container. Swap device=GPU for
device=NPU to run the same pipeline on the NPU.
Tip: To see live video from a container on a Linux desktop, you also need to forward the X11 display (
--env DISPLAY -v /tmp/.X11-unix:/tmp/.X11-unix). Saving to a file, as above, works everywhere.
Where to next?#
Congratulations — you built and ran real video AI pipelines with DL Streamer! 🎉
Great places to continue:
Elements reference — the full catalog of
gvaelements you can mix and match (classification, audio, GenAI, and more).Samples — 30+ ready-to-run examples: multi-stream, face analysis, LiDAR, radar, Vision-Language Models, and Kafka/MQTT publishing.
Supported models — the 70+ models you can run out of the box.
Video tutorials on YouTube — the DL Streamer playlist with walkthroughs and demos.
Ideas to try right now by editing the commands above:
Change
device=GPUtodevice=NPUordevice=CPU.Replace
filesrc location=...withv4l2src device=/dev/video0to run on your webcam in real time.Replace
filesrc location=...withurisourcebin buffer-size=4096 uri=<RTSP_or_HTTP_URL>to run on a network stream.Swap
yolo11sfor a larger model likeyolo11mfor higher accuracy.
* Other names and brands may be claimed as the property of others.